background image


2.5” Removable & Portable Enclosure

  RX-251-US                                          User  Manual 


-3-

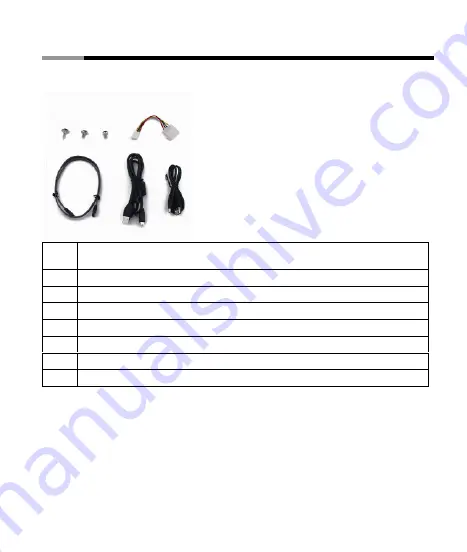
2. Accessories 


n


o


p


q


r


s


t


No. Description 

Screws for fixing the 5.25” bracket to the PC case. 

Screws for fixing the 3.5” insertion bay to 5.25” bracket or to a 3.5” drive bay. 

Screws for fixing a 2.5” IDE hard drive in the 2.5” enclosure.   

4-Pin power cable to connect to the power supply. 

SATA cable to connect the 3.5”bay and motherboard. 

USB 2.0 cable to connect 2.5” enclosure to the computer.   

USB-DC cable to connect 2.5” enclosure to the computer for providing extra power. 


Содержание RX251-US

Страница 1: ...2 5 Removable Portable Enclosure RX 251 US User s Manual...

Страница 2: ...bile Rack Mode SATA I Hard Drive Capacity Supported Up to 160GB Hard Drive size supported 9 5mm height Power Supply Portable Mode USB bus power Mobile Rack Mode 4 pin to board Operating System Support...

Страница 3: ...2 5 Removable Portable Enclosure RX 251 US User Manual 2 RX 251 US Introduction 1 The RX 251 US is divided into three parts A 3 5 insertion bay B 5 25 bracket C 2 5 HDD Enclosure...

Страница 4: ...ing the 3 5 insertion bay to 5 25 bracket or to a 3 5 drive bay 3 Screws for fixing a 2 5 IDE hard drive in the 2 5 enclosure 4 4 Pin power cable to connect to the power supply 5 SATA cable to connect...

Страница 5: ...ation The RX 251 US can be used as mobile rack function in desktop PC and an external storage The detailed installation steps are as below a Install the hard drive in the enclosure Unscrew the externa...

Страница 6: ...nual 5 Connect the 2 5 IDE hard drive to the connector on the board Please check the HDD board s pin is match when installation Turn over the board and fix the board and hard drive by screws Slide the...

Страница 7: ...251 US User Manual 6 Close the panel and fix it by screws b In Desktop PC There are two ways to use the RX 251 US in the desktop PC Method 1 Install the RX 251 US in the 5 25 drive bay Slide the 3 5...

Страница 8: ...e RX 251 US User Manual 7 Fasten the 3 5 insertion bay on the 5 25 bracket by screws Slide the 3 5 insertion bay and 5 25 bracket into the available 5 25 drive bay in the PC case Fasten the 5 25 brack...

Страница 9: ...e back of the 3 5 insertion bay r Connect the other side of the SATA cable to SATA port on the motherboard If your motherboard doesn t have on board SATA port you may install the SATA add on cards and...

Страница 10: ...pply Please refer to the manual of the power supply From power supply q q Slide the 2 5 enclosure to the 3 5 insertion bay to the end till the ejection button is up Now you can freely access the hard...

Страница 11: ...10 Method 2 Install the RX 251 US in the 3 5 drive bay Slide the 3 5 insertion bay into the available 3 5 drive bay Fasten the 3 5 insertion bay in the PC case by screws o o Connect the one side of t...

Страница 12: ...the back of the 3 5 insertion bay q r Connect the 4 pin power cable q to the power supply Please refer to the manual of the power supply From power supply q q r Slide the 2 5 enclosure to the 3 5 inse...

Страница 13: ...ble Portable Enclosure RX 251 US User Manual 12 When you want to take the enclosure out please press the ejection button the enclosure will be out c Portable external storage Take out the enclosure fr...

Страница 14: ...e RX 251 US User Manual 13 Plug the USB cable to the enclosure Connect the USB cable s to the available port on the computer s If the hard drive needs more power please connect the USB DC cable t to i...

Страница 15: ...ual 14 Connect the USB DC t cable to the available USB port on the computer s t Thank you for purchasing a quality Rosewill Product Please register your product at www rosewill com for complete warran...

Отзывы: