background image

5

User Manual

e-SATA 4 Port PCI Adaptor with RAID 

RC-209-EX

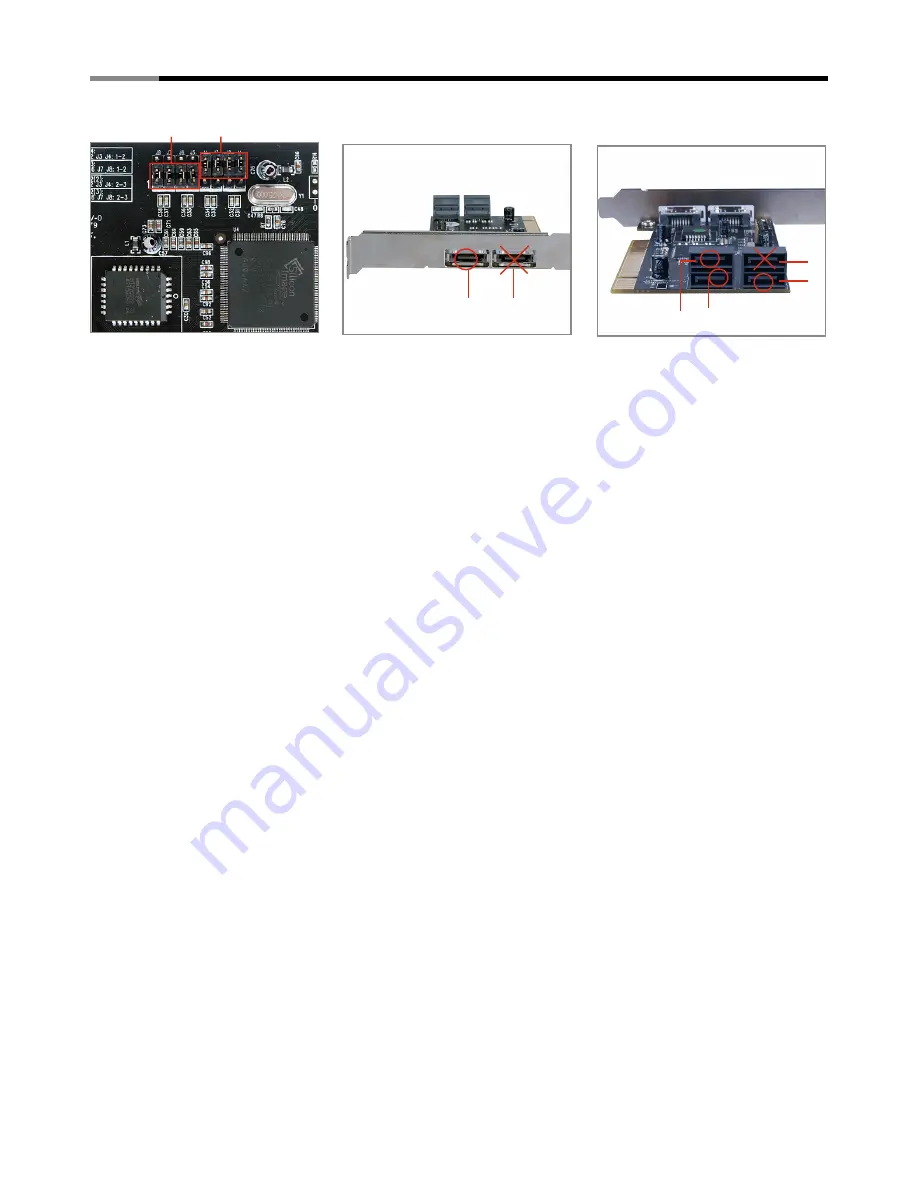
Mode 4  - ABCE Active

Note: There are six SATA ports in Serial ATA 4-Channel RAID adapter. We named these ports 
character A through F. Ports A to D are internal SATA ports and E & F are external SATA ports. By 
changing the jumper setting on the Serial ATA 4-Channel RAID adapter that allows you to select 
between external and internal ports to use. By default, Port A, B, C and D are working. 

Hardware Installation

. Turn Off the power to your computer and any other connected peripheral devices.
2. Unplug the power cord form the back of the computer.
3. Remove your computer’s cover.
4. Remove the slot bracket from an available PCI slot.
5. To install the card, carefully align the card’s bus connector with the selected PCI slot on the  
    motherboard. Push the board down firmly, but gently, until it is well seated.
6. Replace the slot bracket’s holding screw to secure the card.

Device Connection

The Serial ATA 4-Channel RAID adapter is a four channel Serial ATA controller that supports up 
to four Serial ATA hard disk drives. It is recommended to use identical hard drives for all RAID 
configurations.
. Install your hard disk drive(s) in chassis.
2. Connect the Serial ATA hard disk drive to the system power supply using the included Serial  
    ATA power cable.
3. Connect one end of the Serial ATA cable to the hard disk drive.
4. Attach the other end of the Serial ATA cable to the Serial ATA controller on the Serial ATA  
    4-Channel RAID adapter.
5. Follow the same instructions to connect up to four hard drives. Device connection is now  
    complete.
6. Replace the computer cover and reconnect the power cord.

E

F

C

D

B

A

 & 2 PIN close

2 & 3 PIN close

Содержание RC-209-EX

Страница 1: ...e SATA 4 Port PCI Adaptor with RAID RC 209 EX User Manual...

Страница 2: ...tep photo installation of Magic Switch Hardware installation Important message for user RAID introduction RAID 0 RAID 1 RAID 0 1 RAID 5 BIOS configuration Driver installation Quick guide Detail guide...

Страница 3: ...mirroring striping and Concatenation modes HDDs function normally when not in RAID sets Supports SATA up to 150MB Sec Supports Windows 2000 XP 2003 32 64 bit Vista 32 64bit Bus Interface PCI Bus 32bi...

Страница 4: ...4 1 2 close Enable SATA Connector F 2 3 close Enable SATA Connector C J5 J8 1 2 close Enable SATA Connector E 2 3 close Enable SATA Connector D Note There are six 1 5G SATA channels in RC 209 EX We na...

Страница 5: ...RC 209 EX that allows you to utilize 4 ports of this card Please reference our photos below for the proper jumper setting Port A and B are always active With different jumper setting you can active po...

Страница 6: ...4 Port PCI Adaptor with RAID RC 209 EX Mode 1 Default ABCD Active Mode 2 ABDF Active Mode 3 ABEF Active E F C D B A 2 3 PIN close 2 3 PIN close E F C D B A 2 3 PIN close 2 PIN close E F C D B A 2 PIN...

Страница 7: ...onnector with the selected PCI slot on the motherboard Push the board down firmly but gently until it is well seated 6 Replace the slot bracket s holding screw to secure the card Device Connection The...

Страница 8: ...un RAID card please do not enter the RAID BIOS and set any RAID set at the beginning of booting You can jump to P11 Driver installation directly to complete the install The only different is ignoring...

Страница 9: ...select Create RAID Set then press Enter 3 Select RAID0 then press Enter 4 Select the number of drives then press Enter 5 Select Auto configuration then press Enter 6 Input the RAID size press Enter 7...

Страница 10: ...o exit and reboot 14 Continue with FDISK and FORMAT steps as if you were installing a conventional hard drive RAID 1 Mirror For New Blank Hard Drives Recommended for all fresh HD without data 1 As the...

Страница 11: ...become the new member of the mirror set After you process this function your mirror will be rebuilded 1 During boot press Ctrl S or F4 to enter the RAID BIOS 2 Select Create RAID Set then press Enter...

Страница 12: ...press Y to accept 7 Press Ctrl E to exit the BIOS 8 When asked Are you sure to exit Y N press Y to exit and reboot 9 Continue with FDISK and FORMAT steps as if you were installing a conventional hard...

Страница 13: ...When asked Are you sure to exit Y N press Y to exit and reboot 10 Continue with FDISK and FORMAT steps as if you were installing a conventional hard drive Manual configuration 1 As the BIOS boots pre...

Страница 14: ...Ctrl S or F4 when prompted to enter the RAID BIOS 2 Select Delete RAID Set then press Enter 3 Select the RAID set then press Enter 4 When asked Are You Sure Y N press Y to confirm Resolving Conflicts...

Страница 15: ...EX into a PCI slot Enter the OS and install RC 209 EX with driver disk In this case PC is booting up by an existing HDD connecting to motherboard After RC 209 EX is installed complete you can add HDD...

Страница 16: ...This will let PC boot from a HDD controller instead of motherboard HDD e Keep the floppy in floppy drive and follow the installation Press S when the screen shows as the following picture Choose the c...

Страница 17: ...e SATA 4 Port PCI Adaptor with RAID RC 209 EX If below screen happens please choose Standard PC with C Step i486 Keep the floppy disk in floppy drive PC will notice you as below if you take them off...

Страница 18: ...stem will detect the HD which now plug on the card After you install RC 209 EX successfully by floppy disk installation will lead you back to the same screen as below and then press enter to left the...

Страница 19: ...all your data will be lost d Reboot your PC and now you can enter your OS with RAID 1 Please change the booting sequence in CMOS if necessary Detail guide For Windows 2000 For New Installation A new...

Страница 20: ...s installation 4 At the Windows Setup screen press F6 to install the RAID driver 5 When prompted press S to specify the location of the driver 6 Insert the floppy disk then press Enter 7 Select Silico...

Страница 21: ...on screen instructions to complete the Windows installation Note If the Security Alert warning pops up click Yes Our driver has passed Microsoft compatibility testing this message appears during new...

Страница 22: ...river installation To make this floppy disk copy the contents of the RC 209 64 bit Windows RAID5 folder found on the driver CD onto a blank floppy disk then follow the directions below 1 Setup the RAI...

Страница 23: ...32 bit Windows SATARAID5 Management 3114 W I32 R_ 15100 msi then click OK Change D to match your CD ROM drive letter 4 Follow the on screen instructions to complete the installation For Windows XP Se...

Страница 24: ...www rosewill com...

Отзывы: