Rose electronics UltraVista 4K60 Скачать руководство пользователя страница 14


UltraVista 4K60 Manual 

9


i. 

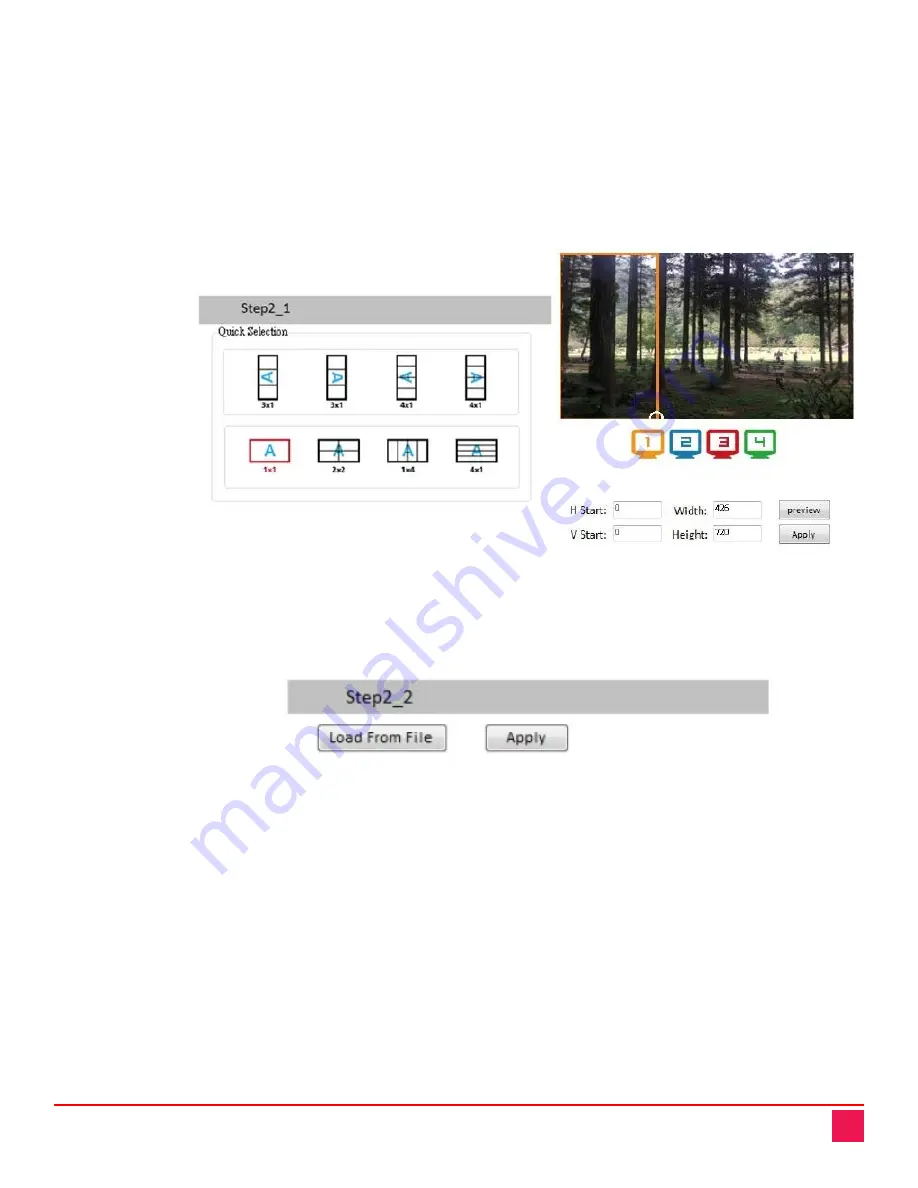
Step2-1 (Output Settings through Quick Selection):

 Click the 

Step2-1

 button and the 

Quick 

Selection

 menu will be displayed. Select the screen splitting mode and rotation (rotation 

requires 720p or 1080p output resolution). The 3x1 mode will divide the output into 3 parts, 

with rotation; and the 4x1 mode divides it into 4 parts, also with rotation. When either of 

these modes are selected, a white circle will be displayed on the output image. Sliding the 

circle resizes the output screen. The screen size can also be specified by entering the 

numerical coordinates. 


NOTE: 

4K2K60 (YUV 4:4:4) input can only be displayed in a 2x2 output layout, with each 

output set to 1080p60. 


Figure 9. Quick Selection Menu 


ii. 

Step2-2 (Output Settings from file):

 If a settings file has been saved on the computer running 

the software, click the 

Step2-2

 button to load this file. Click the 

Load from File

 button to 

select the desired file, and then click the 

Apply

 button. 


Figure 10. Load from File Menu 


iii. 

Step2-3 (Output settings through a custom definition):

 Click the 

Step2-3

 button to perform a 

define a customized portion of the input image for display on the output screen. Clicking on 

the 

Grid selection

 button will cause a grid to be displayed on the input image, so as to 

provide an accurate estimation of the output image.  Click the 

Apply

 button to activate the 

custom setting. Clicking the 

Save As

 button allows the configuration to be saved as a file on 

the computer for future loading.  


Содержание UltraVista 4K60

Страница 1: ...UltraVista 4K60 UHD Video Wall Controller 4K60 Installation and Operation Manual 10707 Stancliff Road Houston Texas 77099 Phone 281 933 7673 tech support rose com...

Страница 2: ...transit to prepay shipping charges to the warranty service location and to use the original shipping container or its equivalent You must call for a return authorization number first Under no circumst...

Страница 3: ...l interference when the equipment is operated in a commercial environment This equipment generates uses and can radiate radio frequency energy and if not installed and used in accordance with the inst...

Страница 4: ...iew 4 Figure 4 Rear View 5 Figure 5 Connection Dialog Box 6 Figure 6 Connection Failure 6 Figure 7 Video Wall 4K60 Control Interface 7 Figure 8 Output Resolution Step 1 8 Figure 9 Quick Selection Menu...

Страница 5: ...Appendices Appendix A Specifications 17 Appendix B Part Numbers 18 Appendix C IR Remote Control 19...

Страница 6: ...ayed output to four HDMI or DVI displays The input image can be cropped or zoomed to show any part of it on an output display Each display output can also be individually rotated to generate a mix of...

Страница 7: ...SYSTEM OVERVIEW UltraVista 4K60 Manual 2 Sample Application Figure 1 UltraVista 4K60 Video Wall displaying 1920x1080 on all monitors...

Страница 8: ...920x1080 30Hz 1920x1080 60Hz 4K2K 30Hz 4K2K 60Hz 4 2 0 10bits 4K2K 60Hz 4 2 2 10 bits 4K2K 60Hz 4 4 4 8bits 640x480 60Hz 720x480 60Hz 720x576 60Hz 800x600 60Hz 1024x768 60Hz 1280x720 60Hz 1280x768 60H...

Страница 9: ...igure 2 UltraVista 4K60 Front View Figure 3 Front View IR Sensor Power indicator Control buttons 2x2 4K2K UHD layout Recall custom layout 3 layout sets Recall original layout Toggle between 1x1 and 2x...

Страница 10: ...jack PROG USB for firmware update and software configuration Ethernet Ethernet port for software configuration Audio L left channel analog audio Audio R right channel analog audio HDMI IN video input...

Страница 11: ...a computer running Microsoft Windows 98 2000 XP 7 or 8 The software can communicate with the UltraVista 4K60 through a USB connection or through an Ethernet connection For a TCP IP control interface...

Страница 12: ...t connection type and status for USB for Ethernet Quick Selection Use this menu to set up screen resolution coordinates and screen layout Click one of the four colored display icons and drag within th...

Страница 13: ...put port and set its resolution Changing an output s resolution will change the coordinates displayed for that output Figure 8 Output Resolution Step 1 b Step2 Output settings can be selected through...

Страница 14: ...output layout with each output set to 1080p60 Figure 9 Quick Selection Menu ii Step2 2 Output Settings from file If a settings file has been saved on the computer running the software click the Step2...

Страница 15: ...f the button modifies the image size by one pixel After adjustment the rest of the image will be automatically scaled to fit the screen The image on each output can be shifted in a horizontal directio...

Страница 16: ...ull HD 1080p 60 24bit 2D 2ch Full HD 1080p 60 24bit 2D 7 1ch 4K2K 60 24bit 2D 2ch 4K2K 60 24bit 2D 7 1ch To use an output display EDID select the display from the pull down list and click the Learn bu...

Страница 17: ...ovide a name to the UltraVista 4K60 unit to aid in identifying it enter up to 8 characters in the New Host Name field and click the button To change the default splash screen used by UltraVista 4K60 c...

Страница 18: ...the Read from device button Figure 16 IP Configure Screen Modify the IP address as desired and click the Write to device button Figure 17 Setting Up a Static IP on the UltraVista 4K60 To have the IP a...

Страница 19: ...tings information and to reconnect to the device click the REFRESH button The ReConnectForm window will be displayed allowing the user to restart the configuration connection Figure 18 Re establish Co...

Страница 20: ...r cords power adapter and connection cables designed for this Unit Keep objects that might damage this Unit and liquids that may spill clear from this Unit Liquids and foreign objects might come in co...

Страница 21: ...alent insured and shipped to Rose Electronics Attn RA__________ 10707 Stancliff Road Houston Texas 77099 USA Technical Support If you are experiencing problems or need assistance in setting up configu...

Страница 22: ...1 2 Volts peak to peak HDCP Compliant Interfaces Input 1x HDMI DVI 1x USB 1xRJ45 Output 4x HDMI DVI 1x Stereo Control IR remote control Ethernet USB virtual com Front Panel Connector Types DVI DVI D...

Страница 23: ...UltraVista 4K60 Manual 18 Appendix B Part Numbers Part Numbers Description VWL T222 4K DVX UltraVista 4K60 Video Wall Processor...

Страница 24: ...ecrease the audio volume Fast switch to 1x1 screen Full Screen Fast switch to 3x1 screen with 90 rotation Fast switch to 3x1 screen with 90 rotation Fast switch to 2x2 screen Fast switch to 4x1 screen...

Страница 25: ...COM sales rose com 800 333 9343 Rose Electronics 10707 Stancliff Road Houston Texas 77099 Rose USA 281 933 7673 Rose Europe 49 0 2454 969442 Rose Asia 65 6324 2322 Rose Australia 61 0 421 247083 WWW...

Отзывы: