background image

 INSTALLATION 

10 

SERVEVIEW PRO INSTALLATION AND OPERATIONS MANUAL


Organizing the system 

It is recommended that before any ServeView Pro configuration or cable 
connections be made, plan how the system will be laid out, the placement 
of the CPUs and the placement of the ServeView Pro. Take into 
consideration the cable lengths needed to connect to the KVM station and 
each CPU. Identify which computer will be connected to each CPU 
connector and if that computer uses a PC mode 2 keyboard and PS/2 
mouse.  If not, the CPU port should be pre-configured to change the default 
keyboard and mouse types to the correct settings.   
 
If you are adding Slave units to expand your system, it is important that you 
understand the width command, especially if your system consists of 
different models (4-CPU ports, 8-CPU ports, and 16-CPU ports). For 
example, if your system consists of an 8-port master, two 8-port Slave units 
and one 4-port Slave unit, and you program the expansion width to 8, there 
will be 4 blind ports on the 4-port unit. In other words, the 4-port unit will 
appear to the system as having 8 CPU ports. CPU ports 5-8 are blind ports.  
If you program the expansion width to 4, then only CPU ports 1-4 on the 8-
port Slave units can be accessed.  In systems that have a mixture of 
models, it is recommended that the width value be set to the number of 
CPU ports on the Slave unit with the most CPU ports.  

Installation – Single unit 

This section explains how to connect and initially configure the ServeView 
Pro. If you are cascading two or more ServeView Pro units together, please 
refer to the Cascade installation section.  

Connecting the KVM station 

Connect the KVM station’s keyboard, video monitor, and mouse cables to 
the corresponding connectors on a KVM cable as shown in Figure 3. The 
KVM cable should have the correct connector types for the equipment 
used. Connect the DB25M connector into the connector labeled 
“Monitor/Keyboard/Mouse” on the ServeView Pro “M” chassis rear panel or 
the KVM-1 connector on the “B” and “C” chassis. If a serial mouse is used 
on a KVM station, all mice in the system (on every computer) must be a 
serial mouse. 

Apply power 

For the “M” chassis, connect the power transformer to a 110/220-volt 
source and to the DIN 5F power adapter connector on the rear panel. Press 
the ON/OFF button in the front panel once to turn on the unit.  
 
For the “B” and “C” chassis, connect a power cord to 110-220-volt source 
and to the IEC320 connector on the rear panel.  Press the rocker switch to 
the ON position. 
 

Содержание ServeView Pro SEB-8UB

Страница 1: ...10707 Stancliff Road Phone 281 933 7673 Houston Texas 77099 Internet WWW ROSE COM TM INSTALLATION AND OPERATIONS MANUAL ...

Страница 2: ... LIMITED IN DURATION TO A PERIOD OF ONE YEAR FROM THE DATE OF PURCHASE AND NO WARRANTIES WHETHER EXPRESS OR IMPLIED WILL APPLY AFTER THIS PERIOD SOME STATES DO NOT ALLOW LIMITATIONS ON HOW LONG AN IMPLIED WARRANTY LASTS SO THE ABOVE LIMITATION MAY NOT APPLY TO YOU IF THIS PRODUCT IS NOT IN GOOD WORKING ORDER AS WARRANTIED ABOVE YOUR SOLE REMEDY SHALL BE REPLACEMENT OR REPAIR AS PROVIDED ABOVE IN N...

Страница 3: ...ial area is likely to cause interference in which case the user at his own expense will be required to take whatever measures may be necessary to correct the interference Changes or modifications not expressly approved by the party responsible for compliance could void the user s authority to operate the equipment This digital apparatus does not exceed the Class A limits for radio noise regulation...

Страница 4: ...ter from the front panel 16 Selecting a computer using keyboard commands 16 Selecting a computer through the RS232 port 16 Reset to factory defaults 16 Rack mounting 16 Firmware update 17 Maintenance and Repair 21 Technical Support 21 Safety and EMC Regulatory Statements 23 Figures Figure 1 ServeView Pro models 4 Figure 2 Rear panel 5 Figure 3 Single Unit installation 12 Figure 4 Cascading units 1...

Страница 5: ...he latest technology in single user keyboard monitor mouse switching The ServeView Pro is the result of Rose Electronics commitment to providing state of the art switching solutions for today s demanding workplace The ServeView Pro has proven to be a valuable and dependable investment for users that have the need to access multiple computer systems from a single KVM station Each model can support ...

Страница 6: ...matic and simultaneous booting Flash memory with free base firmware upgrades available from our web site Compatibility KVM compatibility Keyboards PC Unix and most US and foreign QWERTY keyboards Japanese and Korean keyboards with or without Windows keys 101 102 104 105 106 109 Sun Some older XT AT auto sensing or single mode keyboards may not be compatible Monitors VGA SVGA XGA Composite Mice Sta...

Страница 7: ...s designed to provide seamless trouble free switching from a single KVM station to any connected computer or server You can switch to any of the connected computers by simple keyboard commands the front panel or buttons or from a computer terminal or standalone PC connected to the RS 232 serial port not connected to a CPU port If your system demands are greater than a single unit can provide the S...

Страница 8: ...wer Power LED Green when unit is on ON OFF M chassis only In ON Out OFF LEDs Indicator LEDs Numbered pairs of LEDs shows status and power of connected computers and Switches Connects to the previous CPU Connects to the next CPU The and switches are used when upgrading the firmware resetting the unit to factory defaults running diagnostics Table 1 Front panel ...

Страница 9: ...Figure 2 Rear panel Label Connector Description Power M Chassis only DIN 5F Power adapter connector None B and C Chassis only IEC320 Power receptacle w switch CPU x M 1 4 B 1 8 C 1 16 DB25F CPU adapter cable connectors KVM 1 DB25F KVM cable connector RS232 RJ12 6 conductor jack Table 2 Rear panel connectors ...

Страница 10: ...le is used to connect each computer to the ServeView Pro The CPU cable connects from the DB25F CPU ports on the ServeView Pro to the keyboard video and mouse ports on each CPU This cable is configured with a DB25M connector on one end and a connector for the keyboard video and mouse on the other end These CPU cable connectors should be compatible with each CPUs keyboard video and mouse port ServeV...

Страница 11: ...switching to next CPU port in scan mode Set mode Ctrl Mnn Enter where nn mode value from Table 4 Alternate way to configure keyboard and mouse Null mouse command Ctrl N Used to re sync a PS 2 mouse Reset mouse Ctrl O alpha O Resets computer s mouse Win NT 2000 only Reset command Ctrl R Resets and enables mouse and keyboard on currently selected computer Max computers Ctrl Pnnn Total ports used all...

Страница 12: ...7 bit 8 CPU mouse Reserved for future use 9 CPU mouse 3 button serial Mouse systems 10 CPU mouse PS 2 wheel 11 CPU Keyboard mouse USB PC MAC 12 CPU Keyboard mouse USB Sun 20 Keyboard PC 101 102 PC 21 Keyboard PC 104 105 PC Win95 30 Mouse PS 2 or PS 2 wheel 31 Mouse Serial 2 button 7 bit Microsoft 32 Mouse Serial 3 button 8 bit not used 33 Mouse Serial 3 button Mouse systems 40 Keyboard mouse Set a...

Страница 13: ...onal keystrokes will be sent to the selected computer and not the ServeView Pro 3 Use only the numeric keys above the keyboard and not the numeric keypad 4 Letter commands such as Ctrl M are not case sensitive and are only shown in uppercase for clarity Do not use the shift key to enter letter commands 5 To connect to the previous or next computer the keyboard command is Ctrl or Ctrl The plus and ...

Страница 14: ...expansion width to 4 then only CPU ports 1 4 on the 8 port Slave units can be accessed In systems that have a mixture of models it is recommended that the width value be set to the number of CPU ports on the Slave unit with the most CPU ports Installation Single unit This section explains how to connect and initially configure the ServeView Pro If you are cascading two or more ServeView Pro units ...

Страница 15: ...w Pro should be pre configured if needed before the CPU is connected The default keyboard and mouse types set for each CPU port is a PC mode 2 keyboard and a PS 2 mouse If the computer being connected does not use a PC mode 2 type keyboard and a PS 2 mouse pre configure the CPU port for the correct keyboard and mouse type Once the CPU port has been configured the computer can be connected to the S...

Страница 16: ...4 Connect the computer that has been pre determined to be connected to the CPU port being configured using the appropriate CPU cable 5 Boot the computer if needed You should see the boot up sequence on the KVM monitor If the computer was connected to a pre configured CPU port with power applied you should see that computers video 6 Switch to the next CPU port to connect a computer to as defined in...

Страница 17: ...odels then you can count the CPU ports used to connect to the computers The ports on the master unit used for expansion should not be counted If there is a mixture of ServeView Pro models in the system the Maximum computers value is the Width value times the number of Slave units plus the CPU ports on the master unit that are not used for expansion Valid entries are 2 to 256 In the example in Figu...

Страница 18: ...ower to all ServeView Pros and the KVM monitor 2 Switch to the CPU port the computer is being connected to by pressing and releasing the left control Ctrl key type in the CPU port number starting with port 1 and press Enter 3 Connect the computer to the CPU port using the appropriate CPU cable If the computer being connected does not use a PC mode 2 keyboard and a PS 2 mouse or is being connected ...

Страница 19: ... values Ctrl K Enter f Perform steps a through e for each CPU port that needs the default keyboard and mouse changed to a different type 4 Boot the computer if power was not applied You should see the boot up sequence on the KVM monitor If the computer was connected with power applied you should see that computer s video 5 Verify that the keyboard video and mouse function properly before proceedin...

Страница 20: ...the or key will advance forward or backwards one sequential port Selecting a computer through the RS232 port Selecting a computer can be done through the RS232 port if needed Contact Rose Electronics Technical support for details Reset to factory defaults To reset the ServeView Pro to the original factory default settings first power down the unit press and hold the minus switch in and turn the un...

Страница 21: ...y the program version start a text editor application like notepad press and release the left control Ctrl key then press the I key and the program version will display The latest firmware file names on Rose Electronics web site are UPPxx hex main program and UPKxx hex kernel program xx the revision number To update the ServeView Pro s firmware first download the latest revision from Rose Electron...

Страница 22: ...n Y N If any of these errors occur check the RS232 cable the connectors and the adapter Make sure they are in good working order Verify the communication program is configured correctly Enter Y to try upgrading the flash again If programming is unsuccessful the unit should be serviced Method 2 Using the front panel switches with a file copy 1 Press both the and switches on the front panel and powe...

Страница 23: ... removed for less than three seconds possibly causing keyboard to lock up Disconnect and re connect the keyboard If PS 2 type keyboard and mouse cables may be reversed Not using left control key Using numeric keypad instead of keys on top row Not releasing control key before typing in number Waiting more than 2 seconds to enter computer number Using caps lock or shift key Wrong or missing characte...

Страница 24: ...necessary Video not synchronized or wrong color Cable is loose reseat cable Monitor not capable of syncing to video selected upgrade monitor Cable is defective try using cable from another computer if problem goes away cable is defective Port on ServeView Pro is defective try using another port on ServeView Pro If problem goes away port is defective Lower resolution OK but can t enter high resolut...

Страница 25: ...inal container or equivalent insured and shipped to Rose Electronics Attn RA__________ 10707 Stancliff Road Houston Texas 77099 USA Technical Support If you are experiencing problems or need assistance in setting up configuring or operating your switch consult the appropriate sections of this manual If however you require additional information or assistance please contact the Rose Electronics Tec...

Страница 26: ...e damage to them Use only power cords power transformer and connection cables designed for this Unit Use only a grounded three wire electrical outlet Keep objects that might damage this Unit and liquids that may spill clear from this Unit Liquids and foreign objects might come in contact with voltage points that could create a risk of fire or electrical shock Operate this unit only when the cover ...

Страница 27: ...ce until you have understood the hazardous conditions and have taken appropriate steps Grounding These are Safety Class I products and have protective earthing terminals There must be an un interruptible safety earth ground from the main power source to the product s input wiring terminals power cord or supplied power cord set Whenever it is likely that the protection has been impaired disconnect ...

Страница 28: ...ARNING ou CAUTION avant d avoir bien compris les conditions présentant un danger et pris les mesures appropriées Cet appareil est un produit de classe I et possède une borne de mise à la terre La source d alimentation principale doit être munie d une prise de terre de sécurité installée aux bornes du câblage d entrée sur le cordon d alimentation ou le cordon de raccordementfourni avec le produit L...

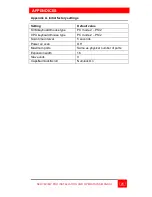
Страница 29: ...tial factory settings Setting Default value KVM keyboard mouse type PC mode 2 PS 2 CPU keyboard mouse type PC mode 2 PS 2 Scan time interval 5 seconds Power on scan Off Maximum ports Same as physical number of ports Expansion width 16 Slave units 0 Caps Numlock Scroll Numlock On ...

Страница 30: ...mouse to DB25 CAB VX0509Cnnn AT VGA AT Kbd Serial 9 mouse to DB25M CAB CXV0800Cnnn SUN w VGA HD15 Monitor SUN Kbd Mouse CAB SCX0800Cnnn Coax Sun CPU video Kbd mouse to DB25M CAB C1V0400Cnnn Coax Apple video Kbd mouse to DB25M CAB AV0400Cnnn Apple CPU video Kbd mouse to DB25M CAB CXVSMMnnn Cascading Cable KIT ATRX RJ11 Cable DB9 to RJ11 adapter TFR 08D150FSUD 110 220 VAC Power transformer for M cha...

Страница 31: ... 42 4x 12 3 x 8 9 cm Weight 2 4 port M chassis 4lb 1 8kg 4 8 port B chassis 6lb 2 7kg 4 8 port C chassis 7lb 3 2 kg 12 16 port C chassis 8lb 3 6 kg Environment 0 55 C 32 131 F 5 80 non cond RH Power Auto switching 90 240 VAC 60 watts Connectors Power IEC 320 standard receptacle CPU KVM connector DB25F RS232 connector RJ12 6 conductor Video bandwidth 250 MHz Video sync HV composite and sync on gree...

Страница 32: ... loss of mounting integrity Do not over tighten the screws used to mount the unit to the mounting brackets The following general guidelines should be observed when installing your unit into a rack 1 The ServeView Pro is designed to work in an ambient temperature of 0ο C to 55ο C 32ο F 131ο F 2 Do not block power supply vents or otherwise restrict airflow when rack mounting this unit 3 Mechanical l...

Страница 33: ...WIN95 APPLE SUN Left Control Left Control Left Control Left Win95 Start Left Cloverleaf Left Diamond Left Alt Left Option Left Alt Right Alt Alt Graph Right Option Alt Graph Right Win95 Start Right Cloverleaf Right Diamond Right Win95 App Power Key Power Key Right Right Control Right Control Compose Left Control then Pause then A Left Control then Pause then A Stop A Pause or Keypad Stop Keypad Ag...

Страница 34: ...4 C4 W4 Z4 C4 W3 Z4 C4 Z3 C4 C4 C4 C4 C3 C3 800X600 W4 Z4 C4 W4 Z4 C4 W3 Z4 C4 Z3 C4 C4 C4 C4 C3 C3 1024x768 W3 Z4 C4 W3 Z4 C4 W3 Z4 C4 Z3 C4 C4 C4 C3 C3 C2 1280x1024 W2 Z4 C4 W2 Z3 C4 Z3 C4 Z3 C3 C3 C3 C2 C2 C2 1600x1200 Z3 C4 Z3 C3 Z2 C3 C3 C3 C2 C2 C2 C1 Legend N Normal cabling C Coax cabling 4 Perfect or near perfect video Unable to easily detect defects 3 Very acceptable Images clear small re...

Страница 35: ......

Страница 36: ...10707 Stancliff Road Phone 281 933 7673 Houston Texas 77099 WWW ROSE COM ...

Отзывы: