4
5
1
2
3
1
1
2
A
B
C
1
3
4
2
D
EN // OWNER’S MANUAL
WORKSTAND // PROD. CODE: 2315579
This manual is also available on rosebikes.com/manuals.
General information
Please read this manual carefully before first using your new workstand and make sure you understand
everything. Keep this manual for future reference.
If you sell or give away your workstand, please also include the owner’s manual.
Intended use
The workstand is intended for bicycle repair, maintenance and care. The maximum load of the workstand is
50 kg and must not be exceeded.
Technical details:
Working height:
approx. 97 - 149 cm (floor - centre clamp jaw)
Holding claw:
360° rotatable; for tube diameters of approx. 20 - 55 mm
Complete weight: approx. 4.95 kg
Assembly
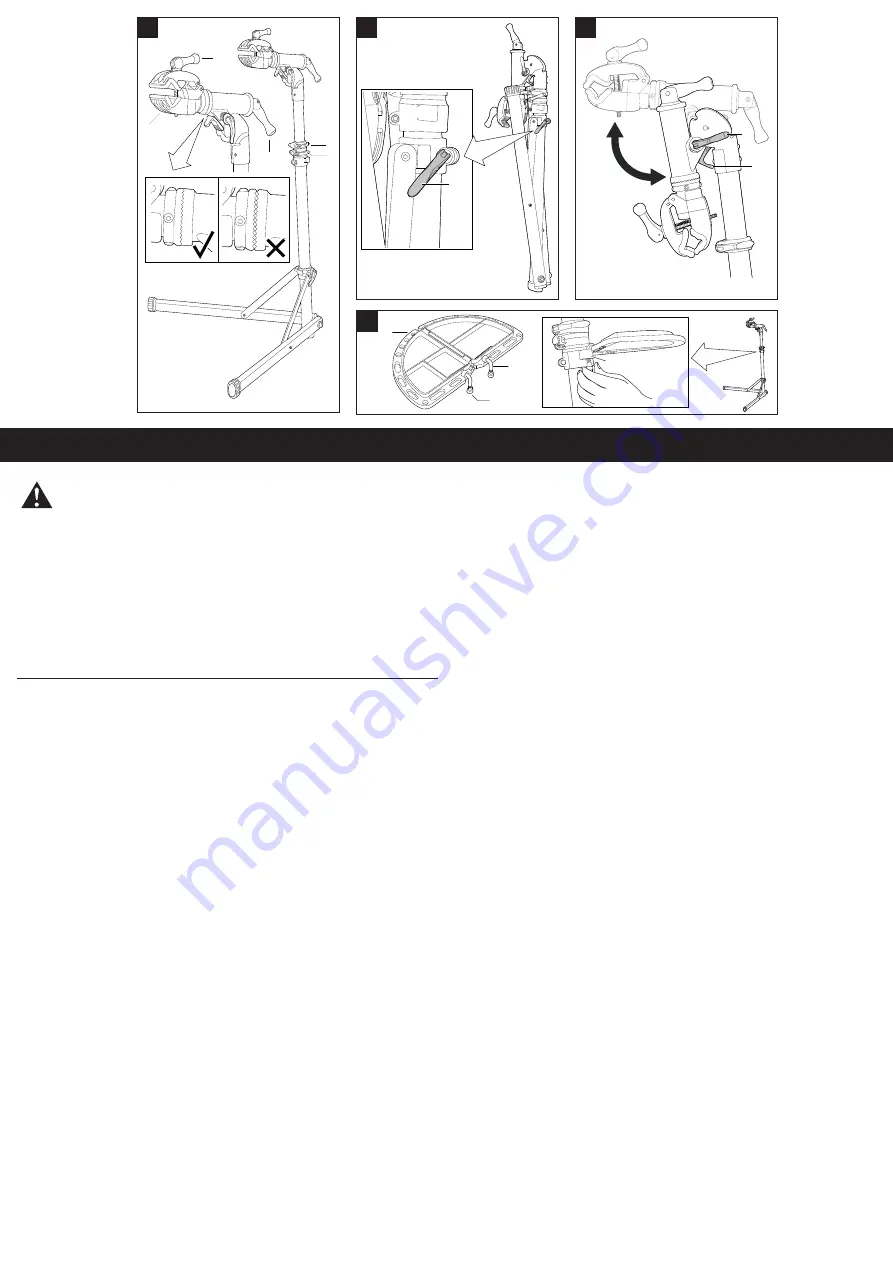
1. Open the quick-release fastener of the support legs (B/1), fold the support legs down and close the
quick-release fastener.
2. Open the quick-release fastener of the retaining claw (C/1), pull the locking lever (C/2) forward and fold
the retaining claw upwards to the end position.
→
The locking lever snaps back into the upper end position.
3. Close the quick-release fastener of the retaining claw (C/1).
4. Hold the upper part of the workstand with one hand, open the quick release of the height adjustment
(A/5), pull the telescopic tube apart until the desired height is reached and close the quick release
fastener.
Mounting the tool plate
1. Fold out the tool plate (D/1).
2. Insert the pins (D/2) of the tool plate into the respective slot (D/4).
3. Screw the nuts (D/3) onto the pins (D/2) and tighten them by hand.
Rotating the retaining claw
1. Flip the tension lever (A/3) and rotate the retaining claw (A/2).
2. Turn the retaining claw to the desired position and flip the tension lever again. Make sure that the teeth
of the retaining claw mesh (see A).
DANGER
Risk of injury and damage due to incorrect handling of the workstand!
Some points must be observed when using the workstand:
• The retaining claw can achieve a very high clamping force. Pressure-sensitive components made of
carbon or aluminium (lightweight, tuning components) must not be clamped or only with low clamping
force.
• Height-adjustable seat posts should not be clamped around the moving part.
• The height of the workstand may only be adjusted when unloaded.
• The bicycle must be clamped in such a way that the workstand cannot tip over.
• When removing a wheel, for example, the centre of gravity can suddenly change and the workstand can
tip over.
• Before working on e-bikes, the drive system must be deactivated. For additional safety, the battery can
also be removed.
Clamping
1. Insert the component to be clamped into the retaining claw (A/2).
2. Turn the clamping cam lever (A/1) clockwise in the closed position until the component clamps securely.
3. To release the clamp, open the clamp cam lever (A/1) and turn it counterclockwise a few more turns if
necessary.
Height adjustment
The height limit (A/4) can be used to set how far the workstand can lower after opening the quick release of
the height adjustment (A/5).
Before adjusting the height, unclamp heavy objects from the holding claw (A/2).
1. Hold the upper part of the workstand with one hand, open the quick release of the height adjustment
(A/5), pull the telescopic tube apart until the desired height is reached and close the quick release
fastener again.
Disassembly
1. Remove the tool plate (D/1) if necessary. To do this, unscrew the nuts (D/3) from the pins (D/2) and
remove the tool plate. The tool plate can be folded together for easier storage.
2. Open the quick-release fastener of the retaining claw (C/1), pull the locking lever (C/2) forward and fold
the retaining claw downwards to the end position.
→
The locking lever snaps back into the lower end position.
3. Hold the upper part of the workstand with one hand, open the quick-release fastener of the height
adjustment (A/5) and the quick-release fastener of the height limitation (A/4), push the telescopic tube
together and close both quick-release fasteners.
4. Open the quick-release fastener of the support legs (B/1), fold the support legs up and close the quick-
release fastener.
5. Store the workstand in its bag for longer storage.
Maintenance and Care
Handle the workstand with care and make sure to protect it from damages and corrosion during storage.
A proper functioning of the workstand largely depends on its condition.
• Before first use and regularly thereafter, check all screws and retighten if necessary.


