background image

- 12 -

Safety Precautions

1. Warnings

2. Precautions

Components List

Location / Function of Buttons and Ports

1. Front Side of the Product

2. Rear Side of the Product

3. Remote Control

How to Install the Product

1. Intended Product Design and Recommended Installation Location

2. How to Connect the Power Cord

3. How to Properly Connect the Rear Ports and Cables

  3-1. How to Connect the Analog Output Port to a Power Amplifier or AV Receiver
  3-2. How to Connect the Analog Input Port to Audio Device
  3-3. How to Connect the Analog Input/Output Port to Audio Device
          (TV or Devices That Provide Digital Input/Output Capabilities)
  3-4. How to Connect USB Audio Output Port to External DAC
  3-5. How to Connect USB Audio Input
  3-6. How to Connect eARC Input
  3-7. How to Connect to HDMI Output
  3-8. How to Connect Trigger Input/Output to IR Receiver
  3-9. How to Connect Speaker L/R Output

4. External Memory (USB Flash Drive) and SATA Storage Devices

5. How to Connect SSD

  5-1. How to Insert SSD
  5-2. How to Format After Installing SSD
  5-3. How to Copy Files Through the Network

6. Network Connection

  6-1. Ethernet Connection (Wired)
  6-2. WiFi Connection (Wireless)

7. How to Pair with the Bluetooth Remote Control

8. How to Connect to RoonReady

Default Settings

1. Power Button

2. Input / Output Settings

Table of Contents

14

14
15

16

17

17
18
19

20

20
21
22

32
33

35

37

37

39
39
39

Содержание RS520

Страница 1: ... 1 1 Beyond Audio HiFi ROSE Advanced All In One Network Streamer RS520 ...

Страница 2: ... 2 2 Beyond Audio HiFi ROSE ...

Страница 3: ... 3 3 ...

Страница 4: ... 4 ...

Страница 5: ...Integrated Amplifier With Gallium Nitride Amplifier built in RA180 In Out Port Analog In Line1 Line2 Line3 Bypass Balanced Phono MM MC Analog Out Sub Woofer Speaker Stereo A B 4ch 200W 8Ω Stereo A BTL B Stereo A 4ch 200W 8Ω BTL B 2ch 400W 8Ω BTL A B BTL A 2ch 400W 8Ω BTL B 2ch 400W 8Ω 5 430 391 124 mm 16 7 kg High Purity Aluminum Color Silver Advanced All In One Network Streamer RS520 Reference Gr...

Страница 6: ...e Connectivity Bluetooth DLNA Airplay Spotify Connect Roon Ready Design 278 231 83 mm 3 2 kg 8 8 Wide viewing angle touch screen Color Black Silver High Performance Network Streamer RS150 Series Hi Res DSD Native DSD 512 PCM 32bit 768kHz In Out Port Digital In Optical Coaxial AES EBU HDMI ARC USB Audio Digital Out Optical Coaxial AES EBU I2S DVI I2S RJ45 Analog In Line In Analog Out Pre out_XLR Pr...

Страница 7: ...eamer DAC AMP Built in High Performance Power Amplifier 50W 2ch High Resolution Music Playback available DSD256 PCM32bit 384kHz A Femto Clock provides High Precision Digital equipment PreAmplifier connection available Awarded the world s three major design awards Reddot GOOD DESIGN PIN UP Hi Res DSD Native DSD 256 PCM 32bit 384kHz In Out Port Digital In Optical Digital Out Optical Analog In Line In ...

Страница 8: ...h dual passive woofer engine design Patented technology Connectivity WiFi Bluetooth DLNA Airplay Rear Micro USB USB A Type Micro SD Headphone Design 364 123 123 mm 1 5 kg 5 IPS touch panel Color White Rear USB B Type Design 152 152 25 mm 0 9 kg Color Silver USB isolator Adopted to block motion noise USB B Type Port Adopted for HiFi Audio 900g weight for CD playback without external shaking Minimiz...

Страница 9: ...ld Keep track of your favorite channels Radio Rip CDs by connecting an external USB CD ROM and save them on a storage device EnjoyRoseRadio whichconsistsofabout30 000 radiochannelsfrom200countriesaroundtheworld Channelsareorganizedintovariouscategories and youcaneasilysearchforchannelswithfiltersofgenre region language Enjoy curated playlists divided by Apple Music s own musical tastes You can enjo...

Страница 10: ...e and check it out at Home My Music Playlist You can freely and conveniently control various HiFi ROSE functions wirelessly Control Remote Search Control You can control a variety of functions remotely including Music ROSE Tube TIDAL Qobuz Bugs Radio Podcasts Apple Music and CD Play ROSE Connect includes the remote control function You can conveniently search for a variety of music in the Media Li...

Страница 11: ... 11 OWNER S MANUAL RS520 Product User Manual ...

Страница 12: ...t Provide Digital Input Output Capabilities 3 4 How to Connect USB Audio Output Port to External DAC 3 5 How to Connect USB Audio Input 3 6 How to Connect eARC Input 3 7 How to Connect to HDMI Output 3 8 How to Connect Trigger Input Output to IR Receiver 3 9 How to Connect Speaker L R Output 4 External Memory USB Flash Drive and SATA Storage Devices 5 How to Connect SSD 5 1 How to Insert SSD 5 2 H...

Страница 13: ...ode 2 2 3 4 SoftWare Volume Control 2 2 3 5 How to Calibrate the Lower 8 Bits of a 32 bit Sound Source 2 2 4 Unbalanced L R 2 2 4 1 Pre Out Level Settings 2 2 4 2 SoftWare Volume Control 2 2 4 3 How to Calibrate the Lower 8 Bits of a 32 bit Sound Source 2 2 4 4 FIR Interpolation Filter 2 2 4 5 PCM Resampling Frequency 2 2 4 7 DSD Mode Playback 1 Default Playback 2 Media Library 2 1 Activate Media ...

Страница 14: ...uine power cable provided by ROSE Any other cable may cause operational errors or damage decreased performance to the product Do not spill dirt or liquid on the product It may damage the components and circuits If the product gets wet do not turn it on Contact your nearest service center However free repairs are not available in this case Do not connect antennas or accessories that are not certifi...

Страница 15: ...roduct with a chemical solution can create heat and cause the product to catch fire When cleaning the product wipe it with a soft cloth or towel Do not disassemble modify or repair the product on your own If you do you will no longer qualify for free repairs If a malfunction occurs because of this contact an authorized service center for repairs Only programs provided by the manufacturer are avail...

Страница 16: ... 16 Components List 1 Main Device 2 Bluetooth Remote Control 3 Power Cable 4 User Manual MANUAL 5 SSD Mounting Screws 6 AAA Batteries for Remote Control 7 External IR Receiver ...

Страница 17: ... within 5 seconds and the home screen is displayed when the boot is complete For detailed functions refer to Initial Settings Power Button page 39 Volume Control Buttons You can adjust the volume level by pressing the volume buttons Volume can be adjusted from 0 to 99 in 100 steps Caution Please note that listening to music at high volume for a long time may cause hearing damage Touch Panel You ca...

Страница 18: ...his port to output analog signals Max 9 0 u 2 2 Vrms Ethernet Connect the LAN cable to this port USB 3 0 You can connect a USB storage device to play music files or connect a CD ROM to use the ripping function HDMI You can connect the HDMI cable to play the video output up to 3840x2160 60 signal on your TV or monitor eARC Connect the eARC output HDMI port of the TV to the eARC input HDMI port of t...

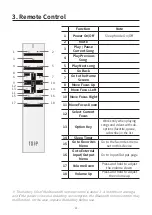
Страница 19: ...ay Next song 6 Go Back 7 Go to the Home Screen 8 Move Focus Up 9 Move Focus Left 10 Move Focus Right 11 Move Focus Down 12 Select Current Focus 13 Option Key Works only when playing songs and videos with sub options favorite queue subscribe in the list 14 Sleep Timer 15 Go to Favorites Menu Go to the favorites menu set on this device 16 Go to External Input Output Menu Go to Input Output page 17 V...

Страница 20: ... sure to provide adequate ventilation A longer operating life is ensured when electronics are properly ventilated and maintained so that they do not overheat more than necessary Do not install this product directly on a device that generates a lot of heat such as a power amplifier The figure below shows the minimum ventilation requirements required for the product Keep a space of at least 2 5 cm o...

Страница 21: ...r cord Please connect the power cord after all connections are complete Connect the power cord to the AC inlet port of the product first and then connect the power cord to a wall outlet Caution Always disconnect the power cord from the outlet side first RS520 Concentric Plug ...

Страница 22: ...ower amplifier or AV receiver The analog audio output volume adjustment for this product can be selected as Variable and Fixed through the pre out level settings Caution Before connecting this product to a power amplifier set the volume of this product to mute or to level 5 or lower and then connect using an RCA cable If the product is playing music and the volume is turned up a loud shock sound m...

Страница 23: ...xternal device such as a CD player to the analog line audio input of this device When using an analog audio input as a source you must switch the input source to ANALOG IN in the Input Output Settings You can change the input output settings from the home screen settings settings on the Rose Connect app and the remote control RS520 ...

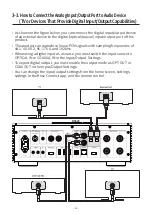
Страница 24: ...This product can reproduce linear PCM signals with sampling frequencies of 44 1 48 88 2 96 176 4 and 192kHz When using a digital input as a source you must switch the input source to OPTICAL IN or COAXIAL IN in the Input Output Settings To export digital output you must enable the output mode as OPT OUT or COAX OUT in the Input Output Settings You can change the input output settings from the home...

Страница 25: ...y be damaged 3 4 How to Connect USB Audio Output Port to External DAC You can connect an external DAC to the USB port of this product After connecting the external USB DAC to the USB 3 0 port of this product you must enable the output device as an external USB DAC in the Input Output Settings This product complies with the USB Audio Class 2 0 specification RS520 ...

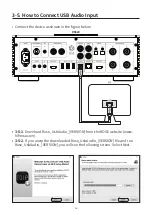
Страница 26: ...vice as shown in the figure below 3 5 1 Download Rose_UsbAudio_ VERSION from the ROSE website www hifirose com 3 5 2 If you unzip the downloaded Rose_UsbAudio_ VERSION file and run Rose_UsbAudio_ VERSION you will see the following screen Select Next RS520 ...

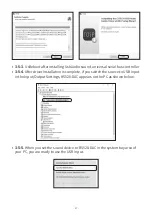
Страница 27: ...oller 3 5 4 After driver installation is complete if you switch the source to USB input in the Input Output Settings RS520 DAC appears on the PC as shown below 3 5 5 When you set the sound device to RS520 DAC in the system tray area of your PC you are ready to use the USB input ...

Страница 28: ...e eARC input port of this product you can output sound through the speaker output or PRE OUT port When setting the output to the PRE OUT port you must connect it to the input LINE INPUT port of the external amplifier device If the TV does not have an eARC port please connect it to the ARC port eARC supported audio format LPCM up to 192kHz 24 bit It does not support Dolby and DTS RS520 ...

Страница 29: ...ow to Connect to HDMI Output As shown in the figure below you can connect a TV to the HDMI port of this product By connecting this product to a TV video output up to 3840x2160 60 signals can be played back RS520 ...

Страница 30: ...r output terminal you can use the trigger function by connecting it to the trigger input port of this product with a monaural mini terminal cable Caution The power available for this product is DC 3 3 12 V so be sure to check the power supply of the external device Applying power that does not meet the specifications may cause serious damage to the product Available power supply DC 3 3 12V Power S...

Страница 31: ...ception works well The IR external receiver uses a 3 5 stereo mini phone plug Refer to the following figure for the pinout 3 9 How to Connect Speaker L R Output It is composed of 2ch stereo and outputs a maximum of 250 W 8 Ω for each channel For the speaker configuration it is recommended to use 2 full range speakers each with 250 W output or more Caution outputting loud sound on a low output spea...

Страница 32: ...are compatible up to 10TB and SATA storage devices up to 4TB SSDs can be purchased separately and only the 7mm thick standard is available Only Samsung SSDs have been tested for compatibility and some SSDs made by Intel may not work properly 5 How to Connect SSD 5 1 How to Insert SSD 5 1 1 Remove the screws 2 pcs from the SSD cover on the bottom of the main body 5 1 2 Slide the cover in the direct...

Страница 33: ...4 pcs 5 1 3 5 1 4 7mm thick SSD 5 1 4 5 2 How to Format After Installing SSD You can format the SSD connected to this product in the SSD Format menu in Storage Settings 5 1 5 Assemble the SSD cover with the SSD installed on the main body 5 1 6 Slide the cover in the direction marked LOCK and re fasten the screws 2 pcs 5 1 5 5 1 6 ...

Страница 34: ...n SMB to view the storage associated with this product and copy files directly from your PC To connect to SMB of this product from your PC both devices must be connected to the same network 5 3 How to Copy Files Through the Network Set SMB ID PW in Storage Settings ...

Страница 35: ...he Settings Ethernet menu to connect to the network If connected normally the IP address and other information are automatically obtained 6 1 1 After Ethernet connection you can use this product for Wi Fi tethering Once you have entered your network name and password and enabled the tethering feature you can connect to this Wi Fi tethering using your password on another device ...

Страница 36: ...work You can remotely control this product by installing the ROSE Connect Premium application available on Google Play Store and App Store on your smartphone To control this product from the mobile application ROSE Connect Premium the product and smartphone must be connected to the same network You can configure one network by using a wireless network extender bridge etc RS520 ...

Страница 37: ...ooth Remote Control 7 1 Press the Home and Option buttons on the remote control at the same time for about 5 seconds 7 2 When the white LED of the remote control turns on activate the Bluetooth switch to ON in the Settings Bluetooth menu on the main device and select Search Peripheral Devices 7 3 After selecting ROSE RCU from the Available Device List if you select ROSE RCU from Registered Devices...

Страница 38: ...this product from Select Audio Once the connection with ROSE is complete you can control and listen to the music by running the music in Roon To control this product from Roon your PC and product must be connected to the same network ...

Страница 39: ... 2 1 LCD OFF The sound continues to play and only the screen is turned off If you press the power button again while the LCD screen is off the screen turns on This function allows you to turn off only the screen while using the product 1 2 2 Shutdown The system will shut down 1 2 3 Restart Move to the Home screen after turning the product off and on If you touch anywhere on the screen other than t...

Страница 40: ...520 Set this product to Internal mode You can select it when using a storage device or streaming source as the default mode when starting for the first time When an external input is in use it is automatically selected when playing music from a storage device or a streaming source 2 1 2 LINE IN L R When using an analog audio input as a source select LINE IN as the input source in the Input Output ...

Страница 41: ...s 2 1 4 OPT IN OWhen using the optical input as the source select OPT IN as the input source in the Input Output Settings 2 1 5 USB IN When connecting this product to your PC and using it as a USB DAC select USB IN as the source in the Input Output Settings Refer to How to Install the Product How to Connect USB Audio Input ...

Страница 42: ...s Only one output among USB HDMI and internal DAC can be selected 2 2 1 USB DAC If you select USB after connecting a USB DAC a list of connected USB DACs appears Select the USB DAC to use from the list When USB DAC is selected the model name of the selected USB DAC appears and becomes available If you select the USB DAC setting icon the following USB DAC Setting screen appears ...

Страница 43: ...frequency If you want to output the original sound select the Original Sampling Rate If you want to use the resampling function select the desired sampling rate 48kHz 96kHz 192kHz etc 2 2 1 3 DSD Mode This is a menu that determines the transmission format Native DOP PCM of the audio sample to be delivered to the DAC when playing the DSD sound source If you select USB DAC you can play DSD sound sou...

Страница 44: ...when the volume is at maximum If the volume is smaller than the maximum MQA stream is not supported 2 2 1 5 How to Calibrate the Lower 8 Bits of a 32 bit Sound Source Some DACs may cause noise when playing 32 bit sound sources with high sampling rates In this case this feature can be used to reduce noise by correcting the lower 8 bits 2 2 1 6 OUTPUT Gain This is a menu to adjust the gain value of ...

Страница 45: ... the sampling frequency If you want to output the original sound select the Original Sampling Rate If you want to use the resampling function select the desired sampling rate 48kHz 96kHz 192kHz etc 2 2 2 2 DSD Mode This is a menu that determines the transmission format Native DOP PCM of the audio sample to be delivered to the DAC when playing the DSD sound source For HDMI output only DSD to PCM is...

Страница 46: ... is not available in Native DSD and DSD over PCM mode It is applied after changing to DSD to PCM up to DSD128 mode Caution 2 For digital output MQA stream is only supported when the volume is at maximum If the volume is smaller than the maximum MQA stream is not supported 2 2 2 5 How to Calibrate the Lower 8 Bits of a 32 bit Sound Source Some DACs may cause noise when playing 32 bit sound sources ...

Страница 47: ...propriately 2 2 3 Digital You can configure coaxial output and optical output If you select the digital setting icon the digital output setting screen appears as follows 2 2 3 1 MQA Type This is the menu to set the MQA playback mode You can choose authenticator or decoder mode Only the original sound or decoded audio data can be exported as digital output not fully decoded audio data ...

Страница 48: ...3 DSD Mode This is a menu that determines the transmission format Native DOP PCM of the audio sample to be delivered to the DAC when playing the DSD sound source In Native mode the analog output can play up to DSD512 but the digital output does not produce sound Analog output does not produce sound when set to DOP mode and only outputs up to DSD64 when set to optical and coaxial modes are supporte...

Страница 49: ...anging to DSD to PCM up to DSD128 mode Caution 2 For digital output MQA stream is only supported when the volume is at maximum If the volume is smaller than the maximum MQA stream is not supported 2 2 3 5 How to Calibrate the Lower 8 Bits of a 32 bit Sound Source Some DACs may cause noise when playing 32 bit sound sources with high sampling rates In this case this feature can be used to reduce noi...

Страница 50: ...he analog output setting screen appears as follows 2 2 4 1 Pre Out Level Settings This is a function of fixing the pre out output level Without using this product s volume control function you can fix the output level of this product with an input within the allowable range of the connected amplifier ...

Страница 51: ...imum If the volume is smaller than the maximum MQA stream is not supported 2 2 4 3 How to Calibrate the Lower 8 Bits of a 32 bit Sound Source Some DACs may cause noise when playing 32 bit sound sources with high sampling rates In this case this feature can be used to reduce noise by correcting the lower 8 bits 2 2 4 4 FIR Interpolation Filter Even when the user selects a specific filter Minimum ph...

Страница 52: ...6 DSD Mode This is a menu that determines the transmission format Native DOP PCM of the audio sample to be delivered to the DAC when playing the DSD sound source In Native mode the analog output can play up to DSD512 but the digital output does not produce sound Analog output does not produce sound when set to DOP mode and only outputs up to DSD64 when set to optical and coaxial modes are supporte...

Страница 53: ...ct Thickness 2 5 inch 7 mm Enter the Music Video Folder tab to play the music files in the storage device 2 Media Library You can scan sound sources in storage media or network shared folders and save them as a library DB 2 1 Activate Media Scanning When you connect a new storage device to the USB port on the back of the device a pop up will appear informing you that the new storage has been detec...

Страница 54: ... home page of this product After DB scan is completed album art and list of music and video are displayed and can be played You can also add research delete DB through the Music Video and Settings menu 2 2 After Media Scanning The album list is displayed with album art and you can play the entire track included in the album You can sort and play by album artist genre composer You can search by the...

Страница 55: ...the update is available while connected to the network a system update pop up will be displayed When you select Yes button in the system update pop up the OTA update will proceed After rebooting the software system update is complete Caution Forcibly removing power during an update may cause problems ...

Страница 56: ...tem version information in the Settings menu When you select Update button a system update pop up is displayed When you select Yes button in the system update pop up the OTA update will proceed After rebooting the software system update is complete Caution Forcibly removing power during an update may cause problems ...

Страница 57: ...system update the update pop up is automatically disposed and you can proceed with the update Updates can occur in the following cases 1 3 1 When Only XMOS Update Is Available It automatically reboots after running the XMOS update 1 3 2 When Only Audio MCU Update Is Available It automatically reboots after running the MCU update ...

Страница 58: ...Audio MCU Updates Are Available After completing the XMOS update the Audio MCU update is automatically executed It will then automatically reboot Caution Do not remove power by force during an update as this may cause problems ...

Страница 59: ...QA Master Quality Authenticated MQA which delivers the sound of the original master recording is an award winning British technology The master MQA file indicates that it has been duly certified and is available in small enough capacity to stream or download RS520 includes MQA technology which allows you to play MQA audio files and streams to deliver the sound quality of the original master recording...

Страница 60: ... TIDAL Qobuz Bugs ROSE Tube Internet Radio ROSE Podcast Apple Music In Output Audio Input Optical x 1 Coaxial x 1 Analog In x 1 USB DAC x 1 eARCx1 Audio Output Optical x 1 Coaxial x 1 Analog Out x 1 Video Output HDMI 2 0 x 1 up to 3840 x 2160 60Hz Media Connection File System NTFS eXfat FAT32 Network Protocol SMBv1 SMBv2 FTP WebDav Storage Interface USB3 0 x 2 SATA x 1 Supported Codec Audio MQA WA...

Страница 61: ...Pre Out 124dB 1kHz 600Ω 2Vrms Speaker 109dB 1kHz 8Ω 250W Power Input Voltage AC100 240V 50 60Hz Power Consumption 150W Circuit Breaker 6A Thermal Circuit Breaker Update SW update via internet USB OTA ROSE Store Remote Control Feature Remote Controller 38kHz Infrared Ray Within 10m of Operating Distance Bluetooth Remote Control Remote App ROSE Connect Android iOS Google PlayStore App Store Accessor...

Страница 62: ...dress Serial No Contact Address Warranty Period Until 1 year from the date of purchase Name of the Company Received the Conformity Assessment CI TECH Co Ltd Manufacturer Country of Manufacture CI TECH Co Ltd Republic of Korea Identification Code of the Certified Company SYH Certification No R R SYH 520 ...

Страница 63: ... for membership on ROSE devices ROSE device Settings User Account Log in Sign up How to sign up for membership in RoseConnectPremium RoseConnectPremium Settings My Page Sign up Q The output is fixed to HDMI in the input output setting of the RS520 so I can t change it to another output Turn off the device unplug the power cord wait about 10 seconds and then connect it again If the same problem sti...

Страница 64: ...e or sound tone from different manufacturers and models Exchange and Return Due to Product Defects For initial defects of the product that occurred without the cause attributable to the consumer within 15 days of receiving the product if the defect is confirmed by collecting the product it can be exchanged or returned with a new product Make sure you have a box with a genuine serial number and all...

Отзывы: