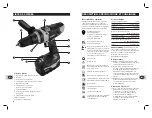
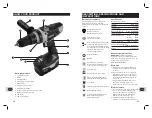
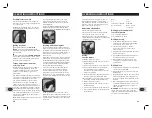
background image

14

GB 

15

GB 

Know your product

1.   On/off trigger switch
2.   Battery
3.   Soft grip handle
4.   Forward/reverse lever switch
5.   Keyless chuck
6.   2 Speed gearbox selector
7.   Adjustable side handle
8.   Torque selector / Hammer selection collar
9.  Battery charge indicator light
10.  LED button
11.  LED work area light

KNOW YOUR PRODUCT

Description of symbols

The rating plate on your tool may show 
symbols. These represent important 
information about the product or instructions 
on its use.

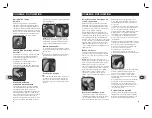
Wear hearing protection. 
Wear eye protection. 
Wear breathing protection.

Conforms to UL 745-3, 
745-4-1,745-4-2:1997.

Recycle unwanted materials instead 
of disposing of them as waste. All 
tools, hoses and packaging should 
be sorted, taken to the local recycling 
centre and disposed of in an 
environmentally safe way.

Read the manual.

Warning.

Do not dispose of batteries. 
Return exhausted batteries to your 
local collection or recycling point.

Use inside only.

Do not expose to rain or water

Always charge the battery pack 
between temperatures 0˚C to 40˚C.

Do not burn.

Fail-safe safety isolating transformer.

Nickel-cadmium battery.

Contains Nickel-cadmium battery. 
Battery must be recycled or 
disposed of properly.

Specifications

Nominal battery charge:                   14.4V
Charger:  

      120V ~ 60Hz

Batteries: 

           2 x 1.5Ah

Charging time:  

               1 Hour

Drill no load speed:         0-350, 0-1250 RPM
Torque settings:  

       21 Positions

Max, drilling capacity: 

Steel: 

10mm


Wood: 

28mm


Concrete:  10mm

Drill chuck capacity:         13mm (1/2) keyless
Hammer impact frequency: 
 

0-5,600 / 0-20,000 min-1

Weight:  

     2.1kg (4.6lbs)

General safety instructions

WARNING!

 Read and understand all 

instructions. Failure to follow all instructions 
listed below, may result in electric shock, fire 
and/or serious personal injury.

Save these instructions.

Work area

a)   Keep your work area clean and well lit. 

Cluttered benches and dark areas invite 
accidents.

b)   Do not operate power tools in explosive 

atmospheres, such as in the presence of 
flammable liquids, gases, or dust. Power 
tools create sparks which may ignite the 
dust or fumes.

c)   Keep bystanders, children, and visitors 

away while operating a power tool. 
Distractions can cause you to lose control.

Electrical safety

a)   Do not abuse the cord. Never use the cord 

to carry the tool. Keep cord away from 
heat, oil, sharp edges, or moving parts. 
Replace damaged cords immediately. 
Damaged cords may create a fire.

b)   A battery operated tool with integral 

batteries or a separate battery pack must 

DESCRIPTION, SPECIFICATIONS AND 

INSTRUCTIONS

6

7

3

1

5

4

8

2

9

11

10

Содержание 2001516

Страница 1: ...Black Code 2001516 Date 051222 Edition 14 Op PJ Manuel d utilisation Operating Manual F GB 2 13 14 23 PERCEUSE À PERCUSSION VISSEUSE SANS FIL 14 4 V 2001516 14 4V CORDLESS HAMMER DRILL DRIVER 2001516 ...

Страница 2: ...ur d isolation à sécurité intégrée Pile au nickel cadmium Contient une pile au nickel cadmium qui doit être recyclée ou éliminée convenablement Fiche technique Charge nominale de la pile 14 4 V Chargeur de pile 120 V 60 Hz Piles 2 x 1 5 Ah Temps de chargement 1 heure Vitesse à vide de la perceuse 0 350 0 1250 tr min Réglages du couple 21 positions Capacité du mandrin 13mm 1 2 sans clé Frequenza im...

Страница 3: ...us possédez Des accessoires qui conviennent à un outil peuvent devenir dangereux lorsqu ils sont utilisés avec un autre outil Entretien courant a L entretien courant de l outil ne doit être effectué que par un réparateur qualifié L entretien courant et la maintenance effectués par du personnel non qualifié peuvent engendrer des risques de blessure b Lors de l entretien courant d un outil n utilise...

Страница 4: ... arrière de l outil Pour mettre le bloc pile en place aligner les glissières de l outil et les boutons du bloc pile et glisser le bloc pile sur la perceuse Vous assurer que le bloc pile est bien à plat sur le pied de l outil et glisse correctement entre les glissières La pile doit glisser complètement sur le pied de la perceuse jusqu à ce que le bloc pile s enclenche en position 1 Brancher le char...

Страница 5: ...mbole est gros plus le couple est élevé et une fixation plus grande peut être utilisée Pour sélectionne l un des symboles faites tourner le collet 8 jusqu à ce que la fèche du boîtier soit alignée avec le symbole désiré Boîte à 2 vitesses La boîte de transmission à 2 vitesses vous permet de sélectionner l engrenage offrant la vitesse et le couple qui conviennent le mieux à la tâche NOTA Vous assur...

Страница 6: ...er la perceuse mais la laisser travailler à son rythme 3 Maintenir le foret bien affûté 4 Réduire la pression lorsque le foret est sur le point de traverser l article que vous percez Remplacement du mandrin Retrait du mandrin Toujours porter des lunettes de sécurité Tourner la bague de sélection du réglage du couple 8 à la position Drill et en première vitesse sur le sélecteur de vitesse 6 Serrer ...

Страница 7: ...874 8661 pour parler avec un de nos techniciens en service et ce de 9 h à 21 h du lundi au vendredi heure normale de l Est La garantie ne porte pas sur l usure normale y compris l usure des accessoires Le produit est garanti pendant 36 mois s il est utilisé à des fins normales Toute garantie devient invalide si le produit a été surchargé ou soumis à un usage négligent ou inadéquat ou si une person...

Страница 8: ...st be recycled or disposed of properly Specifications Nominal battery charge 14 4V Charger 120V 60Hz Batteries 2 x 1 5Ah Charging time 1 Hour Drill no load speed 0 350 0 1250 RPM Torque settings 21 Positions Max drilling capacity Steel 10mm Wood 28mm Concrete 10mm Drill chuck capacity 13mm 1 2 keyless Hammer impact frequency 0 5 600 0 20 000 min 1 Weight 2 1kg 4 6lbs General safety instructions WA...

Страница 9: ...Service or maintenance performed by unqualified personnel could result in a risk of injury b When servicing a tool use only identical replacement parts Follow instructions in the Maintenance section of this manual Use of unauthorized parts or failure to follow Maintenance Instructions may create a risk of electric shock or injury GENERAL SAFETY INSTRUCTIONS Safety rules for cordless drill drivers ...

Страница 10: ...ge indicator red light should go out indicating that the battery pack is fully charged and that the charger is now in Maintenance Charge mode this is confirmed by the light coming back on The battery pack can be left on Maintenance Charge until you are ready to use it 5 To remove the battery pack from the charger depress the battery pack release buttons and slide the battery off OPERATING INSTRUCT...

Страница 11: ...e flat section of the accessory To firmly clamp the accessory in the chuck grasp the chuck housing and rotate the chuck housing in a clockwise direction Ensure the bit is retained firmly or damage to the chuck jaws can result OPERATING INSTRUCTIONS To remove the accessory open the chuck jaws by firmly holding the chuck housing and rotating the housing in an anti clockwise direction Open the jaws s...

Страница 12: ...ill always have all the information and parts on hand 2 Keep the tool s air vents unclogged and clean at all times 3 Remove dust and dirt regularly Cleaning is best done with compressed air or a rag 4 Never use caustic agents to clean plastic parts 5 Lubricate the guide roller from time to time with a drop of oil It will extend the life of the roller CAUTION Do not use cleaning agents to clean the...

Страница 13: ......

Отзывы: