background image

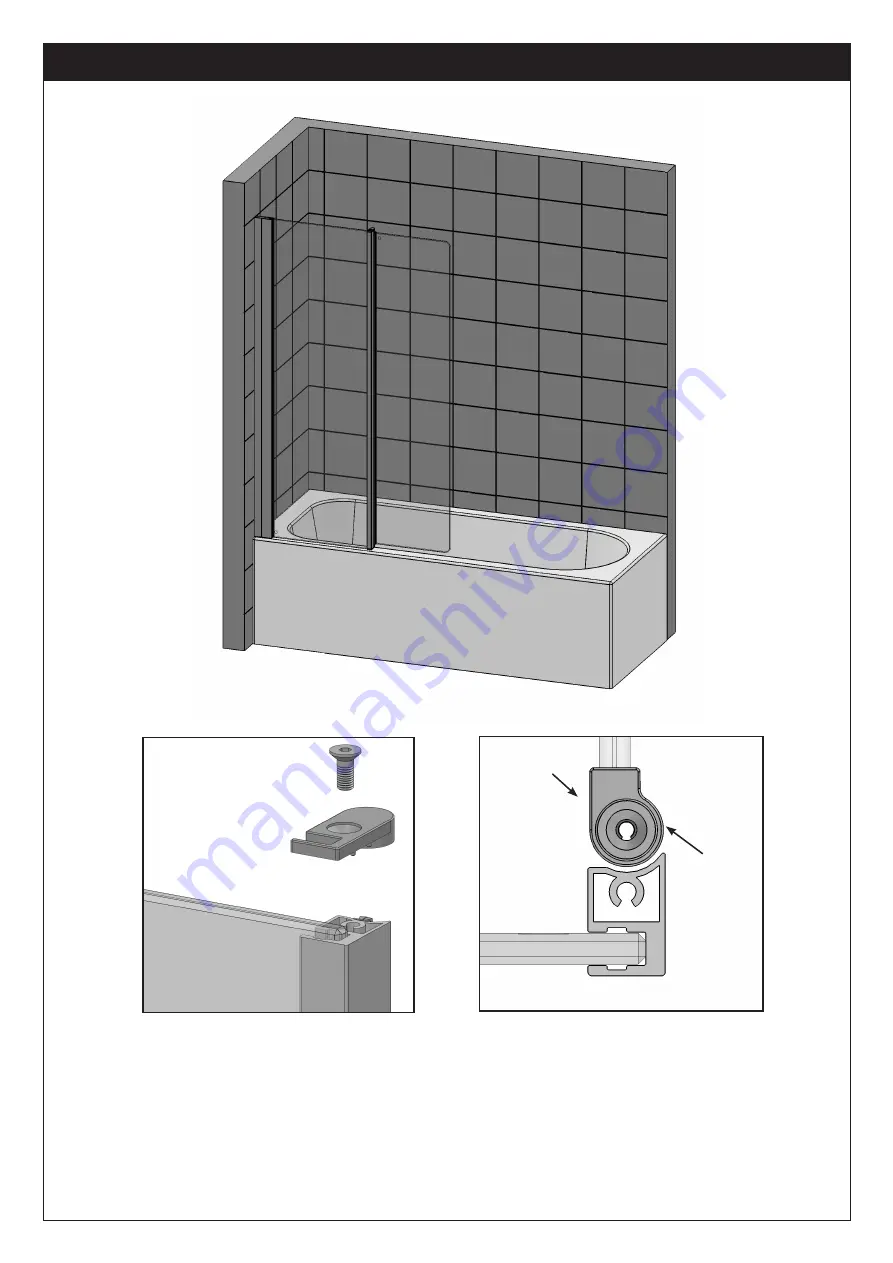
Step 4 - Fitting the Moveable Panel

1.  Using the 4mm Allen key (supplied) remove the countersink screw and Top Pivot Assembly from the Fixed 

Panel.

2.  Ensure that the Moveable Panel is the correct way before fitting, the “P” shaped extrusion should be 

positioned so that the Flat Face is to the inside of the showering area and the Round Face to the outside.

3.  Offer the Moveable Panel onto the bottom Pivot Assembly then reattached the top Pivot Assembly so the 

panel is then secured into position.

4.  With the deflector facing inward push the Bottom Seal up onto the bottom of the Moveable Panel and also 

along until it butts up against the aluminium profile (trim to length if required)..

•  Please take care when cutting the bottom seal.

•  Make sure the bottom seal is butted up against the aluminium profile.

Flat 

Face

Round 

Face

Содержание V8BV13

Страница 1: ...ging 2 Check all the product components are in the box and the fixing kits 3 Unpack your product and handle it with care 4 Please check the product for defects or damage once the installation has commenced we cannot accept responsibility for any defects or damage 5 Please take time to read these instructions prior to installing your product 6 Before you commence any drilling check there are no hid...

Страница 2: ...al the bath along the tiled wall with a bathroom sealant not supplied 6 With the water still in the bath leave the sealant to cure for at least 24 hours Spray the seal and joints with the shower head and check for leaks when the silicon has cured Check the plumbing for leaks Do not plasterboard over the bath Do not grout the tiles when the bath screen has been fitted the grout may discolour the al...

Страница 3: ... Wall Profile in Step 2 You must ensure the glass runs parallel to the outside edge of the bath before marking the Bath Top You will need help to hold the screen in position while you mark the tiled wall and bath top IMPORTANT INFORMATION Failure to fit the fixed panel to the inside edge of the bath top will result in the bath screen leaking and will not be covered under the terms of the guarantee...

Страница 4: ...push the wall plugs supplied into the drilled holes 6 Apply a bead of sealant the width of the Wall Profile at the bottom where the Wall Profile meets the tiled wall 7 Screw fix the wall profile to the wall using the 40mm screws supplied ensuring it is vertical 8 Apply a bead of sealant to the inside of the Wall Profile at the bottom where it meets the Bath top IMPORTANT The Wall Profile must be c...

Страница 5: ...etely vertical and it is sitting down on top of the bath and is also parallel to the outside edge 4 Drill three holes through the Fixed Panel into the Wall Profile with the 2 5mm drill bit supplied Ensure the Fixed Panel is sitting fully down on top of the bath and is completely vertical 5 Place the bases onto the 9mm screws and screw fix the Panel to the Wall Profile Fit the Cover Caps You will n...

Страница 6: ...ring area and the Round Face to the outside 3 Offer the Moveable Panel onto the bottom Pivot Assembly then reattached the top Pivot Assembly so the panel is then secured into position 4 With the deflector facing inward push the Bottom Seal up onto the bottom of the Moveable Panel and also along until it butts up against the aluminium profile trim to length if required Please take care when cutting...

Страница 7: ...can be shortened by snapping off at these points adding a small amount of sealant will help keep the cap in place 4 Fit the Deflector to the bottom ensure it is fitted with the deflector part facing inward towards the bath Push the Deflector up to the aluminium then trim the to length as required NOTE The Deflector is fitted to enable the water to be deflected back into the bath 5 Please allow 24 ...

Страница 8: ...ixed Panel Assembly 1 13 23 4 Pivot Assembly Top 1 14 24 5 Linear Seal 1 15 25 6 Tube Cap Right Hand 1 16 7 Moving Panel Assembly 1 17 8 Pivot Assembly Bottom 1 18 9 Tube Cap Left Hand 1 19 10 Deflector 1 20 If you need to replace any damaged parts please see illustration below for parts list then call Customer Relations on 01325 328033 ...

Страница 9: ...ew Clean your product using a mild detergent diluted in water and then polished off using a soft cloth If you live in a hard water area periodically clean your product using a 50 50 solution of white vinegar and water The solution should be left on the enclosure for approximately 5 minutes then rinsed off using warm water This method of cleaning should remove lime scale residue Simple Maintenance ...

Отзывы: