manualshive.com logo in svg
background image

18 


Customer Service Guide             


VI) Dashboard (Siren Lights) Replacement 


Step (5) 


Locate the two latches underneath the dashboard as below


Bottom view of Dashboard assembly


Step (6) 


Left                                                                Right


Содержание W462

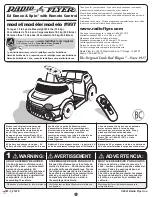
Страница 1: ...1 6V Fire Police GMC Truck Service Guide...
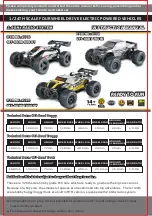
Страница 2: ...s I Check Battery 3 II Check Wiring Condition 6 III Check Foot Pedal 8 IV Gearbox Replacement 10 V Door Replacement 15 VI Dashboard Replacement 16 CAUTION Disconnect the battery before proceed the che...

Страница 3: ...Operation Use a Flat head screwdriver unlock and remove the seat Locate the battery harness unplug the connector then use a volt meter to check battery condition at battery side Step 1 Turn and unlock...

Страница 4: ...4 Customer Service Guide I Check Battery Unplug the battery connector RED underneath the seat Step 3 Step 4...

Страница 5: ...p 5 Reading Judgment 6 0 V 6 6 V Good condition 5 6 V 5 9 V Proceed to Recharge 5 5 V Battery to be recharged if after the stipulated recharging time voltage has not increased the Battery needs replac...

Страница 6: ...e II Check Wiring Connection Operation Disconnect and reconnect all plugs and connections leading to the drive board shown below A Motor Gearbox Follow above Point I to remove the seat locate the Gear...

Страница 7: ...cess the plugs underneath then check the wiring connections Locate the connectors for dashboard which near the right front wheel Step 1 Step 2 There are three connectors only two connectors if street...

Страница 8: ...e III Check Foot Pedal Operation Follow below procedures to check the Foot Pedal connection Step 1 Tip over the vehicle and pull out the Foot Pedal cover by flat head screwdriver from its right side E...

Страница 9: ...9 Customer Service Guide III Check Foot Pedal Step 3 Slide in the Foot Pedal into Chassis from right side 2 Snap back in place 1...

Страница 10: ...t Operation Follow below steps to take apart the gearbox completely for replacing Unplug the gearbox connector white color underneath the seat Step 1 Step 2 Use flat head screwdriver to remove the rim...

Страница 11: ...11 Customer Service Guide IV Gearbox Replacement Step 3 There are five latches as showed Step 4 Use a flat head screwdriver to remove the snap pin from axle...

Страница 12: ...12 Customer Service Guide IV Gearbox Replacement Well keep all the small stuffs when processing Step 5 Step 6 Cut the cable tie that holding the gearbox in place...

Страница 13: ...13 Customer Service Guide IV Gearbox Replacement Step 7 Slide the rear wheel out from axle Step 8 Slide the gearbox out from axle...

Страница 14: ...14 Customer Service Guide IV Gearbox Replacement Step 9 Replace the whole gearbox sub assembly with a good one Reverse above other procedures to re assemble back the vehicle...

Страница 15: ...teps to take apart and replace the opening door completely Step 1 After remove the dashboard unscrew these two screws to remove the damaged door Step 2 Replace the whole gearbox sub assembly with a go...

Страница 16: ...Dashboard Siren Lights Replacement Operation Follow below steps to take apart and replace the whole dashboard assembly Step 1 Unscrew the steering wheel from left hand side Step 2 Remove the steering...

Страница 17: ...17 Customer Service Guide VI Dashboard Siren Lights Replacement Step 3 Unscrew these two screws for dashboard fastening Step 4 Unplug all the connectors near the right front wheel...

Страница 18: ...18 Customer Service Guide VI Dashboard Siren Lights Replacement Step 5 Locate the two latches underneath the dashboard as below Bottom view of Dashboard assembly Step 6 Left Right...

Страница 19: ...ghts Replacement Step 7 Unlock and remove the dashboard by releasing the two latches underneath Step 8 Reverse above other procedures to re assemble back the vehicle Then replace the whole dashboard a...

Отзывы: