background image

6

Safety

WARNING: SAFETY RIDING RULES

The user must follow all safety rules and guidelines, or serious injury or death may 
occur.

•  Always use common sense and safe practices when using the vehicle. The user 

must be at least 3 years old and weigh no more than 35 kg (77 lb). 

•  This product contains small parts that are for adult assembly only. Keep small 

children away when assembling. Remove and dispose of all protective material 
and plastic bags before assembly. 

• 

Product Safety Commission (CPSC) Standard 16 CFR 1203. 

•  Only sit on the seat in the vehicle.
•  Do not allow more than one rider at a time.
•  Do not overload the vehicle. Do not remove the weight restriction decals.
•  Do not pull the vehicle with another vehicle or similar device.
•  Keep body parts such as hands, legs, hair and clothing away from moving parts. 

Moving parts can cause serious injury. 

•  Always wear shoes in the vehicle. 
•  Do not operate near streets or motor vehicles.
•  Do not operate near drop-offs such as steps, steep inclines or hills. Operate on 

relatively level ground. 

• 
•  Do not operate in dangerous weather conditions such as rain or snow.
• 
• 
•  Always use the vehicle in a safe, secure environment with adult supervision. 
• Adult assembly required.

PREVENT INJURIES AND DEATHS:
NEVER LEAVE CHILD UNATTENDED. ALWAYS

 keep child in view when child is in 

vehicle. Direct adult supervision is 

REQUIRED.


NEVER

 use in roadways, near cars, on or near steep inclines or steps, swimming 

pools or other bodies of water. 

ALWAYS

 wear shoes.

ALWAYS 

sit on the seat.

RISK OF FIRE.

 Do not bypass.

• Remove batteries if product is to be left unused for a long time; Always replace the 

whole set of batteries at one time, taking care not to mix old and new ones, or 
batteries of different types.

Do not operate near water, swimming pools or other bodies of water.

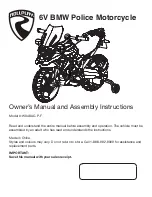
Содержание W348AC-P-F

Страница 1: ...embly and operation The vehicle must be assembled by an adult who has read and understands the instructions Made in China Styles and colours may vary Do not return to store Call 1 888 982 9309 for ass...

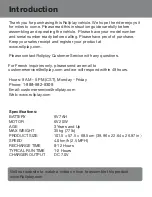
Страница 2: ...tomer Service with any questions Hours 9 AM 5 PM CST Monday Friday Phone 1 888 982 9309 Email customerservice rollplay com Web www rollplay com Specifications BATTERY 6V 7AH MOTOR 6V 20W AGE 3 Years a...

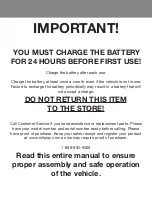
Страница 3: ...tery that will not accept a charge DO NOT RETURN THIS ITEM TO THE STORE Call Customer Service if you need assistance or replacement parts Please have your model number and serial number ready before c...

Страница 4: ...This page has intentionally been left blank...

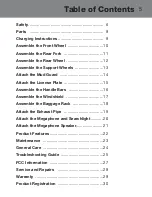
Страница 5: ...he Mud Guard 14 Attach the License Plate 15 Assemble the Handle Bars 16 Assemble the Windshield 17 Assemble the Baggage Rack 18 Attach the Exhaust Pipe 19 Product Features 22 Maintenance 23 20 21 Gene...

Страница 6: ...om moving parts Moving parts can cause serious injury Always wear shoes in the vehicle Do not operate near streets or motor vehicles Do not operate near drop offs such as steps steep inclines or hills...

Страница 7: ...er or milk if the person is vomiting or has decreased alertness Do not induce vomiting explosion It could permanently damage the system Keep the charger housing closed to prevent exposed wiring which...

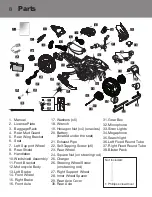
Страница 8: ...gon Nut x4 on axles 20 Battery located under the seat 21 Exhaust Pipe 22 Self T apping Screw x6 23 Rear Wheel 24 Square Nut on steering rod 25 Charger 26 Steering Wheel Screw on steering rod 31 Gear B...

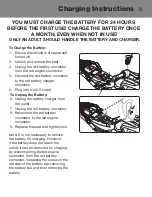
Страница 9: ...rom the outlet 7 Unplug the red battery connector 8 Reconnect the red battery connector to the red engine connector 9 Replace the seat and tighten lock Note It is not necessary to remove the battery f...

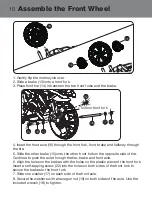
Страница 10: ...ake 15 onto the other front fork on the opposite side of tire Continue to push the axle through the tire brake and front axle 6 Align the holes on the brakes with the holes on the plastic piece of the...

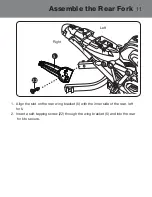
Страница 11: ...e the Rear Fork 1 Align the slot on the rear wing bracket 5 with the inner side of the rear left fork 2 Insert a self tapping screw 22 through the wing bracket 5 and into the rear fork to secure 5 22...

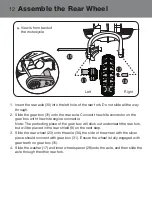
Страница 12: ...the gear box will stick out underneath the rear fork but will be placed in the rear shield 8 on the next step 3 Slide the rear wheel 23 onto the axle 30 the side of the wheel with the silver piece sho...

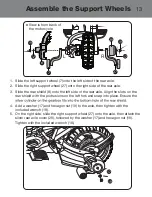
Страница 13: ...slots on the rear shield with the protrusions on the left fork and snap into place Ensure the 4 5 Add a washer 17 and hexagon nut 19 to the axle then tighten with the included wrench 18 On the right...

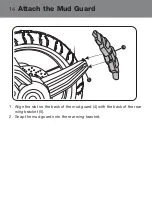
Страница 14: ...14 Attach the Mud Guard 1 Align the slot on the back of the mud guard 4 with the back of the rear wing bracket 5 2 Snap the mud guard onto the rear wing bracket 5 4...

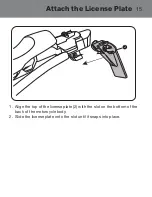
Страница 15: ...15 Attach the License Plate 1 Align the top of the license plate 2 with the slot on the bottom of the back of the motorcycle body 2 Slide the license plate onto the slot until it snaps into place 2...

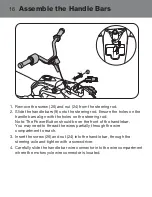
Страница 16: ...steering rod Note The Power Button should be on the front of the handlebar You may need to thread the wires partially through the wire compartment to reach 3 Insert the screw 26 and nut 24 into the h...

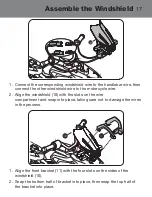
Страница 17: ...motorcycle wire 2 Align the windshield 10 with the slots on the wire compartment and snap into place taking care not to damage the wires in the process 1 Align the front bracket 11 with the four slot...

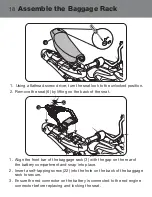
Страница 18: ...cked position 1 Align the front bar of the baggage rack 3 with the gap on the rear of the battery compartment and snap into place 2 Insert a self tapping screw 22 into the hole on the back of the bagg...

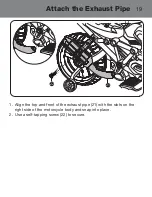
Страница 19: ...19 Attach the Exhaust Pipe 1 Align the top and front of the exhaust pipe 21 with the slots on the right side of the motorcycle body and snap into place 2 Use a self tapping screw 22 to secure 22 21...

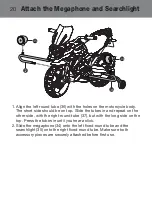
Страница 20: ...de the tubes in and repeat on the other side with the right round tube 37 but with the long side on the top Press the tubes in until you hear a click 2 Slide the megaphone 34 onto the left fixed round...

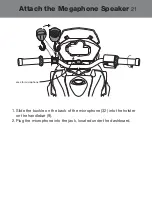
Страница 21: ...Attach the Megaphone Speaker Jack for microphone 1 Slide the buckle on the back of the microphone 32 into the holster on the handlebar 9 2 Plug the microphone into the jack located under the dashboar...

Страница 22: ...ton on the right handle to hear siren sounds and to activate the siren lights 4 Twist Handle Accelerator Twist the right handlebar to move forward Motorcycle will stop once twisting motion is released...

Страница 23: ...Service for assistance Keep the charger away from water or excessive moisture to prevent short circuiting Do not charge the battery with any other charger Do not attempt to recharge non rechargeable b...

Страница 24: ...contact Customer Service for replacement parts See Service and Repairs on page 28 for more information DO NOT operate the vehicle if there are any damaged parts Carefully clean the vehicle with a damp...

Страница 25: ...hort time Undercharged battery Ensure a secure connection when the battery is recharging Recharge for at least 8 12 hours Overcharged battery Never charge the battery for more than 30 hours Battery is...

Страница 26: ...stomer Service Motor or gear box making grinding noises Motor or gear damage Contact Consumer Service Battery will not recharge Charger is not plugged in Plug in the charger to a functional wall outle...

Страница 27: ...ce with the instructions may cause harmful interference to radio communications However there is no guarantee that interference will not occur in a particular installation If this equipment does cause...

Страница 28: ...mer Service Hours 9 AM 5 PM CST Monday Friday Phone 1 888 982 9309 Email customerservice rollplay com Web www rollplay com For a list of available replacement parts please visit www rollplay com WE WI...

Страница 29: ...the Rollplay vehicle or battery if deemed damaged by unreasonable use modification neglect accident abuse misuse improper service or other causes not arising out of defects in materials or workmanship...

Страница 30: ...will use the information provided only for your warranty We will not sell rent or share your personal information First Name Last Name Title Address City State Province Zip Code Postal Code Email Pho...

Отзывы: