


4
Rollerdor RD20X2 Control Box, Edition 2022/1
2. SETTING UP WIRELESS
SAFETY EDGE KIT
(RD20X2 OPTICAL SAFETY EDGE)
PROGRAMMING BASE RAIL UNIT
1
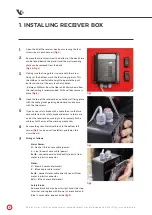
The control box is currently in hold to run
operation for open and close, if the limits
of the motor have not been set then please
use the open and close buttons that can be
found at the bottom right corner of the yellow
transformer
(Fig.6)
to set these limits..
2
Once installation is complete, slide back down
dip switch ‘2’ in the control panel, this can
be found on the four dipswitch block at the
bottom middle of the receiver board (usually
blue or red)
(fig.6)
.
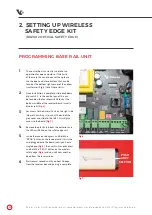
3
For access to the base rail unit on the right side
(where the writing is), push at the end of the
grey cover and slide to the left. This will give
access to the board
(fig.7)
.
4
Remove the plastic tab from the batteries and
the LEDs will blink on the safety edge unit.
5
Inside the receiver box press and hold the
“PROG” button on the receiver card (this is the
card plugged onto the board) until you hear a
single beep
(fig.9)
, then within 5 seconds press
and hold the “PROG” button on the wireless
safety edge
(fig.8)
and you will hear another
beep from the receiver box.
6
Wait several seconds until you hear 2 beeps
from the receiver box and pairing is complete.
fig.6
PUSH
GREY
SECTION
PUSH
GREY
SECTION
fig.7
Pictures are for illustration purposes only, connector blocks are not provided and further fittings may be required.