background image

Chapter 2: Getting Started


 7

Getting Started

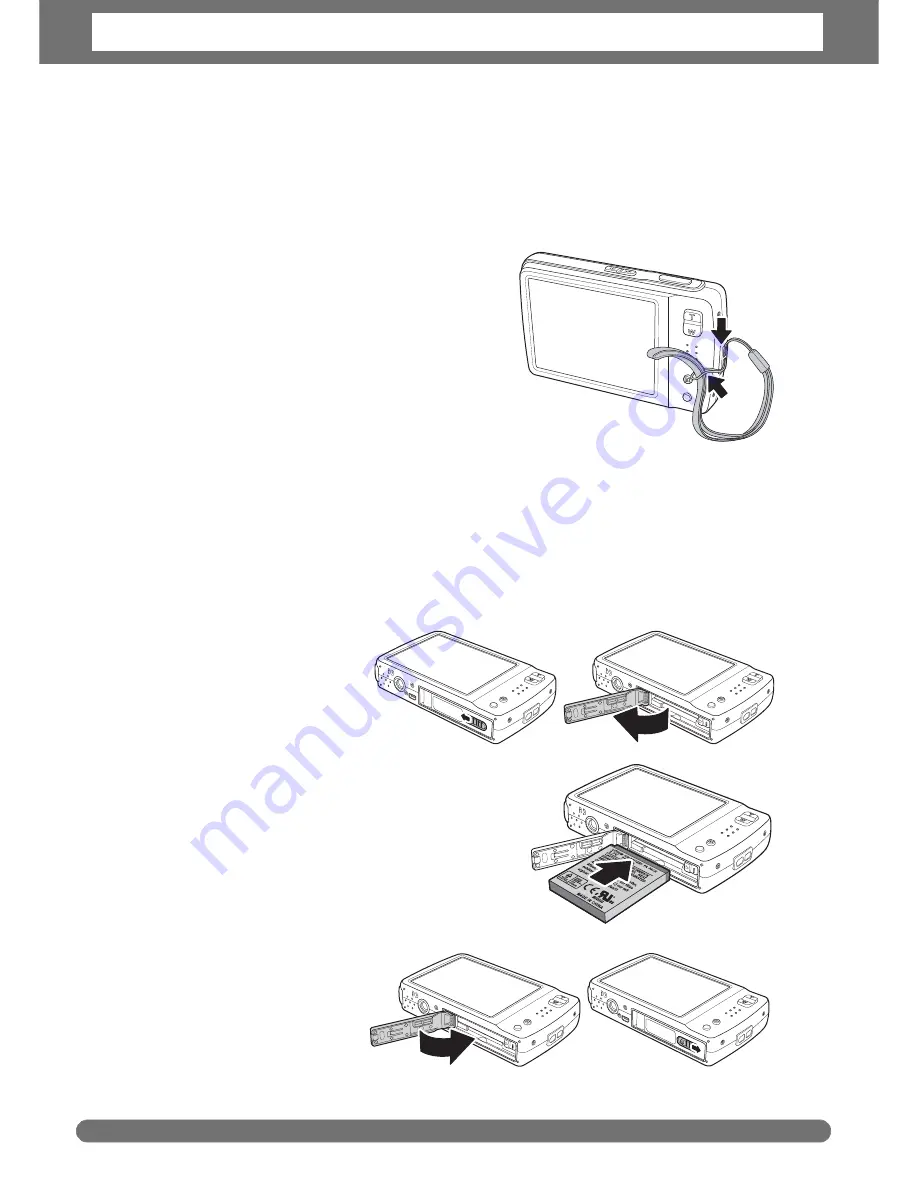
Attaching the Wrist Strap

Follow these instructions to attach the wrist 

strap to your camera to facilitate easy 

carrying:

1. Insert the short loop of the strap in the 

strap ring.

2. Thread the larger loop of the strap though 

the short loop and pull tight to attach the 

strap to the camera.

Inserting the Battery

Follow these instructions to insert the Li-ion battery into the battery compartment. 

Please read 

“Battery Information” on page v

 before inserting/removing 

batteries.

1. Make sure the power is off before inserting the batteries.
2.  Open the battery 

compartment at the 

bottom of the 

camera. 

3. Insert the battery into the compartment 

with the terminal facing inside the camera 

and the battery indent next to the 

compartment door. 

4. Close the battery 

compartment.

DISP

DIS

P

DIS

P

DIS

P

DIS

P

DIS

P

Содержание XS-10 inTouch

Страница 1: ...Rollei XS 10 inTOUCH USER GUIDE 10 MEGA PIXELS ROLLEI 3x APOGON ZOOM 3 0 TOUCHSCREEN TFT LCD USB 2 0 FULL SPEED SD CARD 4 GB SDHC CARD 8 GB SUPPORT...

Страница 2: ...n Sound 6 Camera Memory 6 Internal memory 6 External storage 6 Getting Started 7 Attaching the Wrist Strap 7 Inserting the Battery 7 Inserting an SD SDHC Memory Card 8 Charging the Battery 8 Turning t...

Страница 3: ...etting Frame Rate 37 Setting Stabilizer 37 Recording Voices 37 Playback 38 Viewing in Single Navigation 38 Viewing Slideshow 38 Viewing in Drag Play Mode 39 Viewing Thumbnails 39 Zooming Images 40 Tri...

Страница 4: ...eview 53 Setting Digital Zoom 54 Setting System Sound 54 Setting Volume 54 Setting LCD Brightness 55 Setting Power Save 55 Setting Date Time 55 Setting TV Out 55 Setting Hot Key 56 Setting Startup Ima...

Страница 5: ...antee that interference will not occur in a particular installation If this equipment does cause harmful interference to radio or television reception which can be determined by turning the equipment...

Страница 6: ...to clean the product Wipe the product with a slightly damp soft cloth Battery Information Turn off the camera before installing or removing the battery Use only the provided batteries or type of batt...

Страница 7: ...monitor Microsoft DirectX 9 0C USB port and CD ROM drive For Macintosh Power Mac G3 or later Mac OS 10 0 10 4 Memory 64MB or above HDD space 110MB or above USB port and CD ROM drive Mplayer Main Featu...

Страница 8: ...ents Please check the contents of your camera package It should contain Digital camera Li ion battery Battery charger Wrist strap USB cable Power cord CD ROM Quick Start Guide User Manual optional Cam...

Страница 9: ...on 3 Camera Views Front View Back View Top View Flash Zoom Lens Self timer LED AF Assist Lamp Microphone DISP Zoom buttons Play button LCD screen Display button Stabilizer button Shutter button Power...

Страница 10: ...ress to set stabilizer on off Shutter Press to capture an image or start stop recording video or audio clip Playback If the camera is turned off press and hold for 3 seconds to turn on camera in Playb...

Страница 11: ...ady to take pictures record playback Green fast blinking Camera busy or deleting copying images recording data transfer is in progress Green slow blinking Playing slideshow or recording voice or movie...

Страница 12: ...size It also supports SDHC cards with a maximum capacity of 8GB If there is a storage card inserted in the memory slot the camera automatically saves all images videos and audio clips in the external...

Страница 13: ...to the camera Inserting the Battery Follow these instructions to insert the Li ion battery into the battery compartment Please read Battery Information on page v before inserting removing batteries 1...

Страница 14: ...facing the front side of the camera 3 Push the SD SDHC card into the memory slot until it clicks into place 4 Close the battery compartment To remove the SD MMC card gently push the card until it pops...

Страница 15: ...off the camera press the Power button See Modes on page 10 to know more about Record and Playback mode Initial Settings When you turn on your camera for the first time you will be asked to do the ini...

Страница 16: ...en you turn on your camera using the Power button you are automatically turned on Record mode Switching between Record mode and Playback Mode In Record mode press the Playback button to switch to Play...

Страница 17: ...ut and icon descriptions Record Mode Screen Layout No Item Description 1 Record Mode Indicates the current record mode settings 2 Flash Indicates flash settings 3 Focus Mode Indicates focus mode setti...

Страница 18: ...isplays metering settings 15 Histogram Graphic display of ISO settings 16 Battery Indicates battery level No Item Description 1 Battery Indicates battery level 2 File no Total no Indicates the file nu...

Страница 19: ...the LCD Screen 13 7 Previous Tap to display previous file 8 Voice memo Indicates voice memo is attached 9 DPOF Indicates the file is marked for printing 10 Protect Indicates the file is protected No I...

Страница 20: ...l 2 File no Total no Indicates the file number over the total number of files in the storage card 3 Movie clip Indicates the file is a movie 4 Quick Set Bar Tap to activate Quick Set Bar 5 Next Tap to...

Страница 21: ...s file 8 Protect Indicates the file is protected 9 Volume Adjusts and displays volume level 10 Playback buttons Tap buttons to play pause stop fast forward rewind movie 11 Playing status Displays play...

Страница 22: ...l 2 File no Total no Indicates the file number over the total number of files in the storage card 3 Voice memo Indicates the file is an audio file 4 Quick Set Bar Tap to activate Quick Set Bar 5 Next...

Страница 23: ...e 8 Protect Indicates the file is protected 9 Volume Adjusts and displays volume level 10 Playback buttons Tap buttons to play pause stop fast forward rewind audio playback 11 Playing status Displays...

Страница 24: ...ding on the record mode type Use the Guide lines to properly set image for capture In Playback mode the LCD display can be changed into any of the following LCD display cannot be changed in the follow...

Страница 25: ...ons To enter the function submenu tap the corresponding icon For example to access Flash mode submenu click Flash mode icon the submenu options pop up See illustration on the right To select option ta...

Страница 26: ...options To access the settings menu tap the Main Menu icon No Menu Description 1 Scene Mode Tap to select scene mode 2 Quality Tap to change quality settings 3 Frame Rate Tap to change frame rate sett...

Страница 27: ...ayback settings tap the Main Menu icon No Menu Item Description 1 Effect Tap to add effects to image 2 Rotate Tap to rotate image 3 Z Lighting Tap to adjust Z lighting settings 4 Protect Tap to lock i...

Страница 28: ...camera automatically adjusts the focus and exposure When the camera is ready to take the photo the frame bracket turns green the shutter speed and aperture value are displayed 4 Fully press the Shutte...

Страница 29: ...tup digital zoom To adjusts optical zoom 1 Press the Zoom buttons to zoom in or zoom out an image 2 The zoom indicator appears on the LCD screen To adjusts digital zoom 1 Activate digital zoom See Rec...

Страница 30: ...d and aperture values Portrait The camera blurs the background to focus on the subject Landscape This feature is used to emphasize wide scenic views Sunset This feature enhances the red hue for record...

Страница 31: ...candle light effects NIght Portrait This feature is used to capture portrait pictures with night or dark background Soft Skin This feature enhances skin tone thus facial skin appears smooth Soft Flowi...

Страница 32: ...xposure This function cannot be activated in recording movies or continuous shooting 1 Tap Flash mode icon 2 Tap your desired flash mode Your camera is equipped with six flash modes Auto flash The fla...

Страница 33: ...ution before you capture the image Changing the resolution affects the number of images that can be stored in your memory card The higher the resolution the more memory space is required The table bel...

Страница 34: ...dim conditions and a lower ISO setting in brighter conditions As you move through the selections the preview on the LCD screen changes synchronously Available settings are Auto 100 200 400 800 1600 an...

Страница 35: ...Icon Item Description Auto The camera automatically adjusts the white balance Daylight Ideally used for bright sunny conditions Cloudy Ideally used for cloudy conditions Tungsten Ideally used for indo...

Страница 36: ...Captured image becomes greenish Ideally used to record images like mountains and lawns to make them more vivid Vivid Blue Captured image becomes bluish Ideally used to record images like the sky and t...

Страница 37: ...lash to capture image with a brighter or dimmer lighting effect The table below shows the available settings EV Compensation In difficult lighting condition the auto exposure function of your camera m...

Страница 38: ...The LCD screen displays the frame Tap the or to move through other frame selections Press the shutter button to capture image with selected frame Sharpness This function allows you to enhance or softe...

Страница 39: ...till images only May slowdown AEB continuous shooting when Date Stamp is enabled in AEB Burst mode If Date Stamp is enabled digital zoom is automatically turned off In vertical or rotated images the d...

Страница 40: ...n Focus Camera focuses on every object Infinity Camera focuses on objects distant objects Icon Item Description Off Captures an image without time delay 10 Sec Self timer Sets a 10 second delay to cap...

Страница 41: ...5 To stop recording press the Shutter button Sound cannot be recorded while pressing the control Digital zoom is not available in movie recording The camera will automatically stop recording when the...

Страница 42: ...ovie length ranges within 5 minutes although you can upload a maximum movie length of 10 minutes Therefore when you record using the YouTube mode the following standards are followed Recorded movies a...

Страница 43: ...sed by shaking To turn stabilizer on off in recording movies tap to activate Quick Set Bar Tap the stabilizer icon then select Stabilizer on Stabilizer off Recording Voices 1 To select Voice Recording...

Страница 44: ...rmation on the screen please see Playback Mode Screen Layout on page 12 3 Tap to view next previous image video voice recording 4 To access Quick Set Bar tap 5 To play a video or a voice recording tap...

Страница 45: ...tton twice to view 12 image thumbnails 2 Tap to view next previous page 3 Tap a thumbnail to view it normally Thumbnail icons When you view the thumbnails some images may contain icons These icons ind...

Страница 46: ...To trim an image based on selected zoom view tap To exit zoom function tap Trimming an Image The Trim function allows you to trim an image to another image size This function is only available for st...

Страница 47: ...yback use the to control volume Press the T W button to increase decrease volume 5 Tap or the slider bar to rewind or fast forward the movie 6 Tap to pause playback Tap to resume playback 7 Tap to sto...

Страница 48: ...ol volume Press the T W button to increase decrease volume 4 Tap or the slider bar to rewind or fast forward the voice recording 5 Tap to pause playback Tap to resume playback 6 Tap to stop playback T...

Страница 49: ...g to a still image This function is not available for images captured with VGA and 16 9 HD resolution 1 View the image to add memo dialog to 2 Tap The My Drawing toolbar is displayed on the LCD screen...

Страница 50: ...file 1 View the image to rotate 2 Tap 3 Tap to rotate image 90 counter clockwise clockwise Tap the icons repeatedly until desired orientation is achieved The preview on the LCD screen changes synchro...

Страница 51: ...ble settings are 0 0 1 0 2 0 3 0 and 4 0 4 Tap SET to continue 5 Select whether to Save As Save as another file No Discard changes Overwrite Save and apply changes to the current file Setting DPOF The...

Страница 52: ...and date stamp on off 7 Tap SET to save settings To set DPOF on all files 1 Tap 2 Tap All 3 Confirm to set DPOF on all files 4 Set the number of copies and date stamp on off 5 Tap SET to save setting...

Страница 53: ...urrently viewed file tap Yes To protect multiple files 1 Tap 2 Tap Select The LCD screen displays files in thumbnail view 3 Tap a thumbnail to mark file for protection The protect icon appears on the...

Страница 54: ...the right 3 To delete currently viewed file tap Yes To delete a voice memo 1 View the image file with voice memo attached on the LCD screen 2 Tap 3 To delete the voice memo only tap Voice only To del...

Страница 55: ...s only available for still images To resize an image 1 View image to resize on the LCD screen 2 From the Playback menu tap Resize 3 Tap desired size Select size among 8M 5M 3M and VGA Available size s...

Страница 56: ...memo 1 View the image with an attached voice memo on the LCD screen 2 From the Playback menu tap Voice Memo 3 The Overwrite confirmation message appears Tap whether to Yes Record another voice memo t...

Страница 57: ...CD screen 2 From the Playback menu tap Effect The Effect icons appear 3 Tap desired settings to preview effect on the LCD screen See table for more information 4 Tap SET to continue 5 Tap whether to S...

Страница 58: ...Chapter 5 Playback 52 Vivid Green Image is saved with greenish tint Vivid Blue Image is saved with bluish tint Icon Item Description G B...

Страница 59: ...d memory Copy to Card Select to copy all files stored in the internal memory to the memory card If there is a memory card inserted in the memory slot the camera automatically saves all files to the me...

Страница 60: ...function to enable disable sound when a button is pressed or tapped Available settings are On Off 1 From the Setting menu select System Sound 2 Tap to apply desired settings Setting Volume Use the Vo...

Страница 61: ...n the following instances Recording a movie or audio file Playing a slideshow movie audio file Using the USB connector Setting Date Time Use the Date Time function to set the date and time of your cam...

Страница 62: ...ap SET to save and apply changes Setting Startup Image The Startup Image function allows you to setup a startup image when you turn on your camera 1 From the Setting menu tap Startup Image The menu se...

Страница 63: ...o reset file numbering To understand folder and file structure of your camera see About Folder and File Names on page 61 Reset Tap to reset camera to initial default settings 3 A confirmation message...

Страница 64: ...ct the USB AV 3 in 1 cable to the USB port on the bottom of your camera 4 Connect the other end of the cable to the TV s AV input port 5 The LCD screen turns black and all images and video clips are d...

Страница 65: ...in the file manager No image is displayed on the LCD screen You can also use a card reader to access the memory card contents of your camera Connecting the Camera to a Printer You can print your phot...

Страница 66: ...on selection before printing photos The table below shows the PictBridge submenu options and their available settings Submenu Available Settings Quality Default Fine Normal Draft Layout Default 2 4 6...

Страница 67: ...th a 3 digit number from 100 to 999 and followed by DICAM or _AUCT or _UTUBE Each folder holds up to 9999 files If new files are saved a new folder named in sequence will be automatically created File...

Страница 68: ...ormat is not supported LCD screen displays Memory full Memory card is full Replace the memory card with a new one or delete unnecessary images LCD screen displays File locked This file is locked Unloc...

Страница 69: ...rture Priority Shutter Priority Manual Exposure Portrait Landscape Sunset Backlight Smile Detection Kids Night Scene Fireworks Snow Sports Party Candlelight Night Portrait Soft Skin Soft Flowing Water...

Страница 70: ...Specifications 64 Battery Li ion battery Operating Temperature 0 C 40 C Operating Humidity 0 90 Microphone Built in Speaker Built in Dimensions Normal size 95 45 X 56 45 X 18 9 mm Weight 130g...

Страница 71: ...RCP Technik GmbH Co KG Tarpen 40 Geb ude 6b D 22419 Hamburg Hotline 49 0 6 31 3 42 84 49 welcome rcp technik com www rcp technik com Subject to technical changes...

Отзывы: