background image

1

Chapter 2: Taking Images and Recording Video Clips

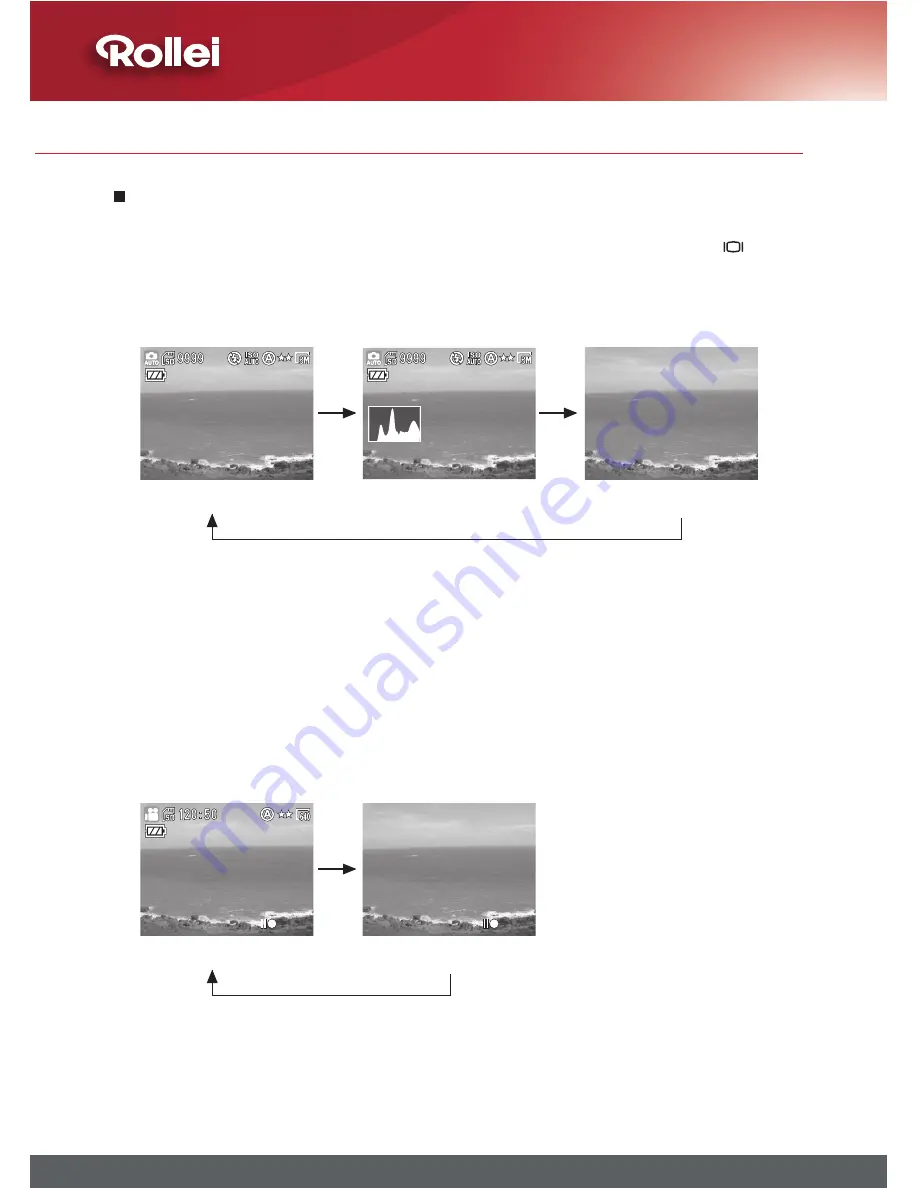
 Changing  Mode

YoucanchangethecontentsontheLCDmonitorbypressingthe 

buttontocyclethroughtheavailableoptions.

Capture Mode

* OSD stands for ‘on screen display’.

*Histogram:Thehistogramisagraphtojudgethetonalrangeofthe

image.Thecorrectexposureoftheimageisthepeakofthegraphinthe

middle.Iftheimageistoodark,thepeakslantstotheleft.Iftheimageis

toobright,thepeakslantstotheright.Youcanadjusttheexposurebyus-

ingEV(ExposureCompensation).

Video Mode

Note: If you do not use the camera over 1 minute, the LCD monitor will    


turn off automatically. Press any button but power button to turn on  


the LCD monitor.

OSD

*

On(Default)

OSDOn+Histogram

*

OSDOff

OSDOn(Default)

OSDOff

Содержание RCP-8325X

Страница 1: ...8 MEGA PIXELS ROLLEI 3x APOGON ZOOM 2 5 COLOR LCD USB 2 0 SD 2 GB SUPPORT...

Страница 2: ......

Страница 3: ...or other countries All brand and product names appearing in this manual are registered trademarks of their respective companies To prevent possible injury please observe the following warnings when u...

Страница 4: ...wing instructions when handling the battery used in this product Improper use of battery may lead to leakage or explosion Recharge only Li ion rechargeable batteries Recharging batteries that are not...

Страница 5: ...malfunctions or interfere with the data recording Avoid Intense Heat Do not use or store the equipment under sunlight or high temperatures Such exposure could lead to the leakage of the batteries or...

Страница 6: ...ing recorded or deleted from memory cards cutting off power could result in data loss or damage the internal circuitry or memory Do not drop Strong shock or vibration of dropping could cause malfuncti...

Страница 7: ...Taking Images Recording Video Clips 15 Using the LCD Monitor 15 Capture Mode 16 Video Mode 17 Changing Mode 18 Using Zoom 19 Optical Zoom 19 Digital Zoom 19 Taking Pictures 20 Using Auto Focus 20 Usi...

Страница 8: ...Playback 41 Using the Playback Menu 42 Activating Digital Enlargement 43 Using Index Display 44 Deleting Images and Video Clips 45 Protecting Images Video Clips 46 Adding Voice Memo to a Still Image 4...

Страница 9: ...ng Digital Zoom 61 Setting AF Illuminator 61 Setting Instant Review 62 Moving Images to Card 62 Resetting the File Number 63 Imprinting the Date Time 63 Formatting the Memory 64 Setting LCD Brightness...

Страница 10: ...rn on the camera 4 Press the button to capture mode and frame your subjects with the LCD monitor 5 Slightly press the shutter release button half way down and hold it to set the focus and exposure 6 P...

Страница 11: ...t Terminal Tripod Mount DC Terminal Microphone Memory Card Slot Battery Cover SP OK Shutter Release Button Power Button LCD Monitor Speaker Scene Program Delete Button Macro Button Self timer Button E...

Страница 12: ...he strap eyelet Insert the long loop of the wrist strap into the small loop of the strap and then tighten it 1 Make sure that the camera is turned off Plug the AC adapter connecter into the DC IN 5V s...

Страница 13: ...placed by an incorrect type Dispose of used batteries according to the instructions 3 Insert a SD memory card into the memory card slot as shown Note 1 The write protect switch of the memory card prev...

Страница 14: ...on continuously The language and date time setup screens are displayed Once you have configured these settings the AUTO Live View will be displayed Press button to select the language you need Press t...

Страница 15: ...or layout and descriptions of all icons Note 1 You may not be able to see the LCD monitor clearly when using the LCD monitor under intense light such as sunlight You can adjust the LCD brightness to i...

Страница 16: ...orescent Tungsten Cloudy Quality Normal Fine Best Size 3 96x 47 816x 11 560x19 0 7 x1704 048x1536 640x480 Drive mode Continuous Burst Macro Infinity Exposure compensation Aperture value Shutter speed...

Страница 17: ...ngsten Cloudy Quality Normal Fine Best Size 640x480 3 0x 40 Self timer 10sec 5sec sec Macro Infinity Recording indicator Standby On recording SD Card Internal memory Battery Full capacity Half capacit...

Страница 18: ...f the image The correct exposure of the image is the peak of the graph in the middle If the image is too dark the peak slants to the left If the image is too bright the peak slants to the right You ca...

Страница 19: ...out of an image 2 The zoom indicator appears on the LCD monitor Optical Zoom 1 Press the T button to optically zoom in to the maximum magnification Release the button and press it again to activate th...

Страница 20: ...n For information about Auto Focus see Setting focus on page 30 1 Frame your subject with the LCD monitor 2 Press the shutter release button halfway down and hold it to set the focus and exposure 3 Wh...

Страница 21: ...ame with the LCD monitor Press the shutter release button halfway down and hold it to set the focus and exposure 2 Keep the shutter release button pressed and recompose your picture with your subject...

Страница 22: ...ter after you press the shutter release button down fully If you want to take yourself into the image you can use this function We recommend you use a tripod or place the camera on a steady surface wh...

Страница 23: ...OK button to confirm the setting Setting Flash When taking pictures in difficult lighting conditions you may need the flash to get correct exposure The camera provides you with built in flash modes M...

Страница 24: ...ht Scene The camera will decrease the shutter speed when taking images in the dark conditions i e at night We recommend using a tripod Sports The camera will increase the shutter speed to capture fast...

Страница 25: ...on your subjects by pressing the W T button before you start recording 3 Press the shutter release button halfway down and hold it to set the focus and exposure 4 Press the shutter release button dow...

Страница 26: ...select Video mode 2 Press the button to enter the capture or video menu 3 Scroll through the menu by pressing button and highlight the option you wish to select Press the OK button to confirm all sett...

Страница 27: ...s The higher the resolution the more memory space will be required Setting Size for Still Images Setting Size for Video Clips 1 In Capture menu select SIZE 2 Select 3296 x 2472 8M 2816x2112 6M 2560x19...

Страница 28: ...compression applied resulting in a more detailed image These more detailed images require more memory space The lower the quality the lower the compression and detail and the less memory will be spac...

Страница 29: ...ITE BALANCE 2 Select CLOUDY TUNGSTEN FLUORESCENT DAYLIGHT or AUTO 3 Press OK button to confirm the setting Setting Function CLOUDY Setting for shooting in overcast condition TUNGSTEN Setting for shoot...

Страница 30: ...Focus The AF frame helps you to get the area on which the camera focuses 1 In Capture menu select ISO 2 Select 1000 800 400 200 100 80 or AUTO 3 Press OK button to confirm the setting 1 In Capture men...

Страница 31: ...will see the shooting conditions and select among the nine focus frames to focus on CENTER AF The camera uses the center focus frame to focus on FACE DETECTION The camera will detect and focus on fac...

Страница 32: ...the setting Setting Function FULL Measures brightness level from the entire capture in order to determine exposure level CENTRAL Measures brightness level from the central area of the capture in orde...

Страница 33: ...mage 1 In Capture Video menu select COLOR STYLE 2 Select B W SEPIA or NORMAL 3 Press OK button to confirm the setting Setting Function B W Takes the photo in black and white SEPIA Takes the photo in s...

Страница 34: ...HARD NORMAL or SOFT 3 Press OK button to confirm the setting Setting Function HARD Emphasizes all subjects in the image Outlines and edges are emphasized and stand out NORMAL The image is captured wit...

Страница 35: ...e final image 1 In Capture Video menu select CONTRAST 2 Select HARD NORMAL or SOFT 3 Press OK button to confirm the setting Setting Function HARD The image is hardened by defining light and dark areas...

Страница 36: ...ore vivid the image is 1 In Capture Video menu select SATURATION 2 Select MORE NORMAL or LESS 3 Press OK button to confirm the setting Setting Function MORE Makes images look more vivid NORMAL The ima...

Страница 37: ...re menu select DRIVE MODE 2 Select SINGLE CONTINUOUS or BURST 3 Press OK button to confirm the setting Setting Function SINGLE Takes a single image Press the shutter release button once to capture the...

Страница 38: ...FRAME 2 Select OFF P1 P2 P3 P4 P5 P6 P7 P8 or P9 3 Press OK button to confirm the setting and take your picture with the Photo Frame Note 1 The digital zoom cannot be used when using Photo Frame Note...

Страница 39: ...uction Slow Sync Only in night scene mode ISO Auto 100 00 400 Protection status Image size DPOF setting Voice memo indicator File size Exposure compensation Aperture value Shutter speed Displayed imag...

Страница 40: ...fault OSD On Detaied Information OSD Off Protection status Image size Movie clip File size Recording time File name Displayed image number Total number of images Play pause indicator Recorded date tim...

Страница 41: ...n to select Playback mode The last taken image or the first frame of the videos appears on the LCD monitor 2 Press button to the previous or next file 3 If you select a video clip an operation guide a...

Страница 42: ...ck mode Press the button to enter the Playback menu 2 Scroll through the menu by pressing button and press button to highlight the option you want 3 Press the OK button to confirm all settings 4 Press...

Страница 43: ...LCD monitor will disappear and the approximate location of the area and magnification level will show 2 Use button to move around the image 3 Press the W button to decrease the magnification level Pr...

Страница 44: ...images at a time 1 When reviewing the image press W button to show the index Up to nine images can be viewed at the same time 2 Use button to change the image selection 3 Press the T button to return...

Страница 45: ...ete it See page 46 for more details 1 In Playback menu select DELETE 2 Select ALL to delete all images and video clips or select ONE to delete the displayed one Press the OK button 3 A confirmation di...

Страница 46: ...or video clips Press the OK button 3 A protected file is indicated by the mark Follow step 1 and 2 again and then press OK button to remove the protection 4 Select SELECT and a thumbnail image galler...

Страница 47: ...and then press OK button 3 Press button to start recording When the voice memo recording starts the indicator icon on the LCD monitor changes from green to red Press button again to stop recording an...

Страница 48: ...48 5 To delete a voice memo select DELETE and then press OK button A confirmation dialogue will appear Select OK and press OK button to delete memo Chapter 3 Reviewing Images and Video Clips...

Страница 49: ...ck menu select DPOF To decide which images are to be printed and the number of copies select STANDARD and then press OK button to enter the submenu 2 In the submenu select STANDARD and then press OK b...

Страница 50: ...OK and then press OK button to remove print settings 5 To print index of images select INDEX and press OK button Use button to select ADD or REMOVE Press OK button to complete DPOF setting Note A sti...

Страница 51: ...nter directly 1 In Playback menu select SLIDE SHOW 2 Use button to select INTERVAL and use button to select the interval setting 1 10sec Select REPEAT and use button to activate REPEAT function ON or...

Страница 52: ...nction allows you to rotate still images 1 In Playback menu select ROTATE 2 Press Left or Right button to rotate 90 clockwise or counterclockwise Press OK button and return to the previous menu Chapte...

Страница 53: ...quirements Windows 98SE ME 2000 XP and Vista Pentium II processor or more Minimum 64MB RAM 200MB of available hard disk space 1024x768 pixels 16 bit color monitor Installing the Software Installing th...

Страница 54: ...t the CD into the CD ROM drive the pop up image will appear If the image does not appear click Start and then Run Type E Rollei exe Click PhotoImpression The computer proceeds to install PhotoImpressi...

Страница 55: ...puter See page 57 Launch PhotoImpression 2 To download the images from the camera select Removable Media 3 Press OK and PhotoImpression will detect new photos to your computer 4 Press OK and the selec...

Страница 56: ...e Windows XP you also have to upgrade to Windows XP Service Pack 2 SP2 If you use Win dows Vista you might need MPEG4 codec 1 Launch VideoImpression and then select add 2 Select DCIM to download the v...

Страница 57: ...ter the LCD monitor is turned off Note 2 If you use Windows 98SE you have to install the USB driver from the software CD ROM 1 Connect the larger end of the USB cable to the USB slot on your computer...

Страница 58: ...compatible printer for printing See page 49 for DPOF settings and page 68 for PictBridge settings Printing with a Computer After uploading the images to a computer by the USB cable you can print image...

Страница 59: ...compatible TV system in SETUP menu 2 Connect the A V Audio Video cable to the A V inputs of the TV and connect the A V cable to the A V connector of the camera Note 1 When you connect your camera to a...

Страница 60: ...o highlight the option you want to select Setting Language This function allows you to change the language Setting Date Time This function allows you to change the date and time 1 In Setup menu select...

Страница 61: ...a Turn on this function to aid focusing in low light situations Turn off this function if you are capturing an image which may be distracted by the illuminator wildlife for example 1 In Setup menu sel...

Страница 62: ...lect INSTANT REVIEW 2 Select ON or OFF Press OK button to confirm the setting 1 In Setup menu select MOVE IMAGES TO CARD and then press OK button 2 A confirmation dialogue will appear Select OK and pr...

Страница 63: ...nting out or displaying images you can decide whether to imprint the date and time on the images or not 1 In Setup menu select FILE NO RESET and then press OK button 2 A confirmation dialogue will app...

Страница 64: ...it was taken DATE The image is printed with the date it was taken OFF The image is printed without the date or time 1 In Setup menu select FORMAT and then press OK button 2 A confirmation dialogue wil...

Страница 65: ...era sound effect by setting camera sound 1 In Setup menu select LCD BRIGHTNESS 2 Use button to adjust the brightness value Press OK button to confirm the setting Note This setting is disabled when vie...

Страница 66: ...re Thailand and China As these systems are not com patible you cannot watch an NTSC system based TV in an area where the PAL system is used Setting Function SHUTTER ONLY All sound is off apart from a...

Страница 67: ...can change the USB connection mode depending on whether the camera is to be connected to a computer STORAGE or a printer PICTBRIDGE 1 In Setup menu select AUTO POWER OFF 2 Select 10 MIN 5 MIN 3 MIN 1...

Страница 68: ...SETUP menu change the USB connection mode to PICTBRIDGE 2 Use the USB cable that comes with the package to connect the camera to a PictBridge compatible printer 3 Once connected the PictBridge menu a...

Страница 69: ...OK button to print or the button to return to the PictBridge menu 6 Select ALL to print all images and press the OK button The total number of images appears on the screen Press the OK button to print...

Страница 70: ...s you to reset all camera settings to default 1 In Setup menu select RESET and press the OK button 2 A confirmation dialogue appears Select OK to reset your camera Press the OK button to reset all set...

Страница 71: ...enough Press the shutter release button down fully The memory card is full Replace with another memory card upload the images to a computer or delete the images The camera is still saving the last ima...

Страница 72: ...t The flash is on when the subject is bright enough Turn off the flash The camera is too close to the subject when taking images with the flash on Move back from the subject and take the image again L...

Страница 73: ...at is inserted Replace another memory card or erase unwanted images Before erasing upload all the images to a computer Memory error Card error Some problem occurred with the memory card or internal me...

Страница 74: ...iew the image on a computer If that cannot be done the image is damaged Cannot magnify You attempted to magnify a video clip Magnification does not work with video clips Format fail Failed to format S...

Страница 75: ...nt 35 105mm Aperture range F 2 84 Wide F 5 1 Tele Focusing Distance Wide 0 5m infinity Macro 0 1m 0 6m wide 0 5m 1m tele Digital Zoom 8 0 x Shutter Speed 2 1 2000 Exposure Exposure Compensation 2 0 Ev...

Страница 76: ...M 640x480 VGA I O External DC input DC 5V adapter regular plug Video output NTSC and PAL selectable PC connection Mini plug type USB mini USB connector for serial cable Power Source Rechargeable Li io...

Страница 77: ......

Отзывы: