


Preparation is complete once the following screen is displayed.
FINISHED?
IMPORTANT
Do not press [ENTER] at this stage. Press [ENTER] after replacing the wipers and the tray pads. If you press [ENTER] at this
stage, close the right cover according to the instructions on the screen, wait for the following screen to be displayed, and
then press [ENTER] again.
MAINTENANCE
REPLACE WIPER
9.
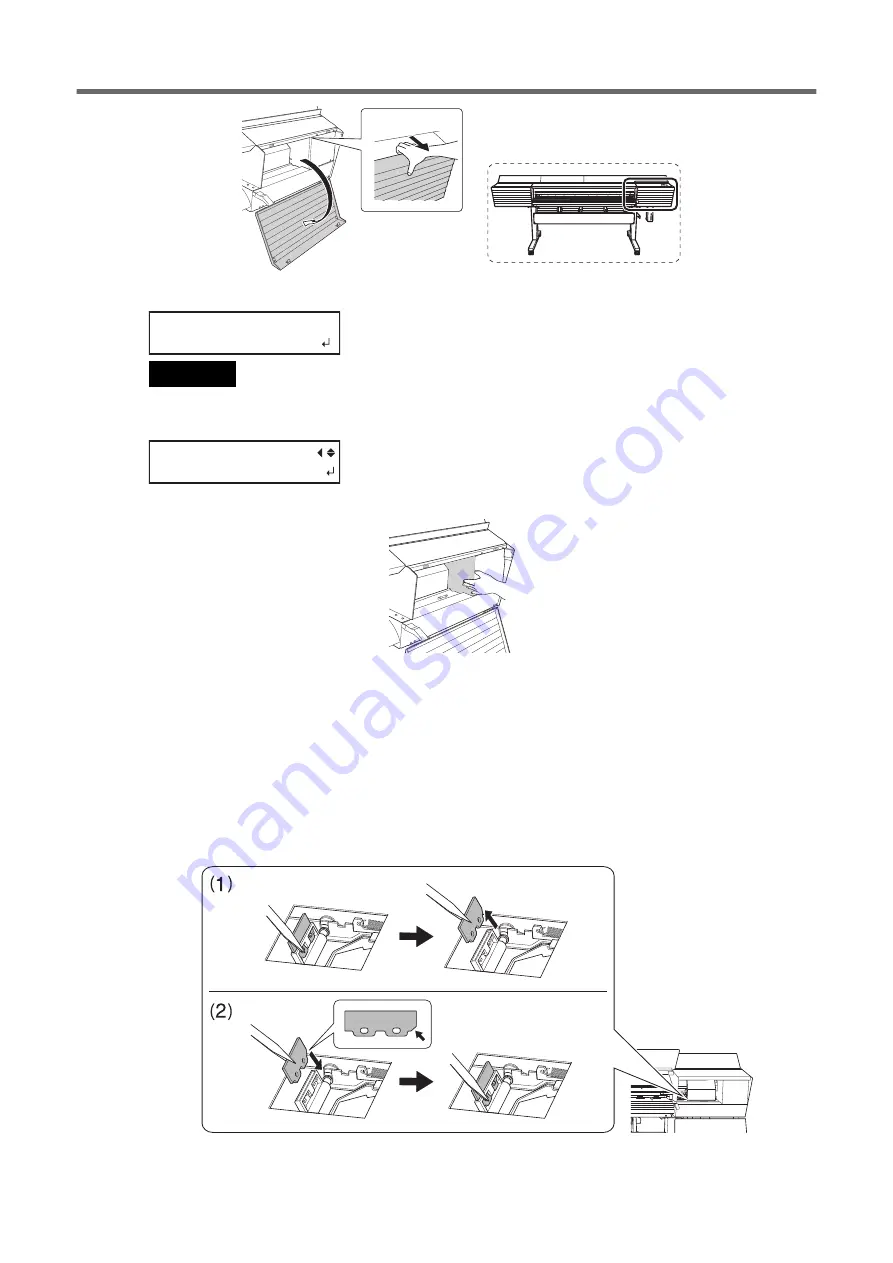
Touch the location shown in the figure to discharge any static electricity.
10.
Replace the wipers.
(1)
Detach the old wipers.
Using the tweezers, unhook the wipers, and then pull them up. Using the tweezers to press on the
hook in the hole on the wiper makes it easier to remove the wiper.
(2)
Attach the new wipers.
Place the inclined end of the wiper on the back side of the machine. If the wiper is installed with the
incorrect orientation, appropriate cleaning will not be possible.
Be sure to attach the wipers to the hooks. Failure to do so may result in dot drop-out or other prob-
lems.
Replacing Parts for Maintenance
162
4. Replacing Consumable Parts
Содержание TrueVIS VF2-640
Страница 7: ...1 Basic Handling Methods 6...
Страница 51: ...Ink Pouch TR2 Cleaning Liquid Pouch Replacement 50 2 Basic Operations...
Страница 52: ...2 Output Method 51...
Страница 61: ...REDO ADJ YES DONE 10 Press ENTER to confirm your entry Printing Output 60 1 Printing Method...
Страница 68: ...3 Optimizing Quality and Effi ciency 67...
Страница 99: ...W1100mm B Adjusting the Output start Location 98 2 Optimizing Work Efficiency...
Страница 121: ...4 Maintenance 120...
Страница 152: ...RELATED LINKS P 152 Super Cleaning Method When Uneven Color Issues Occur with White Ink 3 Advanced Maintenance 151...
Страница 169: ...5 Troubleshooting Methods 168...
Страница 196: ...6 Appendix 195...


