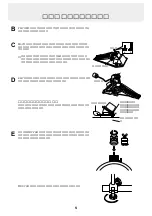
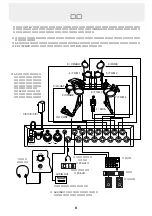
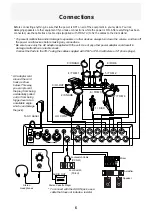
Roland TD-7K Скачать руководство пользователя страница 16

6

Connections

1 / KICK

4 / TOM 1

5 / TOM 2

6 / TOM 3

3 / HI-HAT

2 / SNARE

HH CONT

7 / TOM 4

To AC Outlet

9 / CRASH

8 / RIDE

To prevent malfunction and/or damage to speakers or other devices, always turn down the volume, and turn off 
the power on all devices before making any connections.
Be sure to use only the AC adaptor supplied with the unit. Use of any other power adaptor could result in 
damage, malfunction or electric shock.
Connect the Pads to the TD-7 using the cables supplied with PD-7 or PD-9 (with stereo 1/4" phone plugs).

*  

*  

Before connecting anything, be sure that the power is OFF on all of the equipment in your system. You risk 
damaging speakers or other equipment if you make connections while the power is ON. After everything has been 
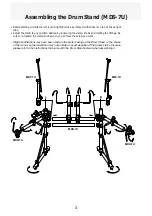
connected, use the cable ties or cable clips (supplied with MDS-7U) to fix the cables to the drum stand.

To connect with the AUX IN jack, use a 
cable that does not include a resistor.

*  

AC adaptor cord 
around the cord 
hook as show 
below. This way, 
you can prevent 
the plug from being 
accidentally pulled 
out (or from being 
tugged over at an 
unsuitable angle, 
which can damage 
the jack).

*  

1/KICK

2/SNARE

3/HI-HAT

1

2

L

R

4/TOM 1

5/TOM 2

6/TOM 3

7/TOM 4

8/RIDE

9/CRASH

HH CONT

FOOT SW

OUT

IN

MIDI

AUX IN

OUTPUT

USE BOSS BRB

ADAPTOR ONLY

12V

1500mA

AC IN

INDIV

PHONES

VOLUME

MAX

MIN

FS-5U

BOSS

FS-5U

BOSS

Stereo

Headphones

Stereo Casette Player

AUDIO OUT

Foot Switch

(FS-5U)

Footswitch Cable
 (PCS-31)

Mixer

Amplifier

Speaker

Содержание TD-7K

Страница 1: ...D 7K TD 7 1 PD 7 4 PD 9 4 KD 7 1 1 FD 7 1 MDH 7U 2 MDY 7U 2 MDS 7U TD 7 218 W 234 D 44 H mm 1350 g PD 7 192 W 230 D 65 H mm 800 g PD 9 254 W x 292 D x 68 H mm 1600g KD 7 172 W 112 D 100 H mm 1410 g FD...

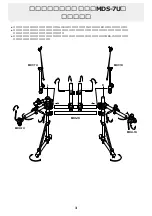
Страница 2: ...KD 7 KD 7 FD 7 MDH 7U MDY 7U 2...

Страница 3: ...3 MDS 7U L R L R MDS 7U MDY 7U MDY 7U MDS 7U R L MDH 7U MDH 7U...

Страница 4: ...4 M5 8 mm TD 7 TD 7 A A B B B B B B D C PD 7 PD 7 PD 7 PD 7 TD 7 PD 9 FD 7 KD 7 MDH 7U PD 9 PD 9 PD 9 E E E E...

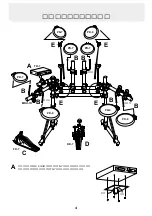
Страница 5: ...5 b a KD 7 FD 7 C D b MDY 7U E PD 7 9 B MDY 7U...

Страница 6: ...OM 1 5 TOM 2 6 TOM 3 3 HI HAT 2 SNARE HH CONT 7 TOM 4 9 CRASH 8 RIDE 1 KICK 2 SNARE 3 HI HAT 1 2 L R 4 TOM 1 5 TOM 2 6 TOM 3 7 TOM 4 8 RIDE 9 CRASH HH CONT FOOT SW OUT IN MIDI AUX IN OUTPUT USE BOSS B...

Страница 7: ...7 TD 7 TD 7 TD 7 32 EXIT 1 32 DATA ENTER EXIT JUMP SYSTEM EDIT 1 2 3 CURSOR CHAIN DATA DOWN UP UP SEQUENCER...

Страница 8: ...ssion 17 Reggae 25 Room 2 Session 10 50 s Rock 18 Drum Solo 26 Power 3 Now Tech 11 Lite 19 Groovy 27 Electronic 4 Quake 12 Scary 20 Live 28 TR 808 5 Guitar Bass 13 Cross Stick 21 The Blues 29 Jazz 6 V...

Страница 9: ...9...

Страница 10: ...98 9 1 10 5 TEL 06 345 9500 1999 1 1 06 6345 9500 530 0004 1 4 16 7F TEL 03 3251 6150...

Страница 11: ...Cymbal Mount x 2 This kit does not include a drum stand Please use the separately available MDS 7U TD 7 Dimensions 218 W x 234 D x 44 H mm 8 5 8 W x 9 1 4 D x 1 3 4 H inches Weight 1350 g 3 lbs witho...

Страница 12: ...d service per sonnel Never use or store the unit in places that are Subject to temperature extremes e g direct sunlight in an enclosed vehicle near a heating duct on top of heat generating equipment o...

Страница 13: ...rotating the fittings Be sure to re tighten the clamp knobs when you achieve the setup you want Slight modifications may have been made in the parts making up the Drum Stand or the shape of the mount...

Страница 14: ...the TD 7 in place using the supplied screws M5 x 8 mm Never use any other screws as damage could result to the TD 7 A A B B B B B B D C PD 7 PD 7 PD 7 PD 7 TD 7 PD 9 FD 7 KD 7 MDH 7U PD 9 PD 9 PD 9 E...

Страница 15: ...he length of the Rod C D When the FD 7 is not going to be used for a long period of time set the Rod as shown in b Do not leave the FD 7 with the Pedal Plate depressed for a long period of time The wa...

Страница 16: ...k damaging speakers or other equipment if you make connections while the power is ON After everything has been connected use the cable ties or cable clips supplied with MDS 7U to fix the cables to the...

Страница 17: ...depress the Hi Hat Control Pedal you can express the range of sound between open and closed hi hats You can also step on the Hi Hat Control Pedal alone to obtain a pedal hi hat sound Changing Patches...

Страница 18: ...fect is obtained by grasping the rim of a pad immediately after you hit it thus silenc ing the sound right after it has been produced The Choke effect cannot be obtained using the PD 5 Patch List Pad...

Страница 19: ...9 MEMO...

Страница 20: ...i Trading Establishment Middle East Commercial Center Al Khobar Dharan Highway P O Box 3631 Al Khober 31952 SAUDIARABIA TEL 03 898 2332 aDawliah Universal Electronics APL P O Box 2154 ALKHOBAR 31952 S...

Отзывы: