Roland Metaza MPX-50 Скачать руководство пользователя страница 28

26

Part 2  Performing Marking

3-3 Starting Marking

Operate Dr. METAZA to send marking data to Metaza.

1

If the power to Metaza is off, press the [STANDBY]
key to switch it on.
Power-on initialization is performed, then operation
stops.

2

From the [File] menu, click [Print].
The [Print] dialog box appears.
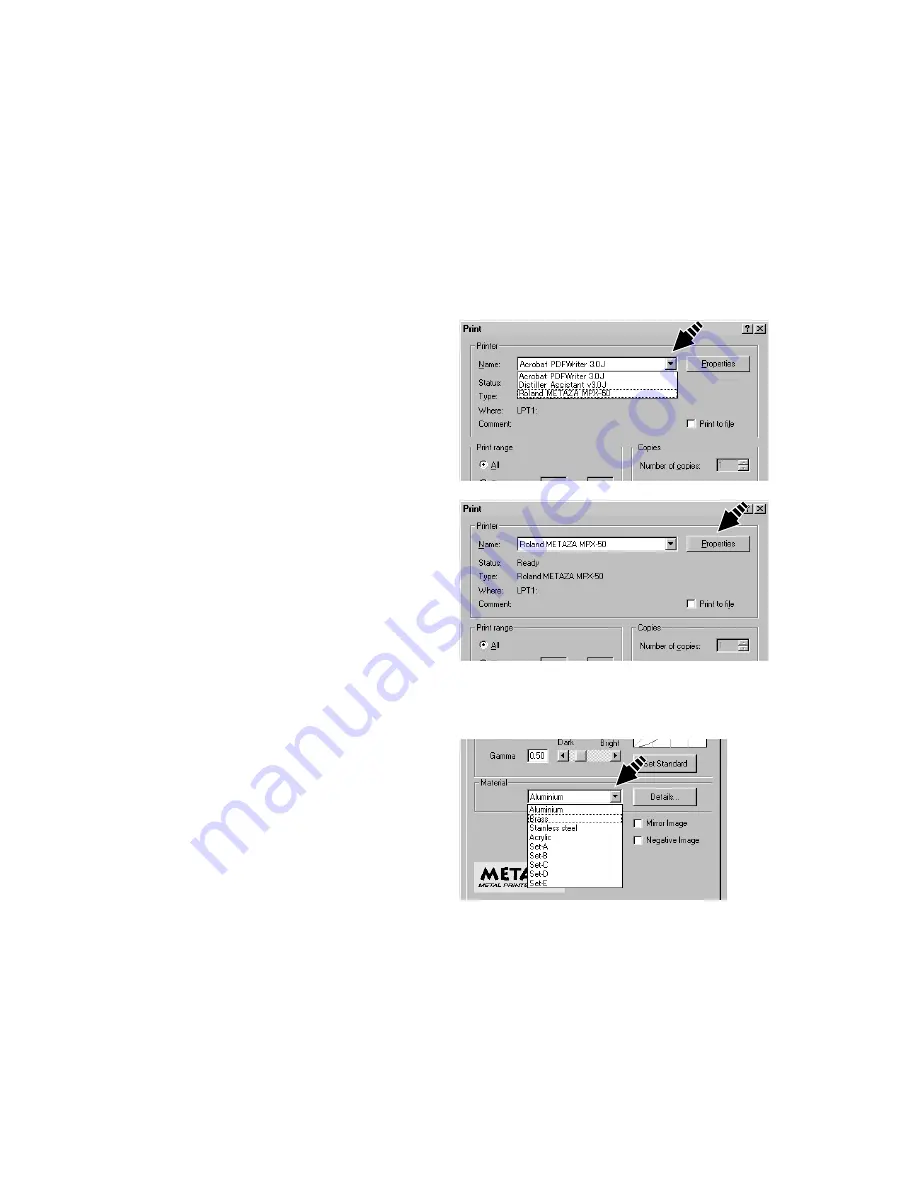
3

Click the drop-down arrow for "Name," then click
[Roland METAZA MPX-50].
If this is already selected, then go on to the next step.

4

Click [Properties].
The [Roland METAZA MPX-50 Properties] dialog
box appears.

5

Click [Image Correction] tab.

6

Click the drop-down arrow in the figure, then click the
composition of the workpiece.
In this example, choose [Brass].

7

Click [OK].
The [Print] dialog box appears again.

8

Click [OK].
The marking data is sent to Metaza, and marking
starts.

Содержание Metaza MPX-50

Страница 1: ...al is prohibited The contents of this operation manual and the specifications of this product are subject to change without notice The operation manual and the product have been prepared and tested as...

Страница 2: ...equipment generates uses and can radiate radio frequency energy and if not installed and used in accordance with the instruction manual may cause harmful interference to radio communications Operatio...

Страница 3: ...35 Registering a Frequently Used Image Symbol 37 Importing an Image from a Scanner 38 Adding a Hand drawn Image or Text 39 Adding a Symbol Image 40 Registering Your Own Original Frames 42 Part 4 Maint...

Страница 4: ...ed within the circle The symbol at left means the unit must never be disassembled The symbol alerts the user to things that must be carried out The specific thing that must be done is indicated by the...

Страница 5: ...ire Do not use with a damaged AC adapter power cord or power cord plug or with a loose electrical outlet Use with any other power supply may lead to fire or electrocution When not in use for several h...

Страница 6: ...ese messages Rating label Do not use with any electri cal power supply that does not meet the ratings dis played on the AC adapter Indicates information to prevent machine breakdown or malfunction and...

Страница 7: ...is exactly analogous to the way a monochrome printer expresses light and dark area by varying the size and arrangement of dots Printer METAZA MPX 50 If the marking force is not varied according to the...

Страница 8: ...hout using commercially available adhesive tape STANDBY LED This lights up when the power is on When it is flashing it indicates that an error has occurred STANDBY key This switches the power on and o...

Страница 9: ...ing The following items are packed together with the unit Check the following to make sure that you received all the items that were shipped along with the unit AC adapter Power cord Roland software p...

Страница 10: ...right To prevent accidents do not install in any of the following types of areas Avoid use in areas subject to strong electric noise Avoid use in areas subject to high humidity or dust The MPX 50 gen...

Страница 11: ...hat to Do Before Marking 1 Connect the commercial printer cable to computer and METAZA 2 Connect power cord to AC adapter 3 Connect AC adapter to AC adapter jack 4 Plug the power cord into an electric...

Страница 12: ...stalling the Driver This driver is only for Windows 98 95 1 Switch on the computer and start Windows 2 Place the included CD ROM in the CD ROM drive The Setup menu appears automatically 3 Click METAZA...

Страница 13: ...o Before Marking 4 Make sure the settings are correct Click Close and finish setting up the driver Continue with installing and setting up Dr METAZA If you aren t setting up Dr METAZA take the CD out...

Страница 14: ...ws 98 16 MB or more 64 MB or more recommended Hard Disk 5 MB or more of free space 1 Place the included CD ROM in the CD ROM drive The Setup menu appears automatically 2 Click Dr METAZA Install The Se...

Страница 15: ...making the following settings Be sure to make the settings before use 1 Click Start and point to Programs Point to Roland Dr METAZA and click Dr METAZA 2 From the File menu click Print Setup The Print...

Страница 16: ...erial Thickness Markable workpiece size general guide Alminium 2 0 mm 0 08 in Length or width of 60 mm 2 3 8 in or less 1 5 mm 0 06 in Length or width of 40 mm 1 9 16 in or less 1 0 mm 0 04 in Length...

Страница 17: ...annot be marked Edge of the material is too high Surface to mark is not straight Shape of the back of the surface to mark When placed on the base the surface to mark must be flat and level Examples of...

Страница 18: ...tion Definition Bitmap Data and Vector Data Bitmap data uses a format that represents images as a collection of dots points Bitmap data is sometimes called bitmapped graphics or raster data Most paint...

Страница 19: ...Powder or dust on the adhesive sheet can reduce the sheet s adhesive force making it impossible to secure material in place If the adhesive force has been reduced then wash the adhesive sheet Washing...

Страница 20: ...until the leveler completely touches the top surface of the base There is no need to use excessive force 6 While pressing down with the leveler tighten the screw When tightening the screw be careful...

Страница 21: ...import mark In this example we ll use Dr METAZA as the design tool for the marking data If you re using a commercially available program to prepare the data refer to the user s documentation for the...

Страница 22: ...in or zoom out for the image Material The combined black and gray areas indicate the workpiece To decide on the size and shape of the workpiece then from the File menu click Material Setup Grid This...

Страница 23: ...e menu click New The Material Setup dialog box appears 2 Enter the outer dimensions of the workpiece Here enter 30 for both Height and Width 3 Choose the shape of the workpiece If the shape is a circl...

Страница 24: ...down arrow for Files of type then select the file format of the image 3 Select the desired file then click Open The specified image is imported and displayed on the screen 4 If you want to use only a...

Страница 25: ...lick 2 Click the location where you want to insert text The Text Properties dialog box appears 3 Enter the text in Text In this example enter Congratulation as the text 4 Click Change Font The Font di...

Страница 26: ...s as you want it click OK 7 Drag the text to position it at the desired location Save the file When you re finished creating the marking data save it in a file 1 From the File menu click Save The Sav...

Страница 27: ...rom the File menu click Print Preview The Preview window appears Click to close the Preview window Change the display scale Drag to change the display position Click to send the marking data to Metaza...

Страница 28: ...ialog box appears 3 Click the drop down arrow for Name then click Roland METAZA MPX 50 If this is already selected then go on to the next step 4 Click Properties The Roland METAZA MPX 50 Properties di...

Страница 29: ...inters 2 Double click the Roland METAZA MPX 50 icon 3 From Printer menu click Purge Print Jobs or Cancel to stop sending data 4 Even when transmission of marking data is stopped Metaza doesn t stop ri...

Страница 30: ...he image unevenness in darkness may occur This performs adjustment when the marking results are not what you intended See Part 5 Images are unattractive This returns the corrected image values to the...

Страница 31: ...values taken from the results of marking the test pattern This marks the test pattern for adjusting tilt using Metaza For information about how to adjust the tilt of the base see Part 5 The image at...

Страница 32: ...e workpiece from the base If the workpiece is difficult to detach inserting a thin flat object such as a piece of sheet metal or a piece of stiff paper between the adhesive sheet and the material may...

Страница 33: ...e with a Scanner Use a TWAIN_32 compliant scanner to scan the shape outline of the workpiece If you are using a flat bed scanner you can scan the workpiece as it is If you are using another type of sc...

Страница 34: ...at meets the offer conditions Number of colors Binary black and white Fill the interior of the shape with black and make other portions white or uncolored Resolution 203 dpi is recommended When set at...

Страница 35: ...ck the drop down arrow for Files of type then select the file format of the image 3 Select the desired file then click Open The Add Material dialog box appears 4 Type a name of shape 5 Enter the size...

Страница 36: ...rs If you re not satisfied with the trimming area you can do it over as many times as you like However you can only redo the operation after importing the image until you quit Dr METAZA To change the...

Страница 37: ...achieve an effect like placing a photo or painting in a frame Choose the one you want from among the registered frame shapes and colors 1 From the Object menu click Frame The Frame dialog box appears...

Страница 38: ...36 Part 3 Dr METAZA Guide 3 To change the frame size drag the pointers 4 To change the frame location drag the frame...

Страница 39: ...nu click Add Parts Symbol The Open dialog box appears 2 Select the desired file then click Open The Add Symbol dialog box appears 3 To show the image underneath when a symbol is inserted specify a tra...

Страница 40: ...er and installing the scanner driver refer to the user s documentation for the scanner 1 From the File menu click Acquire The screen for the scanner driver appears 2 Operate the scanner driver to scan...

Страница 41: ...paper see Importing an Image from a Scanner 1 Click 2 Drag the mouse to draw the picture or write text 3 To change the pen width or color from the Object menu click Pen Setup The Pen Setup dialog box...

Страница 42: ...bol Image This adds images registered as symbols to the editing screen 1 From the Object menu click Symbol The Symbol dialog box appears 2 Click on a symbol image to choose it then click Insert The sy...

Страница 43: ...41 Part 3 Dr METAZA Guide 3 To change the image size drag the pointers 4 To change the image location drag the image...

Страница 44: ...recommend using only about 16 colors Use clearly defined borders between transparent colors and other colors 1 From the Object menu click Add Parts Frame The Open dialog box appears 2 Select the desir...

Страница 45: ...remely dirty then wash the sheet 1 Press the STANDBY key to switch off the power 2 Grasp the base on both sides and pull back toward you to remove 3 Grasp the edges of the adhesive sheet and slowly pe...

Страница 46: ...heet so that both rounded corners are at the top of the base Be careful not to allow any air bubbles to be trapped between the base and the adhesive sheet 8 Press down gently on the adhesive sheet at...

Страница 47: ...ver is set to the port where the printer cable is connected If the computer has only one port select LPT1 for the port setting Is the correct type of cable used The type of parallel cable printer cabl...

Страница 48: ...and perform overstriking at the same location Change the driver settings and continue marking until you obtain the darkness you want White is reproduced but grayscale tones are faint Choose a custom w...

Страница 49: ...due to tilt is often hard to detect near the center of the base and tends to become more conspicuous at distances increasingly farther away from the center especially with larger images Adjustment fo...

Страница 50: ...oward you to remove 5 10 10 15 15 20 20 5 5 5 10 15 20 10 15 20 6 Use the scale to read and note down locations where the test pattern is not continuous or not visible Note down the values in all four...

Страница 51: ...r METAZA and in the Sample folder open Axis dmz 3 Perform marking 4 Grasp the base on both sides and pull back toward you to remove When doing this be careful to ensure that the loaded position of the...

Страница 52: ...oted in step 5 as the Offset width and length Important When you open the properties for a driver from a program such as Dr METAZA any values you set are temporary and are not saved To save the settin...

Страница 53: ...wer consumption Exclusive AC adapter DC 19V 2 1A Acoustic noise level Under 70 dB A According to ISO 7779 Operation temperature 10 to 30 C 50 to 86 F Operation humidity 35 to 80 no condensation Extern...

Страница 54: ...52 MEMO...

Страница 55: ...ram module or literature 2 Reverse engineering disassembling decompiling or any other attempt to discover the source code of the Software 3 Bounds of License Roland does not grant you to sub license r...

Отзывы: