background image


38


Performing


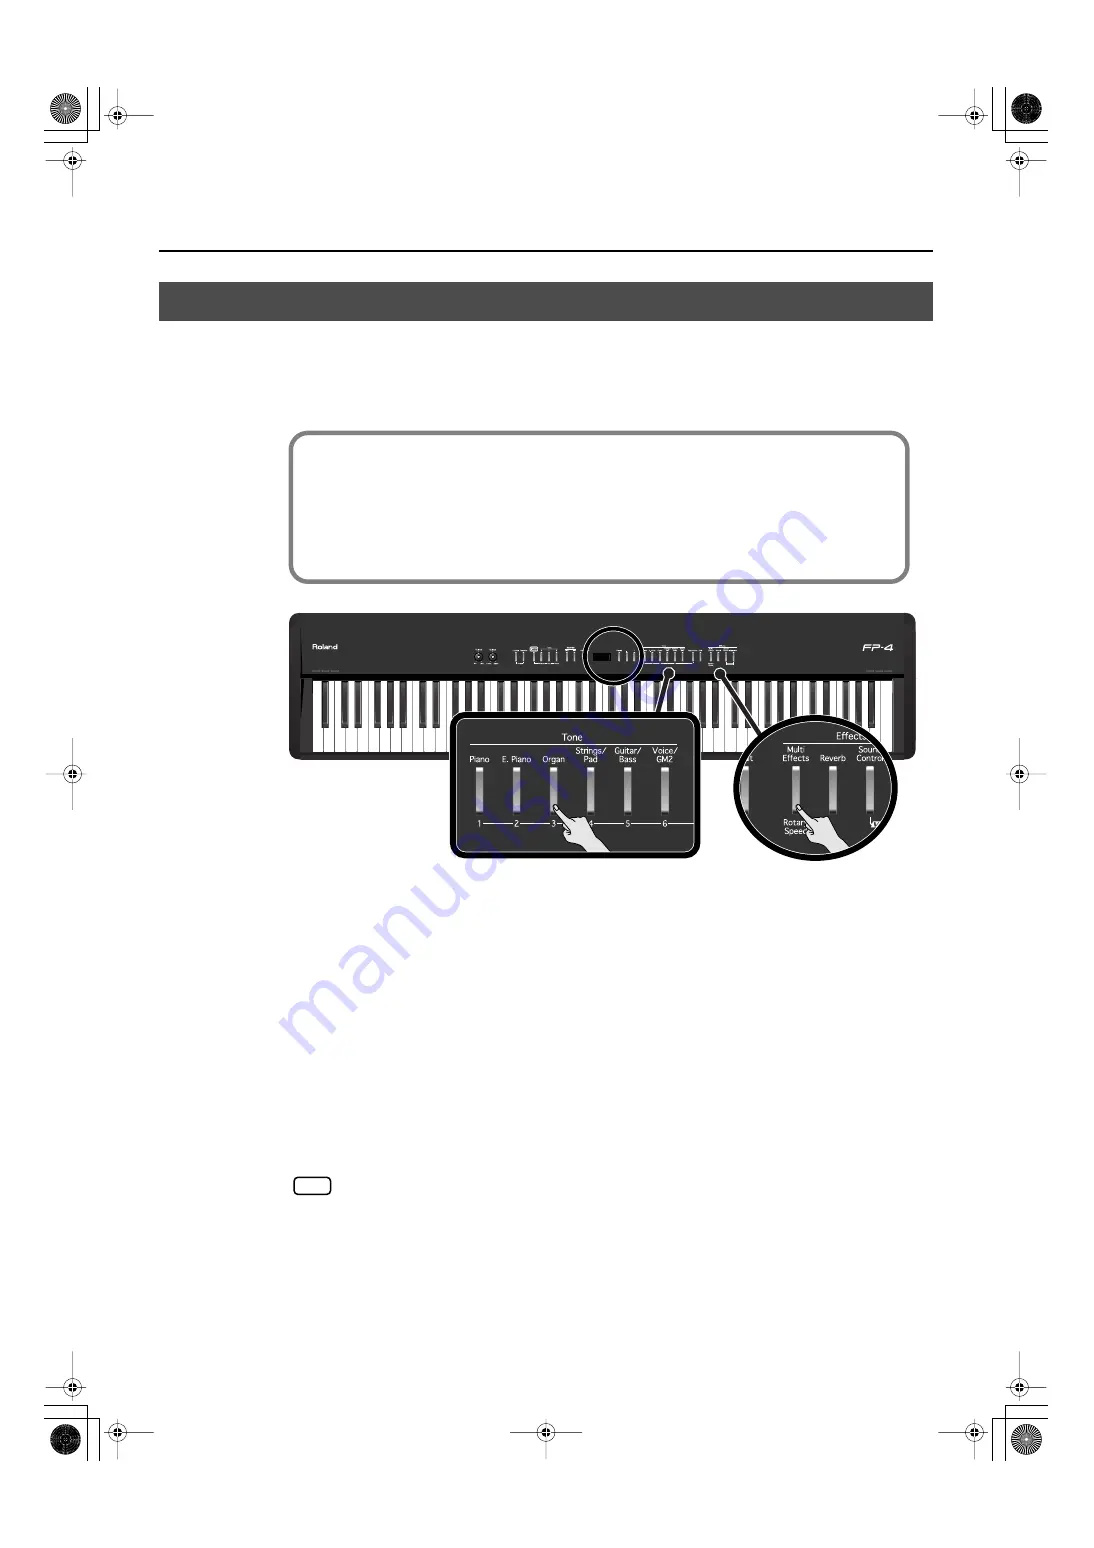
The Rotary effect is applied to some Organ tones you can select with the [Organ] button. 
When one of these tones is selected, you can use the [Multi Effects] button to change the 
speed of the rotary effect.


fig.Panel-Rotaty.eps


1.


Press the [Organ] button and select the organ tone. 


When a tone that has the Rotary effect added is selected, the [Multi Effects] button flashes or 
blinks.


2.


Each time pressing the [Multi Effects] button, switch the speed of the rotary 
effect between rapid and slow rotation.


Pressing the [Multi Effects] button toggles the rotary effect between fast and slow rotation.
If the [Multi Effects] button is blinking rapidly, the rotary effect is being applied with the fast 
rotational speed. If the [Multi Effects] button is blinking slowly, the rotary effect is being applied 
with the slow rotational speed.

If you don’t want the rotary effect to be applied, select an effect type other than the 
rotary effect (p. 83), then turn off the effect (p. 37).


Adding a Spinning Sound to Organ Tones (Rotary Effect)

What’s the Rotary Effect?

What the rotary effect does is to add a “spinning” effect similar to the sound of an organ 
using a rotating speaker. 

In most rotary speakers, the high-frequency speaker and low-frequency speaker rotate at 
different speeds. The FP-4 can simulate this complex type of modulation.

NOTE

FP-4-e.book 38 ページ 2007年5月24日 木曜日 午後7時10分

Содержание FP-4

Страница 1: ...07 06 4N 04453567 DIC 90 0 4 4 5 3 5 6 7 0 4 ...

Страница 2: ...Cover1 4 ...

Страница 3: ...onary statements that you must be sure to read The numbers of pages that you can turn to for additional related information are given like this p This document uses screen shots for explanatory purposes Please be aware that the settings in these explanatory screen shots may not match the actual factory settings Tone names etc Copyright 2006 ROLAND CORPORATION All rights reserved No part of this pu...

Страница 4: ... presence of these sounds are faithfully reproduced through the high quality speakers of the FP 4 Session Partner lets you enjoy session style playing You can play the piano along with realistic rhythms to enjoy session style performances Since suitable chord progressions are assigned to each rhythm simply selecting a rhythm will automatically choose the appropriate chord progression Registrations...

Страница 5: ...ning Sound to Organ Tones Rotary Effect 38 Transposing the Key of the Keyboard Key Transpose 39 Performing with the Metronome 40 Changing the Tempo 41 Changing the Volume 41 Adding Liveliness to the Sound Sound Control 42 Changing the Tonal Quality Equalizer 43 Changing the Equalizer Type 43 Playing Along with Rhythms 44 What is Session Partner 44 Performing Along with Session Partner 45 Changing ...

Страница 6: ...he Chord Display On or Off 90 Initializing Formatting Memory 90 Initializing Internal Memory 90 Metronome Setting 91 Changing the Beat of Metronome 91 Other Settings 91 Restoring the Factory set Condition Factory Reset 91 Disabling the Buttons Panel Lock 92 Using the V LINK Function 92 Connecting Other Equipment 93 Connecting Audio Equipment 94 Sending the Sound to External Speakers 94 Listening t...

Страница 7: ... Do not use the included power cord with any other device Do not bend the power cord or place heavy objects on it 009 Do not bend the power cord excessively or place heavy objects on the power cord Doing so will damage the power cord and may cause short circuits or faulty connections possibly resulting in fire or electrical shock Do not share an outlet with an unreasonable number of other devices ...

Страница 8: ... into the device may cause it to malfunction and may cause short circuits or faulty operation Place in a well ventilated location 101b When using this device and AC adaptor ensure that it is placed in a well ventilated location Grasp the plug when connecting or disconnecting the power cord 102c Always grasp only the plug on the AC adaptor cord when plugging into or unplugging from an outlet or thi...

Страница 9: ...110b Whenever you suspect the possibility of lightning in your area disconnect the AC adaptor from the outlet Keep small items out of the reach of children 118c To prevent small items such as the following from being swallowed accidentally keep them out of the reach of children Included items Music rest attachment screws Don t touch parts that get hot 119 The area near the power switch may become ...

Страница 10: ...or an extended time This can cause deformation or color change 358 Do not leave objects on top of the keyboard This can cause malfunctions such as failure to sound 359 Do not affix adhesive labels to this device The exterior finish may be damaged when you remove the labels 360 Depending on the material and temperature of the surface on which you place the unit its rubber feet may discolor or mar t...

Страница 11: ...t manufacturer may cause this device to malfunction 562 Some connection cables contain a resistor Do not connect such cables to this device Doing so may make the volume extremely low or inaudible Please use connection cables not containing a resistor 203 GS is a registered trademark of Roland Corporation Add XG lite is a registered trademark of Yamaha Corporation 204 Microsoft and Windows are regi...

Страница 12: ...tton switches on off the Session Partner function p 45 By switching Session Partner on you can produce an rhythm in a variety of styles Track Buttons These buttons switch the performance part when playing a song p 25 These buttons also switch Session Partner s performance parts chord progression patterns and rhythm patterns p 47 p 50 p 53 Play Button Starts and stops playback of internal songs and...

Страница 13: ...ations Registration Button This button lets you store your favorite performance settings such as those for the selection of tones Session Partner p 56 Split Button Allows you to play different tones in the left and right sides of the keyboard p 31 Multi Effects Button This button lets you apply various effects to the sound p 37 Reverb Button You can use this to add the characteristic reverberation...

Страница 14: ... musical instrument and listen to the connected device through the FP 4 s speakers p 95 Output Jacks You can connect external speakers here to reproduce the FP 4 s sound p 94 p 96 Speaker Switch This switch turns the internal speaker on off p 94 Power Switch Turns the power on off p 16 DC In Jack Connect the supplied AC adaptor here p 15 Cord Hook Use this to fix in place the cord from the supplie...

Страница 15: ...trong pressure to it Depending on the circumstances of a particular setup you may experience a discomforting sensation or perceive that the surface feels gritty to the touch when you touch this device This is due to an infinitesimal electrical charge which is absolutely harmless However if you are concerned about this connect the ground terminal see figure with an external ground When the unit is ...

Страница 16: ... and the Piano and other buttons will light 3 Use the Volume knob to adjust the volume p 17 The unit becomes operable and playing the keyboard produces sound Due to a circuitry protection feature this unit requires a few moments after power is turned on before it is ready for normal operation Turning the Power Off 1 Turn the Volume knob all the way toward the left to minimize the volume fig Volume...

Страница 17: ...t two locations as shown in the illustration fig MusicRest eps 2 Place the music rest between the screws and the chassis fig MusicRestScrew eps 3 While using one hand to support the music rest tighten the screws two locations to fasten the music rest firmly in place fig MusicRest eps When attaching the music rest you must use your hand to support it firmly so that it does not fall Be careful not t...

Страница 18: ...r than the ones you actually play to vibrate in sympathy with what you ve played producing a rich resonance The FP 4 simulates this sympathetic vibration damper resonance Set the switch on the included pedal to Continuous when the pedal is connected Sostenuto Pedal The notes you are pressing when this pedal is depressed will be sustained With the pedal connected to the Sostenuto FC1 jack it can be...

Страница 19: ...the FP 4 s Volume knob p 17 to adjust the headphone volume Cautions when Using Headphones To prevent damage to the cord s internal conductors avoid rough handling When using headphones mainly try to handle either the plug or the headset Your headphones may be damaged if the volume of a device is already turned up when you plug them in Minimize the volume before you plug in the headphones Excessive...

Страница 20: ... be output fig Panel Demo eps Listening to Demo Songs Button Indication Composer Copyright Piano Masasi Kazuko Hirashita 2006 Roland Corporation E Piano Masasi Kazuko Hirashita 2006 Roland Corporation Organ Masasi Kazuko Hirashita 2006 Roland Corporation Strings Pad Masasi Kazuko Hirashita 2006 Roland Corporation Guitar Bass Masasi Kazuko Hirashita 2006 Roland Corporation Voice GM2 Masasi Kazuko H...

Страница 21: ...r button or the Play button The songs will play consecutively starting with the demo song you selected The button for the song currently being played back flashes on and off When playback of the last song is reached playback continues by returning to the first song and playing that again The display will show the name of the currently playing demo song fig d Pno eps 3 To stop playback press the fl...

Страница 22: ...ate between showing the currently selected tone number the currently selected song number a U or P is shown before the number the currently selected rhythm number an r is shown before the number and tempo If you press the Display button while using Session Partner the rhythm number tempo and tone number will be alternately shown 2 Press the or button to select the song The character P is shown bef...

Страница 23: ...once again will return you to the preceding song Here s how to adjust the volume when song is playing back 1 While holding down the Play button press the or button fig d SPvolume eps The song volume can be set to any value from 0 to 127 While you hold down the Play button the display will show the volume of the song You can not change the volume of the demo song You can also adjust the volume of t...

Страница 24: ...ngs will play back successively starting with the selected song When the last song finishes playing the instrument will return to the first song and playback will continue If you selected an internal song it will return to internal song number 1 If you selected an internal memory song it will return to internal memory number 1 To Stop Playback 4 Press the Play button so its illumination is turned ...

Страница 25: ...lay back the song the right hand part will not play If you again press the button you selected in step 3 so the button is lit the sound of that part will be heard Even while the song is stopped you can press the track buttons to mute or un mute the sound 4 Press the Play button to stop playback Mute settings will be cleared when you switch songs Listening to Each Part Separately Track Mute The per...

Страница 26: ...hold down the track button fig d Guide30 eps The track mute volume can be set to any value from 0 to 80 When you turn off the power the track mute volume setting will return to 0 You can also adjust the track mute volume by turning the Balance knob while you hold down the track button Determining the Volume of a Muted Track NOTE When the following appears in the display If there is the performance...

Страница 27: ... song will play The selected song is played to the end and then playback stops To stop playback press the Play button once more The next time you press the Play button playback will resume from the point at which you stopped If playback has stopped at the end of the song playback will start from the beginning of the song If the song select screen is displayed pressing the button will return you to...

Страница 28: ... pressed to select registrations If you want to select a tone press the Registration button to turn off its light 1 Press a Tone button to select a tone group Try fingering the keyboard You ll hear a tone of the selected tone group The display will indicate the number of the currently selected tone fig d 1 eps 2 Use the buttons to select a variation tone from the tone group The Tone you ve selecte...

Страница 29: ...pper Tone and the one for the Tone button you pressed after that is called the Lower Tone The display will show the tone number of the upper tone fig d 1 eps Here the piano tone is the Upper Tone and the strings tone is the Lower Tone Turning Off Dual Play 1 Press any one of the Tone buttons Now you ll hear only the tone of the button you pressed You can change the pitch of the Lower Tone an octav...

Страница 30: ... If you re using Split play pressing two Tone buttons won t switch you to Dual play Changing the Upper Tone 1 Press the or button Changing the Lower Tone 1 Hold down the Tone button for the Lower Tone and press the or button The display will show the tone number of the lower tone Changing the Tone Variations FP 4 e book 30 ページ 2007年5月24日 木曜日 午後7時10分 ...

Страница 31: ... 4 eps When the Registration button is lit Tone buttons 1 6 can be pressed to select registrations If you want to select a tone press the Registration button to turn off its light 1 Press the Piano button Now the piano tone is selected 2 Press the Split button getting its indicator to light The keyboard will be divided into left and right sides The F 3 key forms the division between the left and r...

Страница 32: ...ch part is to have priority when the effects assigned to the Upper Tone and Lower Tone differ Refer to Setting the Part to Which Effects Are Added p 84 Changing the Upper Tone 1 Press the Tone button to choose a tone group 2 Press the or button to select a variation tone Changing the Lower Tone 1 Hold down the Split button and press the Tone button to choose a tone group 2 Hold down the Split butt...

Страница 33: ...es the split point and appears in the display fig d spltpoint eps The key being used as the split point belongs to the left hand section of the keyboard The name of the key acting as the split point is indicated in the display as shown below fig Chart note eps The number of the lower tone is displayed while you hold down the Split button Changing the Keyboard s Split Point Split Point Power up def...

Страница 34: ...ance eps 1 Use the Balance knob to adjust the volume balance Turning the knob toward the left toward Lower increases the volume of the Lower tone Turning the knob toward the right toward Upper increases the volume of the Upper tone Changing the Volume Balance for Dual Play and Split Play FP 4 e book 34 ページ 2007年5月24日 木曜日 午後7時10分 ...

Страница 35: ...en the Key Touch is Set to OFF p 87 You can adjust the keyboard touch sensitivity in the Function screen p 86 Adjusting the Keyboard Sensitivity Key Touch Setting Description OFF The sound plays at one set volume regardless of the force used to play the keys Light You can achieve fortissimo ff play with a less forceful touch than usual so the keyboard feels lighter This setting makes it easy to pl...

Страница 36: ...ress the Reverb button so its light is turned off You can select from ten levels of depth for the reverb effect 1 Hold down the Reverb button and press the or button The depth for the reverb effect appears in the display fig d 2 eps You cannot make separate reverb effect depth settings for each individual tone The same depth of reverb effect will apply to all sounds You cannot change reverb effect...

Страница 37: ...tomatically You can change the effect type Refer to Changing the Effect Type p 83 Editing the Effect Settings in Detail You can make detailed changes for each effect such as adjusting the effect depth 1 Hold down the Multi Effects button and use the buttons to edit the setting The value of the effect setting applied to the currently selected sound is displayed Turning Off the Effects 1 Press the M...

Страница 38: ...and slow rotation If the Multi Effects button is blinking rapidly the rotary effect is being applied with the fast rotational speed If the Multi Effects button is blinking slowly the rotary effect is being applied with the slow rotational speed If you don t want the rotary effect to be applied select an effect type other than the rotary effect p 83 then turn off the effect p 37 Adding a Spinning S...

Страница 39: ...ranspose button held down you can change the value even by pressing the or button The available range is 6 0 5 If the Key Transpose value is not 0 you can use the Transpose button to turn the Key Transpose function on off When you release the Transpose button you return to the previous screen By holding down the Transpose button and pressing both the and buttons simultaneously the setting returns ...

Страница 40: ... tempo and time signature of that rhythm fig Panel Metronome eps 1 Press the Metronome button so it s lit The Metronome button flashes in red and green in time with the beat selected at that time The indicator lights in red on the downbeats and in green on weak beats Stopping the Metronome Function 1 Press the Metronome button so its light is turned off You can change the beat of metronome Please ...

Страница 41: ...he Display button while using Session Partner the rhythm number tempo and tone number will be alternately shown The volume of the metronome can be adjusted with ten volume levels available This is set to 5 when the instrument is turned on 1 While holding down the Metronome button press the or button to adjust the volume The display will indicate the metronome volume fig d MetroVol eps When the met...

Страница 42: ...e the FP 4 remember whether the Sound Control button should be on or off when you turn on the power p 84 For some sounds this may cause distortion If the sound distorts refer to Adjusting the Volume Master Gain p 85 The Sound Control function is not applied to the sounds of external devices connected to the Input jacks Adding Liveliness to the Sound Sound Control Setting Type Description 1 Sharp C...

Страница 43: ... the tonal character The FP 4 provides four equalizer settings 1 While holding down the Equalizer button press the or button to select the equalizer type fig d 1 eps You can make more exacting changes to the equalizer settings Please refer to the Changing the Equalizer Settings p 85 Changing the Tonal Quality Equalizer Changing the Equalizer Type Setting Description 1 The high frequencies will be ...

Страница 44: ...lowing things Play piano with a session like feel along with Rhythms while the chord progression continues automatically p 45 Play the piano to provide your own accompaniment as you specify chords with the left hand the left part of the keyboard p 51 Enjoy freer piano performances using your own original chord progressions p 54 Session Partner lets you add accompaniment with the rhythms and perfor...

Страница 45: ...ro the Track R button will blink The chord is shown in the display The chord progression advances automatically freeing you up to play the melody fig d C eps The chord name will blink slightly before the chord changes When you press the Session Partner button to make the Session Partner play the chords will be shown as the chord progression continues so the setting that had been shown until then w...

Страница 46: ...once again during the intro or ending the performance will stop immediately You can change the rhythm that will sound Rhythm List p 116 You can set the Chord display on or off Setting the Chord Display On or Off p 90 You can also specify the chords to be played in a Rhythm Performing with the Chord Progression Specified in the Left Hand Chord Progression Off p 51 You can change the chord progressi...

Страница 47: ...part to be played 1 Press the Session Partner button so Session Partner starts playing 2 Press the Track 1 The part or group of parts enabled for performance changes each time you press the Track 1 button as shown below Stopping the Session Partner Performance 1 Press the Session Partner button When you press the Session Partner button an ending will be played and then Session Partner will stop Ch...

Страница 48: ...2 Press the or button to select the Rhythm For more information on the different Rhythm type refer to Rhythm List p 116 Changing Rhythms As You Perform If you change Rhythms while a Rhythm is being played the selected Rhythm begins after the fill in is played The Track R button will blink while the fill in is playing Selecting a Rhythm What s a Fill In A short improvisational phrase inserted at th...

Страница 49: ...2 Press the or buttons to adjust the tempo The tempo is set in terms of the value of a quarter note with possible values ranging from 10 up to 500 When the Session Partner button is pressed the Rhythm is played at the selected tempo If you change the Rhythm during Session Partner play the tempo won t change At such times you can set it to the optimal tempo by getting the tempo to appear in the dis...

Страница 50: ...played while you hold down the Track 2 button fig d 12 eps If you change the chord progression pattern during the performance a fill in will be played and then the performance will begin using the selected chord progression Stopping the Session Partner Performance 1 Press the Session Partner button When you press the Session Partner button an ending will be played and then Session Partner will sto...

Страница 51: ...board will no longer produce sound 3 Use the left side of the keyboard to specify a chord and play a melody in the right side fig ChordProgOff eps It is not necessary to continue holding down the keys for chords in the left side Even after you release the key the same chord continues until the next chord is played You can specify chords simply with your finger even without playing the keys for all...

Страница 52: ...r button will go out You can change the performance settings by using your left hand to specify a chord before Session Partner begins playing 1 While holding down the Session Partner button press the Track 2 button so the Track 2 button s illumination is turned off The Split button will light The Session Partner button will blink and the instrument will wait for the performance to begin 2 Use the ...

Страница 53: ...half when you want to build excitement fig Panel Session 5 eps 1 Press the Session Partner button so Session Partner starts playing 2 Press the Track R button to make it light or go out The Track R button will blink while the fill in is playing Stopping the Session Partner Performance 1 Press the Session Partner button When you press the Session Partner button an ending will be played and then Ses...

Страница 54: ...ress the Session Partner button to stop recording the chord progression Recorded chord progression patterns are saved to You can select patterns by pressing the button when pattern number 1 is displayed You can record a chord progression of up to sixteen measures However when the instrument is shipped from the factory this is set so that eight measures can be recorded Recording will stop automatic...

Страница 55: ...er this is set to eight measures fig Panel Session 7 eps 1 Hold down the Session Partner button and press the Rec button The UCP User Chord Progression appears in the display fig d UserChordProg eps 2 Press the button The display will show the number of measures for which you will record a chord progression fig d RhythmMeasure eps 3 Use the buttons to select the desired number of measures You can ...

Страница 56: ...Registration Favorite Performance Settings Tone setting Session Partner setting etc Registration Sets You can save up to 25 sets FP 4 Internal Memory Registrations you can access with buttons Variation 1 4 1 1 2 1 3 1 4 1 5 1 6 1 1 2 2 2 3 2 4 2 5 2 6 2 1 3 2 3 3 3 4 3 5 3 6 3 1 4 2 4 3 4 4 4 5 4 6 4 1 1 2 1 3 1 4 1 5 1 6 1 1 2 2 2 3 2 4 2 5 2 6 2 1 3 2 3 3 3 4 3 5 3 6 3 1 4 2 4 3 4 4 4 5 4 6 4 1 ...

Страница 57: ...he factory Registration from 6 1 to 6 4 include the Basic Registration Use this when creating registration from scratch For details on the settings that are saved as a registration refer to Settings Stored in a Registration p 128 fig Panel RegistSave eps Specifying the Storage Destination for the Registration 1 Make the desired Session Partner settings and tone settings 2 While holding down the Re...

Страница 58: ...urn off the power while settings are being saved If you do so the FP 4 s internal memory will be destroyed rendering it unusable You can return the content saved at a Registration button to the factory set condition Refer to Restoring the Factory set Condition Factory Reset p 91 To select the performance settings you saved refer to Recalling a Registration p 59 NOTE FP 4 e book 58 ページ 2007年5月24日 木...

Страница 59: ...ration from scratch For details on the settings that are saved as a registration refer to Settings Stored in a Registration p 128 fig Panel RegistSave eps 1 Press the Registration button 2 Press one of the buttons from 1 to 6 to select the button at which you saved the desired registration fig d RegistVar eps 3 Use the buttons to select the registration variation fig d RegistVar2 eps The performan...

Страница 60: ...ing a Place to Store the Registration Set 4 Use the buttons to select the storage destination A dot is displayed following numbers in which a registration set has already been saved as shown below fig d 001 eps If you select a number in which a registration set has already been saved the previously saved registration set will be erased If you don t want to delete the previously saved registration ...

Страница 61: ...ing saved If you do so the FP 4 s internal memory will be destroyed rendering it unusable You can return the content saved at a Registration button to the factory set condition Refer to Restoring the Factory set Condition Factory Reset p 91 To recall the saved performance settings refer to Loading a Registration Set You Saved p 62 NOTE FP 4 e book 61 ページ 2007年5月24日 木曜日 午後7時10分 ...

Страница 62: ... the Track R button use the buttons to get the following indication fig d Registload eps 4 Use the buttons to select the number of the registration set that you want to load If no registration set has been saved in internal memory is shown in the display Loading the Registration Set 5 Press the Rec button The registration set will be loaded to the Registration button Never turn off the power while...

Страница 63: ...istdel eps 4 Use the buttons to select the number of the registration set that you want to delete If no registration set has been saved in internal memory is shown in the display Deleting the Registration Set 5 Press the Rec button The registration set you selected will be deleted Never turn off the power while settings are being deleted If you do so the FP 4 s internal memory will be destroyed re...

Страница 64: ...tton use the buttons to get the following indication fig d RegistShift eps 4 Use the buttons to change the setting Using a Pedal to Switch Registrations Setting Description Pressing a pedal connected to the FC2 connector or FC1 connector will not switch registrations The functions assigned to the FC2 jack and FC1 jack will be available for use p 82 The pedal connected to the FC2 jack can be used o...

Страница 65: ...ack Buttons Track buttons Description Blinking The performance will be recorded If performance data already exists the existing performance will be erased and replaced as the new recording proceeds Lit The performance will not be recorded During recording the performance located at this track button will play back Unlit The performance will not be recorded This track does not contain performance d...

Страница 66: ...s the Rec button The Rec button lights the Play button begins flashing and the FP 4 is put into recording standby If you decide not to record press the Rec button once again Starting Recording 4 Press the Play button After two measures of count sound recording begins Recording starts when you start playing the keyboard without pressing the Play button In this case a count is not sounded When recor...

Страница 67: ...ting to a Computer via the USB MIDI Connector p 98 NOTE You can change the tone used in recording Performing with a Variety of Sounds p 28 You can change the tempo and set the beat for the song Changing the Tempo p 41 Changing the Beat of Metronome p 91 You can use the FP 4 s metronome function In this case the metronome sound is not recorded Performing with the Metronome p 40 Track Button Assignm...

Страница 68: ...n change the tone used in performances p 28 and change the tempo at which songs are played back p 41 You can also play the metronome sound while recording p 40 Settings for Recording 2 Press the Rec button If you decide not to record press the Rec button once again 3 Press the button of the track you want to record so the button is blinking Recording Your Playing Along with a Song Track buttons De...

Страница 69: ...performance will play back 8 Press the Play button once again to stop playback The recorded performance will disappear when you turn off the power If you want to keep the performance you recorded you must save it in internal memory Refer to Saving the Songs You Record p 76 You can save your recorded songs on an external sequencer or computer Refer to Connecting to MIDI Devices p 99 and Connecting ...

Страница 70: ... the Display button several times so it s lit in green 4 Press the button several times to get the following display fig d USr eps 5 Press the Rec button The Rec button will light the Play button will blink and the instrument will enter recording standby mode If you decide not to record press the Rec button once again Starting Recording 6 Start the Session Partner performance p 45 p 51 The Rhythm ...

Страница 71: ...ss the Play button once again to stop playback The recorded performance will disappear when you turn off the power If you want to keep the performance you recorded you must save it in internal memory Refer to Saving the Songs You Record p 76 You can save your recorded songs on an external sequencer or computer Refer to Connecting to MIDI Devices p 99 and Connecting to a Computer via the USB MIDI C...

Страница 72: ...f you decide to re record an existing song select that song Performance Settings 1 Press the Rec button The Rec button will light the Play button will blink and the instrument will enter recording standby mode If you decide not to record press the Rec button once again 2 Press the button of the track you want to record so the button is blinking Recording Selected Track Buttons Track buttons Descri...

Страница 73: ...nd metronome settings will remain as they were for the first recording Listening to the Recorded Performance 5 Press the button to return to the beginning of the song you recorded 6 Press the Play button The recorded performance will play back 7 Press the Play button once again to stop playback The recorded performance will disappear when you turn off the power If you want to keep the performance ...

Страница 74: ... recording track If none of the track buttons R 1 2 buttons has performance data the data will be recorded to button 2 If any of the track buttons have performance data the data will be recorded in the order of button 2 button 1 button R When you record with a specified recording track Your performance will be recorded on the track you ve specified Track button Performance recorded Track R button ...

Страница 75: ...e Rec button The recorded performance is erased After playing back a song you can hold down one of the track buttons and press the Rec button to erase the performance of only that track At this time the display will indicate USr If you erase the performance from all tracks the display will indicate USr A performance you recorded will be deleted automatically when you turn off the power Erasing Rec...

Страница 76: ...buttons to get the following display fig d Songsave eps 5 Use the buttons to select the save destination song number As shown below a dot is shown following numbers in which a song has already been saved fig d 001 eps If you select a number in which a song has already been saved and then save your new song the previously saved song will be overwritten and lost If you don t want to delete the previ...

Страница 77: ...the buttons to get the following display fig d Songdel eps 4 Use the buttons to select the song number that you want to delete Deleting the Song 5 Press the Rec button The selected song will be deleted Never turn off the power while a song is being deleted If you do so the FP 4 s internal memory will be destroyed rendering it unusable Deleting a Saved Song NOTE FP 4 e book 77 ページ 2007年5月24日 木曜日 午後...

Страница 78: ...etting at Power on p 84 Master Gain p 85 USB Driver p 98 Upper Transmit Channel Sound Control p 100 Lower Transmit Channel p 100 Send PC p 102 Local Control p 101 Transmit the Recorded Performance p 102 Function Display Button Page Low Gain Equalizer p 85 Low Freq p 85 Low Mid Gain p 85 Low Mid Freq p 85 Low Mid Q p 85 High Mid Gain p 85 High Mid Freq p 86 High Mid Q p 86 High Gain p 86 High Freq ...

Страница 79: ...asterTune eps When the instrument is shipped from the factory this is set to 40 0 440 0 Hz Storing the Master Tuning Setting in Internal Memory After adjusting the master tuning setting you can store that setting to internal memory If you ve stored the master tuning setting it will be preserved even when the power is turned off 5 Hold down the Piano button and use the buttons to get bUP to appear ...

Страница 80: ... with other instruments be aware that depending on the key there may be some shifting of the pitch Tune the FP 4 to the fundamental pitch of the other instruments Adjusting the Tuning Temperament Display Temperament Description 1 Equal In this tuning each octave is divided into twelve equal steps Every interval produces about the same amount of slight dissonance This setting is in effect when you ...

Страница 81: ...ill apply How the Sostenuto Pedal FC1 Effects are Applied 1 Press the Function button 2 Press the Organ button fig d FC1 eps 3 Use the buttons to specify the part s to which the pedal will apply How the Damper Pedal Effects are Applied 1 Press the Function button 2 Press the Strings Pad button fig d dPr eps 3 Use the buttons to specify the part s to which the pedal will apply Pedal Settings Changi...

Страница 82: ...ill not operate Changing the Works of the Soft Pedal FC2 When the instrument is turned on this is set to function as a soft pedal 1 Press the Function button 2 Press the Guitar Bass button fig d FC2 eps 3 Use the buttons to select the pedal function fig d dmp eps Changing How the Pedals Work Setting Description Damper Sets function to damper pedal Soft Sets function to soft pedal Sostenuto Sets fu...

Страница 83: ...select the effect that will be applied when you press the Multi Effects button 1 Press the Function button 2 Press the Multi Effects button 3 Hold down the Multi Effects button and use the buttons to get E ty to appear in the display fig d EfxType eps 4 Use the buttons to select the effect type fig d 60 eps For details on the effect types and the settings for each effect refer to Effects List p 12...

Страница 84: ...that the equalizer be on when you turn on the power You can also specify the equalizer type that will be selected if the equalizer is on when you turn on the power of the FP 4 1 Press the Function button 2 Press the Reverb button 3 Hold down the Reverb button and use the buttons to get Eq to appear in the display Setting the Part to Which Effects Are Added Setting Description Upper The effect will...

Страница 85: ...he Equalizer button will be on and the Type 1 Equalizer setting will be selected When you turn on the power the Equalizer button will be on and the Type 2 Equalizer setting will be selected When you turn on the power the Equalizer button will be on and the Type 3 Equalizer setting will be selected When you turn on the power the Equalizer button will be on and the Type 4 Equalizer setting will be s...

Страница 86: ...of the mid to high frequency range The bandwidth affected by the controls narrows as the value increases High Gain 12 12 dB Adjusts the level of the high frequency range High Freq 2 00 4 00 8 00 KHz Frequency point in the high frequency range Generally this changes the level at and over this frequency Indication Setting Description NOTE Keyboard Settings Changing the Keyboard Touch Key Touch Setti...

Страница 87: ...tave at a time Altering the pitch in one octave units in this way is called Octave Shift For example you can raise the pitch of the Lower Tone to the same pitch of the Upper Tone in Split Play 1 Press the Function button 2 Press the Split button fig d OctShft eps 3 Use the buttons to specify the pitch of the notes The range of available pitch change spans from two octaves higher to two octaves low...

Страница 88: ...hm used when Session Partner plays 1 Press the Function button 2 Press the Session Partner button 3 Hold down the Session Partner button and use the buttons to get Ptn to appear in the display fig d Ptn eps 4 Use the buttons to change the setting USr is displayed if there is a chord progression you yourself created p 54 Session Partner Settings Setting the Intro and Ending On or Off Setting Descri...

Страница 89: ... suitable for the rhythm will be automatically selected when you switch the rhythm of the Session Partner function 1 Press the Function button 2 Press the Session Partner button 3 Hold down the Session Partner button and use the buttons to get ACP to appear in the display fig d ACP eps 4 Use the buttons to change the setting Selecting the Root Note of the Chord Progression Display Key C C C C d D ...

Страница 90: ...the Track 2 button the display will indicate FMt fig d Format eps When you take your finger off the Track 2 button a confirmation message will appear fig d Sure eps If you press the Play button once again you will return to the previous screen without initializing 3 Press the Rec button Initialization will begin The entire contents of internal memory will be erased Never turn off the power before ...

Страница 91: ...ased and the FP 4 will return to the factory set condition This operation will not restore the contents of internal memory to the factory set condition Refer to Initializing Internal Memory p 90 Executing Factory Reset results in deletion of the registration settings If you want to keep any data you have stored use the Bulk Dump operation to save the data to an external sequencer p 104 1 Turn the ...

Страница 92: ...nction and or damage to speakers or other devices always turn down the volume and turn off the power on all devices before making any connections V LINK V LINK is functionality promoted by Roland that allows linked performance of music and visual material By using V LINK compatible video equipment visual effects can be easily liked to and made part of the expressive elements of a performance How t...

Страница 93: ...External Device 96 Recording an FP 4 Performance to a CD or Cassette Tape etc 96 Using Your Computer to Create a CD 97 Connecting to a Computer 98 Connecting to a Computer via the USB MIDI Connector 98 Connecting to MIDI Devices 99 What s MIDI 99 Making the Connections 99 Using the FP 4 to Play Another MIDI Sound Module 100 MIDI Settings 100 FP 4 e book 93 ページ 2007年5月24日 木曜日 午後7時10分 ...

Страница 94: ...e manufacturer of the cable If you ll be playing the FP 4 in a larger space such as in a concert you can connect amplified speakers to make the sound louder Make connections as shown below fig cnct speaker1 eps Sound will still be heard from the FP 4 s internal speakers even if you connect external speakers If you don t want to hear the internal speakers turn the Speaker switch Off so that sound w...

Страница 95: ... on the FP 4 while you listen to the accompaniment provided by the song of the tape cassette or CD Make connections as shown below fig cnct speaker2 eps If you need to change the volume of the CD adjust the volume on the connected CD player Listening to a CD from the FP 4 s Speakers Input jacks CD Player etc Output jacks FP 4 e book 95 ページ 2007年5月24日 木曜日 午後7時10分 ...

Страница 96: ...ectly to a CD without using a computer fig cnct rec2 eps Recording an FP 4 Performance to an Cassette Tape You can record an FP 4 performance on cassette tape This is a convenient way for you to check the results of your practicing or to let a friend hear your performance Make connections as shown below fig cnct rec1 eps Recording an FP 4 Performance to a CD or Cassette Tape etc NOTE Output jacks ...

Страница 97: ...r online help for your software fig cnct rec4 eps Using Your Computer to Create a CD NOTE Transmit the audio file WAV from the R 09 to your computer via the USB connection FP 4 FP 4 Output jacks Input jacks Output jacks LIne IN jacks USB Audio Interface UA 1EX etc R 09 Use audio recording software to create wav files Computer Use software such as Windows Media Player iTunes etc on your computer to...

Страница 98: ...se and then install the driver For details refer to Changing the USB Driver Settings p 98 1 Press the Function button 2 Press the Reverb button 3 While holding down the Reverb button use the buttons to make the display indicate USb 4 Press the or button to select the USB driver you want to use 5 Turn the power off then on again Connecting to a Computer via the USB MIDI Connector USB cable USB conn...

Страница 99: ... Moreover the available sounds have been expanded General MIDI 2 compliant sound generators are capable of reliably playing back music files that carry either the General MIDI or General MIDI 2 logo In some cases the conventional form of General MIDI which does not include the new enhancements is referred to as General MIDI 1 as a way of distinguishing it from General MIDI 2 Connectors fig cnct mi...

Страница 100: ...and specifying the appropriate MIDI channel for each device you can play or select sounds on those devices The FP 4 will receive all sixteen channels 1 16 1 Press the Function button 2 Press the Sound Control button 3 Hold down the Sound Control button and press the or button so U Ch or L Ch is displayed 4 Press the or button to select the transmission channel If you choose the OFF setting MIDI da...

Страница 101: ...Local Off setting The MT transmits a Local Off message when the power is turned on If you turn on the power in the order of the FP 4 MT series Local Off will be set automatically 1 Press the Function button 2 Press the Sound Control button 3 Hold down the Sound Control button and press the or button so L Ct is displayed 4 Press the or button to change the settings Preventing Doubled Notes When Con...

Страница 102: ...nd Control button use the buttons to make the display indicate Out 4 Press the or button to change the settings Transmitting Tone Change Data Program Change Transmit Switch Setting Description Tone selections you make on the FP 4 will be transmitted to the MIDI device connected to the FP 4 Tone selections you make on the FP 4 will not be transmitted to the MIDI device connected to the FP 4 Transmi...

Страница 103: ...ion button and press the or button to choose the item Transmitting Program Changes Simultaneously with Registration Changes Item Description Bank Select MSB Specifies the Bank Select MSB that will be transmitted Bank Select LSB Specifies the Bank Select LSB that will be transmitted Program Change Specifies the Program Change number that will be transmitted A Program Change is a MIDI message that m...

Страница 104: ...sequencer use a MIDI cable sold separately to connect the FP 4 s MIDI Out connector to the MIDI In connector of your external MIDI sequencer Connecting to MIDI Devices p 99 If you re connecting the FP 4 to a computer use a USB cable sold separately to connect the FP 4 s USB MIDI connector to your computer s USB connector Connecting to a Computer via the USB MIDI Connector p 98 2 Press the Function...

Страница 105: ...omputer via the USB MIDI Connector p 98 2 Press the Function button 3 Press the Registration button 4 While holding down Registration use the buttons to make the display indicate dMP When you take your fingers off the Registration button and the buttons the following screen will appear The Rec button blinks 5 Begin playback on your external device When playback begins on your external device the f...

Страница 106: ... switch or assigned it to some other function the pedal won t operate as a soft pedal or sostenuto pedal p 64 p 82 Buzz is heard from external devices Are the external devices connected to more than one AC power outlet If you connect external devices be sure to connect them to the same AC outlet Device connected to the Input jacks has insufficient volume Could you be using a connection cable that ...

Страница 107: ... settings p 39 Is the Master Tune setting appropriate p 79 Are the settings for the Temperament correct p 80 Two sounds are produced when the keyboard is played Is the FP 4 in Dual Play p 29 When the FP 4 is connected to an external sequencer set it to the Local Off mode Alternatively set SOFT THRU on the sequencer to OFF p 101 Effect does not apply You can specifies which part is to have priority...

Страница 108: ...ocate the speakers 10 15 cm away from walls or other surfaces Keep the volume down Move away from the objects that are resonating If you hear this in headphones It is likely that there is some other reason Please contact your dealer or a nearby Roland service center With certain tones the sounds may seem to be distorted Turn down the volume Alternatively lower the master gain setting Song does not...

Страница 109: ...s off If you select an internal song in which the tempo changes during the song and then record the tempo will change in the same way for the performances that are recorded on the other tracks The tempo of the metronome will also change in the same way If you record additional material without erasing the previously recorded song the song will be recorded at the first recorded tempo Please erase t...

Страница 110: ...I device Reduce the amount of MIDI data sent to the FP 4 A MIDI cable has been disconnected Connect it properly and securely A MIDI transmission error has occurred Check the MIDI cable and connected MIDI device There may be a problem with the system Repeat the procedure from the beginning If it is not solved after you have tried several times contact the Roland service center Indication Meaning Us...

Страница 111: ...ax 10 Tenor Sax 11 BrassSection 12 Flute 13 ChamberWinds GM2 14 STANDARD Set 15 ROOM Set 16 POWER Set 17 ELEC Set 18 ANALOG Set 19 JAZZ Set 20 BRUSH Set 21 ORCH Set 22 SFX Set 14 22 are drum SFX sets Refer to p 113 p 115 for details on the sounds in the drum SFX sets 23 Piano 1 24 Piano 1w 25 Piano 1d 26 Piano 2 27 Piano 2w 28 Piano 3 29 Piano 3w 30 Honky tonk 31 Honky tonk w 32 E Piano 1 33 Detun...

Страница 112: ...yn Calliope 187 Chiffer Lead 188 Charang 189 Wire Lead 190 Solo Vox 191 5th Saw Lead 192 Bass Lead 193 Delayed Lead 194 Fantasia 195 Warm Pad 196 Sine Pad 197 Polysynth 198 Space Voice 199 Itopia 200 Bowed Glass 201 Metallic Pad 202 Halo Pad 203 Sweep Pad 204 Ice Rain 205 Soundtrack 206 Crystal 207 Synth Mallet 208 Atmosphere 209 Brightness 210 Goblins 211 Echo Drops 212 Echo Bell 213 Echo Pan 214...

Страница 113: ...EXC3 Claves High Woodblock Low Woodblock Mute Cuica EXC4 Open Cuica EXC4 Mute Triangle EXC5 Open Triangle EXC5 Shaker Jingle Bell Bar Chimes Castanets Mute Surdo EXC6 Open Surdo EXC6 High Q Slap Scratch Push EXC7 Scratch Pull EXC7 Sticks Square Click Metronome Click Metronome Bell Room Kick 1 Power Kick Side Stick Power Snare Hand Clap Electric Snare 5 Power Low Tom 2 Closed Hi Hat 2 EXC1 Power Lo...

Страница 114: ...C2 Long Low Whistle EXC2 Short Guiro EXC3 Long Guiro EXC3 Claves High Woodblock Low Woodblock Mute Cuica EXC4 Open Cuica EXC4 Mute Triangle EXC5 Open Triangle EXC5 Shaker Jingle Bell Bar Chimes Castanets Mute Surdo EXC6 Open Surdo EXC6 High Q Slap Scratch Push EXC7 Scratch Pull EXC7 Sticks Square Click Metronome Click Metronome Bell Room Kick 2 Jazz Kick Side Stick Brush Tap Brush Slap1 Brush Swir...

Страница 115: ... Push EXC7 Scratch Pull EXC7 Sticks Square Click Metronome Click Metronome Bell Guitar Fret Noise Guitar Cutting Noise Up Guitar Cutting Noise Down String Slap of Double Bass Fl Key Click Laughing Screaming Punch Heart Beat Footsteps 1 Footsteps 2 Applause Door Creaking Door Scratch Wind Chimes Car Engine Car Stop Car Pass Car Crash Siren Train Jet Plane Helicopter Starship Gun Shot Machine Gun La...

Страница 116: ... Smooth Pop 53 88 38 8 Beat Rock2 19 106 39 S 8 Bt Rock2 19 106 40 8 Beat Rock3 29 140 No Style Name Chord Tempo 41 S 8 Bt Rock3 29 140 42 16 BeatRock1 53 142 43 16 BeatRock2 54 86 44 Bounce Rock 11 105 45 S BounceRock 11 105 46 Gt Ballad 12 80 47 S Gt Ballad 12 80 48 E Piano Bld 40 67 49 808 Ballad 42 65 50 New Age Bld 43 66 51 S NewAge Bld 43 66 52 6 8 Ballad 44 178 53 Piano Ballad 55 64 54 Pian...

Страница 117: ...Dm9 CM7 Cdim Dm9 G7 CM7 9 Orig Vari C Am7 Dm7 G7sus4 10 Orig Vari C C B Am Am G F G C 11 Orig C C7sus4 F B 7sus4 C C7sus4 F Fm6 Vari Am E7 C7 F Fm6 Em7 F G 12 Orig Dm G7 C A7 Dm G7 Am D7 Vari F G C C7sus4 F G Am A7 13 Orig Am G Am F D Vari D C D F G 14 Orig C E 7 F7 C E 7 B Vari C7sus4 C7 B 7sus4 B 7 C7sus4 C7 A 7sus4 B 7sus4 15 Orig Am D Am G Vari C B C E G 16 Orig F B F B Vari Dm C Dm C B Gm C 1...

Страница 118: ...ari F C F G 33 Orig A7 D7 A7 D7 A7 E7 D7 A7 E7 Vari C F C C7 F7 C A7 D7 G7 C G7 34 Orig F C7 Am7 C7 F7 B 7 F C C7 Vari A7 D7 G7 C7 35 Orig C6 Dm7 G7 Dm7 G7 C6 Am Am9 Dm7 G 11 C6 F G Vari C6 Dm7 G7 Dm7 G7 C6 Am A aug Dm7 G 11 C6 C6 36 Orig C C7 F C G7 F7 C G7 Vari C F C C7 F7 C A7 D7 G7 C G7 37 Orig C F C F Vari Em7 A7 9 Dm7 G7 Em7 D dim C dim Dm7 G7 38 Orig CM9 F G CM9 C9 FM9 F G Vari FM9 F G CM9 ...

Страница 119: ...C Vari F Fm C F Fm G7sus4 G7 49 Orig C G G7 G G7 C Vari C G7 C G7 Dm7 G7 C 50 Orig C CM7 C7 F CM7 D dim C dim Dm7 Fm C Vari Dm E dim D dim Em7 A7 Dm7 G7 C 51 Orig C G7 A F C G7 A F Vari C G7 E D7 C G7 E G7 52 Orig C Am C Am Vari FM7 C FM7 C E C G7 53 Orig Cm CmM7 Cm7 F7 Cm A 7 G7 Vari Cm CmM7 Cm7 F7 A 7 G7 Cm F7 54 Orig D C D G D B D D C D G D B D Vari G m7 F m7 Bm D D 7 C 7 G m7 F m7 Bm G A7 55 O...

Страница 120: ... Chord Progression Specified in the Left Hand Chord Progression Off p 51 C m D m C 7m D 7m C dim D dim C m7 5 D m7 5 C aug D aug C sus4 D sus4 C 6 D 6 C m6 D m6 C other D other C 7sus4 D 7sus4 Cm7 5 C C D C M7 D M7 C 7 D 7 D CM7 DM7 C7 D7 Cm Dm Cm7 Dm7 Cdim Ddim Dm7 5 Caug Daug Csus4 Dsus4 C7sus4 D7sus4 C6 D6 Cm6 Dm6 D other C other FP 4 e book 120 ページ 2007年5月24日 木曜日 午後7時10分 ...

Страница 121: ... marked with the Performing with the Chord Progression Specified in the Left Hand Chord Progression Off p 51 E E M7 E 7 E m E m7 E dim E aug E sus4 E 7sus4 E m7 5 E 6 E m6 E EM7 E7 Em Em7 Edim Em7 5 Eaug Esus4 E7sus4 E6 Em6 F FM7 F7 Fm Fm7 Fdim Faug Fsus4 F7sus4 Fm7 5 F6 Fm6 F other E other E other FP 4 e book 121 ページ 2007年5月24日 木曜日 午後7時10分 ...

Страница 122: ...d Progression Specified in the Left Hand Chord Progression Off p 51 F other G other F m7 5 G m7 5 F G F M7 G M7 F 7 G 7 F m G m F m7 G m7 F dim G dim F aug G aug F sus4 G sus4 F 7sus4 G 7sus4 F 6 G 6 F m6 G m6 G GM7 G7 Gm Gm7 Gdim Gm7 5 Gaug Gsus4 G7sus4 G6 Gm6 A A M7 A 7 A m A m7 A dim A aug A sus4 A 7sus4 A m7 5 A 6 A m6 A other G other FP 4 e book 122 ページ 2007年5月24日 木曜日 午後7時10分 ...

Страница 123: ... marked with the Performing with the Chord Progression Specified in the Left Hand Chord Progression Off p 51 B 7sus4 A AM7 A7 Am Am7 Adim Am7 5 Aaug Asus4 A7sus4 A6 Am6 B B M7 B 7 B m B m7 B dim B aug B sus4 B m7 5 B 6 B m6 B BM7 B7 Bm Bm7 Bdim Bm7 5 Baug Bsus4 B7sus4 B6 Bm6 B other B other A other FP 4 e book 123 ページ 2007年5月24日 木曜日 午後7時10分 ...

Страница 124: ... The Spring 26 Valse op 64 2 27 Radetzky Marsch 28 Träumerei 29 Moments Musicaux 3 30 Prélude op 28 15 31 Harmonious Blacksmith 32 Ungarische Tänze 5 33 Türkischer Marsch Beethoven 34 Nocturne No 2 35 Frühlingslied 36 Präludium 37 Jägerlied 38 Menuet Antique 39 Für Elise 40 Türkischer Marsch Mozart 41 Ständchen 42 Humoreske 43 Blumenlied 44 Alpenglöckchen 45 Menuett G dur Beethoven 46 Venezianisch...

Страница 125: ...inds Str 1 4 JazzComboSes No Registration Name 2 1 E Piano Bs 2 2 Vib BsCym 2 3 Piano Pad 2 4 MamboSession No Registration Name 3 1 JazzPno Ses1 3 2 RockPno Ses 3 3 LatinPno Ses 3 4 JazzPno Ses2 No Registration Name 4 1 BossaEP Ses 4 2 60sEP Ses 4 3 70sEP Ses 4 4 Funk Session No Registration Name 5 1 Rock Organ 5 2 Jazz Organ 5 3 Bossa Organ 5 4 Full Organ No Registration Name 6 1 FP REGIST 6 2 FP...

Страница 126: ... 16 Stereo Flanger 0 127 Depth of modulation 0 127 17 3D Flanger 0 127 Depth of modulation 0 127 18 2Band Flanger 1 127 Rate at which the low range flanger sound is modulated Hz 0 05 10 00 Hz 19 Auto Wah 1 127 Frequency of modulation Hz 0 05 10 00 Hz 20 Humanizer 0 21 Frequency at which the two vowels switch 21 Ring Modulator 0 127 Adjusts the frequency at which modulation is applied 0 127 22 Trem...

Страница 127: ... the delay W and the sound that is not sent through the delay D D100 0W D0 100W 53 Distortion Chorus 0 100 Adjusts the volume balance between the sound that is sent through the chorus W and the sound that is not sent through the chorus D D100 0W D0 100W 54 Distortion Flanger 0 100 Adjusts the volume balance between the sound that is sent through the flanger W and the sound that is not sent through...

Страница 128: ...he depth of reverb p 36 The effect type and the settings of effects 1 p 37 p 83 p 84 Speed of the rotary effect for organ sounds p 38 Key Transpose s on or off and its value p 39 Session Partner settings p 44 p 55 p 88 p 90 How the pedal effect is applied and the function of the pedal p 81 p 82 Setting the part to which effects are added p 84 Octave Shift for the Lower tone p 87 MIDI transmit chan...

Страница 129: ...x Bank select Modulation Portamento time Data entry Volume Panpot Expression Hold 1 Portamento Sostenuto Soft Resonance Release time Attack time Cutoff Decay time Vibrato rate Vibrato depth Vibrato delay Portamento control Effect 1 depth Effect 3 depth NRPN LSB MSB RPN LSB MSB 1 O x is selectable by SysEx 2 Recognized as M 1 even if M 1 DIGITAL PIANO Model FP 4 Date Oct 1 2006 Version 1 00 MIDI Im...

Страница 130: ...e Approx 30000 notes Tempo Quarter note 10 to 500 Resolution 120 ticks per quarter note Registration 24 Max 25 sets to Internal Memory Internal Songs 65 Songs Demo Songs 8 Songs Others Rated Power Output 7 W x 2 Speakers 8 cm x12cm x 2 Display 7 segments 3 characters LED Connectors Output Jacks L Mono R 1 4 inch phone type Input Jacks L Mono R 1 4 inch phone type Headphone Jack x 2 Stereo 1 4 inch...

Страница 131: ...including effects such as reverb and chorus Designed with the future in mind the GS Format can readily include new sounds and support new hardware features when they arrive Since it is upwardly compatible with the General MIDI Roland s GS Format is capable of reliably playing back GM Scores equally as well as it performs GS music files music files that have been created with the GS Format in mind ...

Страница 132: ...ype 83 Effects 37 Effects List 126 Equalizer 43 85 Equalizer Button 13 43 Equalizer Settings 85 Equalizer Type 43 Erasing Recorded Performance 75 Error Message 110 Expression 82 Expression Pedal 18 82 External Speaker 94 F Factory Reset 91 Fill In 48 Front Panel 12 Function Button 12 Function Mode 78 G General MIDI 99 General MIDI 2 99 Ground Terminal 15 GS 131 H Headphones 19 I Initializing 90 In...

Страница 133: ...Erasing Recorded Performances 75 New Song 66 Recording Along with a Song 68 Recording Selected Track Button 72 Recording Song with Session Partner 70 Registration 56 64 103 105 110 128 Registration Button 13 56 58 59 64 Registration Set 56 60 63 Reverb Button 13 36 Reverb Effect 36 Depth 36 Rhythm List 116 Rhythm Pattern 53 Rotary Effect 38 S Saving Registration Set 60 Songs You Record 76 Session ...

Страница 134: ...ing 79 80 U USB MIDI Connector 14 98 USB Driver 98 V Velocity 87 V LINK 92 Volume Headphone 19 Metronome 41 Muted Track 26 Overall 17 Session Partner Performance 47 Song 23 Volume Balance 34 Volume Knob 12 15 17 19 X XG lite 131 FP 4 e book 134 ページ 2007年5月24日 木曜日 午後7時10分 ...

Страница 135: ...135 MEMO FP 4 e book 135 ページ 2007年5月24日 木曜日 午後7時10分 ...

Страница 136: ...ales J E Olear y ESQ Manduvira Asuncion PARAGUAY TEL 595 21 492147 PERU Audionet Distribuciones Musicales SAC Juan Fanning 530 Miraflores Lima Peru TEL 511 4461388 TRINIDAD AMR Ltd Ground Floor Maritime Plaza Barataria Trinidad W I TEL 868 638 6385 NORWAY Roland Scandinavia Avd Kontor Norge Lilleakerveien 2 Postboks 95 Lilleaker N 0216 Oslo NORWAY TEL 2273 0074 POLAND ROLAND POLSKA SP Z O O UL Gib...

Страница 137: ...For EU Countries GR SI LV LT SK CZ EE PL HU FI SE NO DK NL PT ES IT DE FR UK FP 4 e book 137 ページ 2007年5月24日 木曜日 午後7時10分 ...

Страница 138: ...uipment off and on the user is encouraged to try to correct the interference by one or more of the following measures Reorient or relocate the receiving antenna Increase the separation between the equipment and receiver Connect the equipment into an outlet on a circuit different from that to which the receiver is connected Consult the dealer or an experienced radio TV technician for help This devi...

Страница 139: ...Cover1 4 ...

Страница 140: ...07 06 4N 04453567 DIC 90 0 4 4 5 3 5 6 7 0 4 ...

Отзывы: