Roland FJ-40 Скачать руководство пользователя страница 53

51

4   User's Reference

Default

value

Setting

range

Function

Submenu

Top

menu

Key

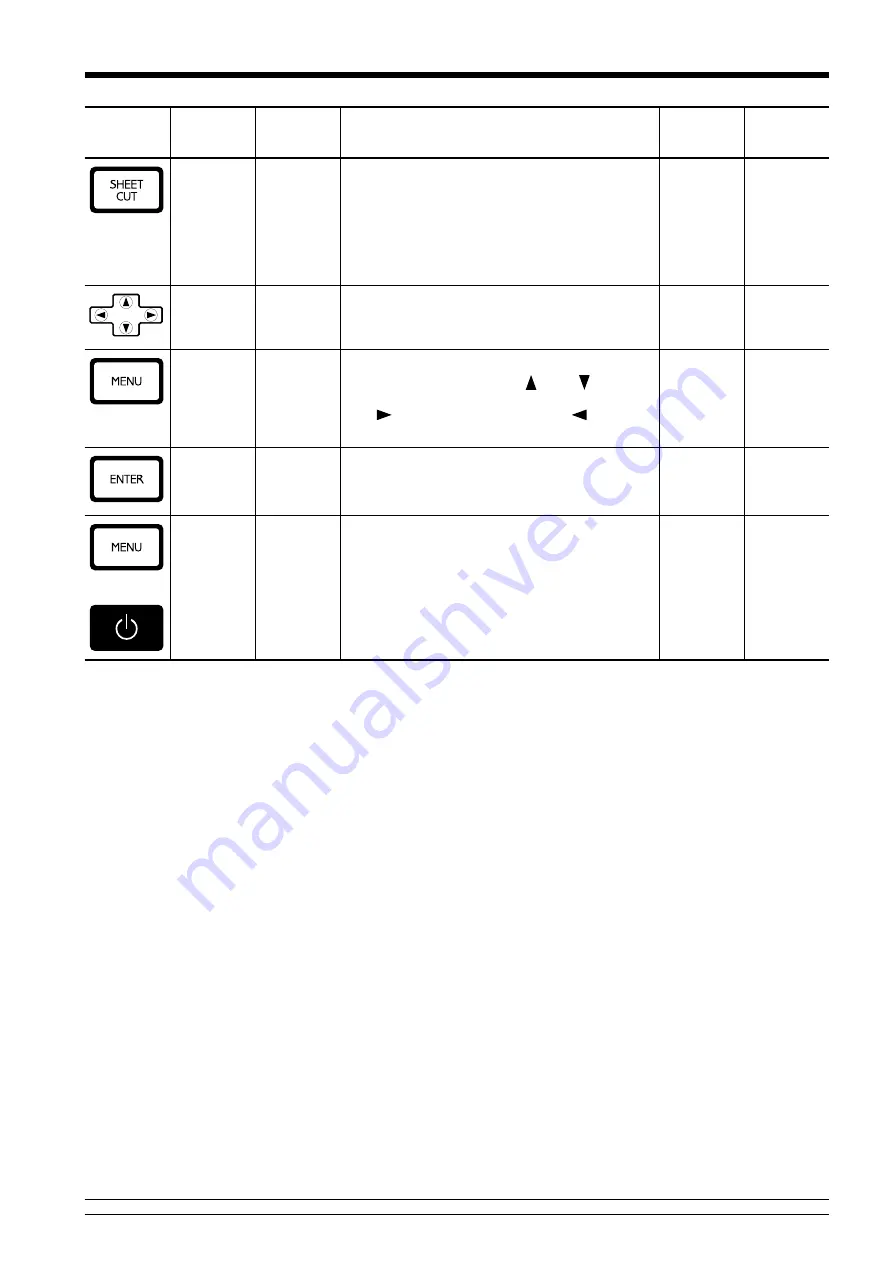
This severs the material at the present position of the
print-start line.  Press this to separate the portion that
has been printed from the roll.
You cannot sever a piece of material while printing is
in progress.
For more information, see "2-7  Ending Printing
Operations -- Separating the Printed Portion."

These move the material and the carriage.
When a menu is displayed, these move among the
menu items.

This is used to accept, execute, or save the item shown
on the display.

LANGUAGE

ENGLISH

JAPANESE

ENGLISH

This sets the language for screen messages.  You can
select either English or Japanese.

+

This enters the menu mode.
When a menu is displayed, the [   ] and [   ] keys
move to the next menu,
the [ 

 ] moves to a submenu, and the [ 

 ] key

moves to the previous screen.

Содержание FJ-40

Страница 1: ...he contents of this operation manual and the specifications of this product are subject to change without notice The operation manual and the product have been prepared and tested as much as possible...

Страница 2: ...the plug provided if it will not fit the outlet have the proper outlet installed by a qualified electrician Check with qualified electrician or service personnel if the grounding instructions are not...

Страница 3: ...terial 19 Loading Sheet Material 21 2 5 Printing Test 22 2 6 Printing 23 Downloading Printing Data 23 Setting the Printing Mode 25 Printing at the Desired Location 26 Making Corrections for Printing 2...

Страница 4: ...be done is indicated by the design contained within the circle The symbol at left means the power cord plug must be unplugged from the outlet Do not disassemble repair or modify Doing so may lead to...

Страница 5: ...or more persons Failure to do so may result in falling of the unit leading to injury Use the joining screws to secure the unit to the stand Failure to do so may result in falling of the unit leading t...

Страница 6: ...nk contacts the eyes flush immediately with water Store ink cartridges out of the reach of children Model name Rating label Use a rated power supply Do not dismantle the cartridge Keep out of reach of...

Страница 7: ...tiliser si l appareil est dans un tat anormal c est dire s il y a mission de fum e odeur de br l bruit inhabituel etc Le non respect de cette consigne pourrait provoquer un incendie ou des d charges l...

Страница 8: ...nt tre effectu s par deux personnes ou plus Le non respect de cette consigne pourrait causer des d fauts dans l appareil entra nant des blessures Utiliser les vis fournies pour bien fixer l appareil s...

Страница 9: ...bout de la lame s paratrice avec les doigts Une n gligence ce niveau pourrait provoquer des blessures S assurer que l appareil est hors tension avant d essayer de remplacer la lame s paratrice Une n g...

Страница 10: ...t le contenu des messages Ne pas d monter la cartouche Conserver hors de la port e des enfants Ne pas emmagasiner das temp ratures hautes ou basses la cartouche d encre Ne pas mettre les mains dans l...

Страница 11: ...ries Power cord 1 Drain bottle 1 User s manual 1 Replacement blade for separating knife 1 Roland COLORCHOICE CD ROM 1 Drain bottle cap 1 Screws 2 In this manual sections that explain commons points fo...

Страница 12: ...computer ENTER key Arrow key PRINT QUALITY key SHEET CUT key CLEANING key MENU key Do not touch the Y rail or the inner side of the right cover Touching the area shown may cause the fingers to be soi...

Страница 13: ...it will execute an emergency stop Operation panel Ink cartridge ports Drain bottle Main power switch Power Connector Carriage When not printing this stays inside the cover Inside the Front Cover Grit...

Страница 14: ...nit in any of the following situations as it could result in breakdown or faulty operation Places where the installation surface is unstable or not level Places with excessive electrical noise Places...

Страница 15: ...nect the power cord computer I O cable and so on so that they will not be unplugged and cause failure during operation Doing so may lead to faulty operation or breakdown Arrange the power cord and int...

Страница 16: ...14 1 Introduction For Macintosh Parallel interface cable Parallel connector Secure the cable in place with the clips Parallel card for Macintosh optional...

Страница 17: ...llected in the drain bottle and cap the bottle securely Press the POWER key to switch off the power 1 Remove the drain bottle and attach the tube plug to the tube tips instead 2 Tube plug Drain bottle...

Страница 18: ...c bag and soak up the ink 3 Close the plastic bag and dispose of it as combustible rubbish Combustible material such as a paper or cloth Incineration Combustibles Do not attempt to disassemble an ink...

Страница 19: ...ack PIGMENT Cyan PIGMENT Magenta PIGMENT Light cyan PIGMENT Light magenta PIGMENT Yellow PIGMENT CMYKOrGr Pigment ink cyan magenta yellow black orange and green PIGMENT Black PIGMENT Cyan PIGMENT Mage...

Страница 20: ...the unit Leave the main power switch on and turn the power off and on in daily use with the sub power switch 1 Press the POWER key on the operation panel 2 Roland FJ 50 Ver 1 00 Roland FJ 50 UNKNOWN I...

Страница 21: ...e left hand side in place at the location shown in the figure Tighten the screw to secure in place When using roll material the retainer on the left hand side should always be used secured in place at...

Страница 22: ...ers lower to hold the material in place 6 Fit the right hand media flange all the way into the hole on the right hand side of the roll material and tighten the retainer screw to secure in place 4 Plac...

Страница 23: ...e tape Guide line Front Sheet loading lever Sheet Material When using sheet material if the loaded material contacts the media flange of the back of the unit shift the right hand retainer to a positio...

Страница 24: ...out head cleaning to restore the head to its normal state Load a material then close the front cover 1 Press the CLEANING key to execute TEST PRINT 2 Press the ENTER key to print a test pattern Press...

Страница 25: ...stop press the PAUSE key Note pressing the PAUSE key to pause operation may result in differing image quality before and after the pause It is a good idea to avoid pausing operation while printing is...

Страница 26: ...ignored and printing is continued without replacing the ink cartridge image quality may be adversely affected and exhibit faintness or other problems INK EMPTY KCMcmY This indicates the ink color The...

Страница 27: ...is setting is made in cases such as when checking layout UNI DIRECTION Unidirectional printing Printing is performed as the carriage moves from right to left Printing quality is better than with BI DI...

Страница 28: ...aterial has been returned toward the back of the unit with the key manually roll the material back onto the roll so that all of the material at the back of the unit is stretched taut The next printing...

Страница 29: ...and keys to line up the new starting location for printing with the left edge of the carriage 2 Left edge of the carriage Press the BASE POINT key 3The BASE POINT LED lights up The origin point is se...

Страница 30: ...right or left hand edge could not be set at the specified place PRINT R EDGE or L EDGE SET ERROR appears on the display The problem may be one of the two situations described below The location specif...

Страница 31: ...ION TEST PRINT When performing test printing for feed correction load the material correctly see 2 4 Loading the Material If the material is not loaded correctly an accurate correction value may not b...

Страница 32: ...the following screen appear on the display 2 Press the ENTER key to start printing a test pattern 3 Check the test pattern and choose a value with no displacement 4 MENU BIDIRECTION BIDIRECTION TEST...

Страница 33: ...to release the material 3 Remove the Material Open the front cover To remove the material follow the steps for loading it in reverse 4 Separating the Printed Portion Either of two methods can be used...

Страница 34: ...to make the following screen appear on the display 2 AUTO SHEET CUT ENABLE ENABLE Use the key to select DISABLE then press the ENTER key 3 AUTO SHEET CUT ENABLE DISABLE The material separating locati...

Страница 35: ...i e while the carriage is on the platen If you leave the carriage uncapped for a long time doing so may result in clogging of the printing head making it unusable Before switching off the main power b...

Страница 36: ...er printing results You can choose either 2 two passes or 3 three passes as the number of passes for overprinting Performing overprinting may result in ink smudges or stretch the fabric Press the MENU...

Страница 37: ...3 MENU PAGE MARGIN PAGE MARGIN 10mm 10mm 0 to 100 mm In steps of 10 mm PAGE MARGIN 10mm 20mm When the material cutting command is enabled Start of the next printing operation End of printing Margin v...

Страница 38: ...tempt to disassemble an ink cartridge Unused ink cartridges should be stored unopened at a temperature of 20 C 4 F to 40 C 104 F If an ink cartridge is dropped the shock due to the fall may damage the...

Страница 39: ...een If ink cartridges other than the filled type or color are installed printing with the correct color blending will not be performed To change the type of ink you must use an optionally available cl...

Страница 40: ...T K C M c m Y K Black C Cyan M Magenta c Light Cyan O Orange m Light Magenta G Green Y Yellow Remaining ink Much Little No marker 3 3 Cleaning the Printing Heads Switching on the sub power automatical...

Страница 41: ...L When head cleaning ends press the key to display the screen shown in the figure Press the ENTER key to start the printing test 3 HEAD CLEANING TEST PRINT Refer to 2 5 Printing Test and check the pri...

Страница 42: ...nk replacement starts Follow the messages on the display to carry out the procedure 7 When the display shown in the figure appears insert the ink cartridge to be newly used 8 When the display shown in...

Страница 43: ...e power 1 Turn off the main power switch 2 The POWER LED goes out Remove the separating knife 1 Loosen the screw until it slips out 2 Grasp the screw portion and slowly pull it out in the direction of...

Страница 44: ...moistened with water then wrung well and wipe gently to clean Cleaning the reflective tape If the tape becomes dirty use a cloth moistened with water then wrung well and wipe gently to clean Cleaning...

Страница 45: ...harged ink Attempting to replace the ink while discharged ink remains may cause discharged ink to overflow from the bottle 5 Mount the drain bottle and press the ENTER key to display the screen shown...

Страница 46: ...puter 10 Remove the drain bottle 11 Drain bottle Remove the drain bottle cap 12 Drain bottle cap Attach the tube plug to the tube tips instead 13 Tube plug Referring to Unpacking and Repacking on the...

Страница 47: ...ng material feed may not proceed smoothly or the material may jam When such material is loaded you can adjust the height of the printing head To adjust the height of the head move the lever until it c...

Страница 48: ...The printing area is normally 10 mm 3 8 inward from the respective left and right hand edges of the material When the printable width have been specified with the PRINT AREA menu the margins are in ac...

Страница 49: ...only in the case of BI DIRECTION Settings for PRINT QUALITY Printing Quality PHOTO SUPER FINE NORMAL FAST DRAFT key Roland FJ 50 Ver 1 00 Roland FJ 50 PIGMENT CMYKLcLm SELECT INK TYPE PIG CMYKLcLm ME...

Страница 50: ...T AREA SET R EDGE PRINT AREA SET L EDGE PRINT AREA EXIT MENU HEAD CLEANING HEAD CLEANING NORMAL HEAD CLEANING POWERFUL MENU INK CONTROL INK CONTROL FILL INK INK CONTROL EMPTY MODE INK CONTROL PUMP UP...

Страница 51: ...en specifying the printing location Move to a submenu screen Moves the carriage when specifying the printing location Move to the previous menu screen Moves the carriage when specifying the printing l...

Страница 52: ...t PRINT QUALITY Printing quality PHOTO SUPER FINE NORMAL FAST DRAFT Printing direction UNI DIRECTION BI DIRECTION Printing quality FINE Printing direction BI DIRECTION This displays the PRINT QUALITY...

Страница 53: ...tion see 2 7 Ending Printing Operations Separating the Printed Portion These move the material and the carriage When a menu is displayed these move among the menu items This is used to accept execute...

Страница 54: ...to the currently set right or left hand edge of the material When setting a new printing area make the setting with SET R EDGE or SET L EDGE For more information see 2 6 Performing Printing Setting th...

Страница 55: ...perations This is used when switching the ink type Before running this choose the type of ink to be used after the change For more information see 3 4 Changing the Type of Ink BIDIRECTION Correction v...

Страница 56: ...nit of measurement for the width displayed on the top menu after setting up the material When inch display is used values are displayed to the first digit to the right of the decimal point MENU UNIT S...

Страница 57: ...en press the SETUP key Hold down for about 1 second This deletes the printing or cutting instructions that have already been sent from the computer to the FJ 50 40 and printing or cutting is stopped I...

Страница 58: ...MPTY message appears during setup A cartridge has run out of ink and printing cannot be started If printing data is being sent this message is displayed and the buzzer sounds At the same time operatio...

Страница 59: ...as changed was feed correction performed Correcting the amount of feed improves the dot positioning accuracy in the feed direction which can help enhance image quality If the type of material was chan...

Страница 60: ...ed correctly the material may come loose or advance at an angle Refer to 2 4 Loading the Material and load the material correctly The material becomes jammed If MOTOR ERROR TURN OFF POWER appears and...

Страница 61: ...Is the blade dull or broken If the blade has become dull or broken replace it with the replacement blade included with the unit see 3 5 How to Replace the Separating Knife Some materials cannot be sep...

Страница 62: ...ert goes continuously Action Close the cover Load the material and try again Press the ENTER key to continue Replace the empty ink cartridge Insert the specified ink cartridge Take out the specified i...

Страница 63: ...ot leave the unit with the carriage not in standby position Recovery from this problem is impossible Use the POWER key to switch the power off First raise the temperature of the area where installed t...

Страница 64: ...r less 2247 mm W x 381 mm D x 392 mm H 88 1 2 W x 15 D x 15 7 16 H 2247 mm W x 736 mm D x 1251 mm H 88 1 2 W x 29 D x 49 5 16 H 75 kg 165 3 lb 90 5 kg 199 5 lb Temperature 15 C to 35 C 59 F to 95 F Hu...

Страница 65: ...rface Specifications Parallel Connector in compliance with specifications of Centronics Signal number Signal number Terminal number Pin Connection 1 19 18 36 3 3K 5V 3 9K 5V Standard Bidirectional par...

Страница 66: ...R4 991005...

Отзывы: