


35
The Basic Track Editing Procedure
1. On the Song Edit screen, select the track or pattern that
contains the recording you want to edit.
Step 1 isn’t absolutely necessary since you can also select a track or pattern
during editing—still, it’s a good way to keep from getting confused.
2. Press F7 (Track Edit)—the Track Edit window opens.
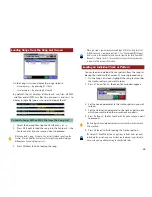
Editing tools
Editing tools
Full name and explanation of currently selected tool.
When
you
display the Track Edit window, the currently selected tool is in
color and the rest are gray—we just wanted to show you all of the tools.
3. Turn the VALUE dial or use
3
,
4
,
5
and/or
6
to highlight
the desired tool.
Since the tools are numbered from 1 to 16, you can also select a tool by
striking the corresponding pad.
4. Press F8 (Select) to display the tool’s pop-up window.
5. Set the tool’s parameters as desired and press F8 (Exec).
6. When the Fantom-X asks if you’re sure you want to
proceed, press F8 (Exec) to finish the editing operation.
You can use the Fantom-X Undo feature to reverse an edit immediately
after you perform it.
Frequently Used Edit Settings
While each editing tool has parameters of its own, there’s a
handful of settings you’ll see again and again:
•
Track/Pattern
—selects the track or pattern to be edited.
•
Ch/Part
—targets for editing the desired MIDI channel data
in the selected track or pattern. You can target all MIDI
channels’ data, or a single, specific MIDI channel’s data.
•
Measure
—targets the measures you want to edit within
the track or pattern. The first box sets the measure at
which the edit is to begin and the second box sets the
number of measures to be included in the edit. To go from
the first box’s measure to the end of the song, select All for
the second box.
•
Range Min, Range Max
—targets the range of notes to be
edited in the selected track or pattern. Range Min sets the
lowest note to be edited. Range Max sets the highest.
Here’s an easy way to set Range Min and Max. Highlight the Range Min
value and, on the Fantom-X keyboard, play the lowest key you want to edit.
Highlight the Range Max value and play the highest key you want to edit.
The Range Min and Max values change to the keys you’ve pressed.
•
Status
—targets the type of data you want to edit. Select All
to edit all of the data in the targeted areas of the selected
track or pattern. To edit only specific types of data within
those areas, highlight the Status value and turn the VALUE
dial to select the desired data type.
Status is a great parameter for power users since it allows you to zero in
on any type of MIDI data for editing without affecting other data types
recorded in the track or pattern.
When an edit tool’s Status parameter is set to a value other than All, the
Range Min and Range Max values can target the minimum and maximum
values to be edited for the selected type of data.


