10
TU-3
Dec. 2009
Test Items
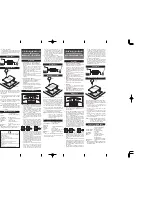
1. Version Check, EEPROM Check, and Switch Check
2. LED and Current-consumption Check
1. Version Check, EEPROM Check, and
Switch Check
This item combines both the version check and the check of
STREAM/CENT
and
MODE
switch operation.
For the version, performing the operation described below makes the digits of
the version number appear in sequence. The screens shown below display
version 1.00.
1.
Hold down the
MODE
and
STREAM/CENT
buttons and insert the plug
into the
INPUT
jack.
The value of the integer portion of the version number appears on the
seven-segment LED display.
fig.test-1-1.eps
* A check of the EEPROM is carried out automatically at this time. If a problem is
found in the EEPROM,
E
appears on the seven-segment LED display.
2.
Within 2 seconds after the operation in step
1
, press the
MODE
switch.
The value of the version number’s first digit to the right of the decimal
point appears on the seven-segment LED display.
fig.test-1-0.eps
3.
Press the
STREAM/CENT
button.
The value of the version number’s second digit to the right of the decimal
point appears on the seven-segment LED display.
fig.test-1-0.eps
4.
Depress the pedal to advance to the next test.
2. LED and Current-consumption Check
1.
Verify that the connections and signal input are as shown below.
INPUT
:
200 Hz, 1.0 Vp-p, rectangular wave
OUTPUT
:
Oscilloscope (channel 1)
BYPASS
:
Oscilloscope (channel 2)
Oscilloscope settings: 0.5 V/div., 1.0 ms/div., coupling DC
2.
The LEDs on the panel light up or flash as shown below. Verify that no
locations remain dark.
•
CHECK
LED:
Flashing
• Meter LEDs (red/green): The LEDs light up in sequence from left to
right, then the center LED lights up green.
(This is repeated.)
• Guide LEDs (
and
; yellow): The left and right LEDs light up
in alternation
• 7-segment LED display:
The segments light up clockwise, with the dot
at bottom right lighting up last.
fig.test-2-1.eps
3.
Depress the pedal.
An LED pattern for verifying current consumption is displayed.
fig.test-2-2.eps
4.
Verify that the current-consumption value is
76 mA
or less.
5.
Depress the pedal.
All LEDs light up, alternating between high and low brightness.
fig.test-2-3.eps
6.
Verify that the brightness changes and that no locations remain dark.
This completes the testing in the Test Mode.
7.
Depress the pedal.
Execution changes to the normal mode. Immediately go on to the test
items on the next page.
If the unit is powered down at this point, then when restarting it, start up
in the normal mode.
Содержание BOSS Chromatic Tuner TU-3
Страница 13: ...13 TU 3 Dec 2009 ...
Страница 14: ...14 TU 3 Dec 2009 Circuit Board Panel Analog Input Output SW Board fig b Panel 1 eps ...
Страница 15: ...15 TU 3 Dec 2009 fig b Panel 2 eps ...
Страница 20: ...MEMO TU 3 Dec 2009 ...