background image

r

 AX-Synth Owner’s Manual

13

ENGLISH

ENGLISH

ENGLISH

ENGLISH

ENGLISH

ENGLISH

Note: 

To prevent malfunction and/or damage to speakers or 

other devices, always turn down the volume, and turn off the 
power on all devices before making any connections.

Note: 

When audio cables with resistors are used, the 

AX-Synth’s volume level may be low. If this happens, use con-
nection cables that do not contain resistors.

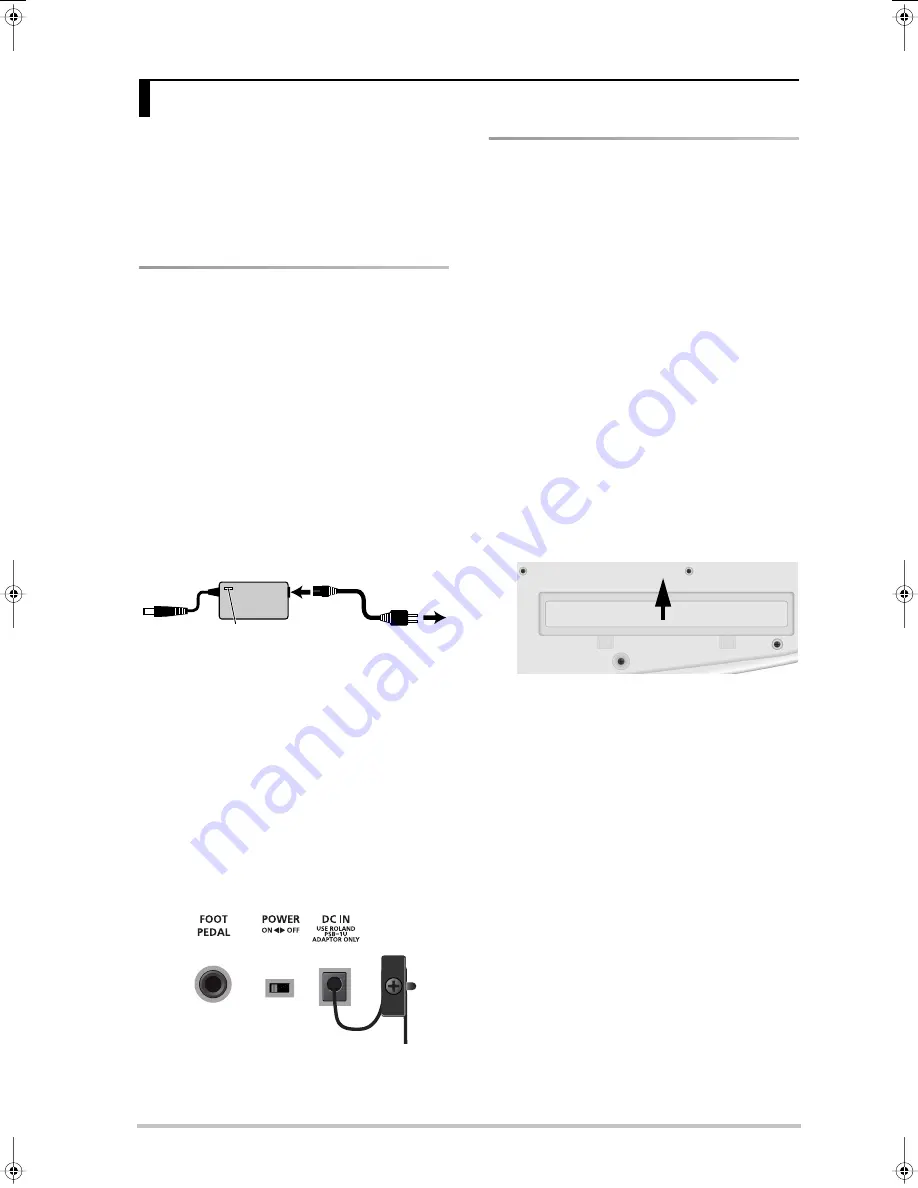
Connecting the AC adaptor

The AX-Synth can be powered either by 8 AA-type 
Ni-MH batteries or the supplied AC adaptor.

(1) Make sure that the 

[POWER]

 switch is in the “OFF” 

position.

(2) Turn the 

[VOLUME]

 knob to the lowest setting to 

minimize the volume.

Note: 

Be sure to use only the supplied AC adaptor. Using 

any other type may cause malfunction or electric shock. 

Note: 

If the AX-Synth is to remain unused for an extended 

period of time, unplug the adaptor.

(3) Connect the included power cord to the AC adap-

tor.

The indicator will light when you plug the AC adaptor 
into an AC outlet.

Place the AC adaptor so the side with the indicator 
(see illustration) faces upwards and the side with tex-
tual information faces downwards.

Note: 

Depending on your region, the included power cord 

may differ from the one shown above.

(4) Connect the AC adaptor to the DC IN jack on the 

AX-Synth’s rear panel, and then plug the AC adap-
tor into an electrical outlet.

To prevent inadvertent disruption of power to your 
unit (should the plug be pulled out accidentally), and 
to avoid applying undue stress to the AC adaptor 
jack, anchor the power cord using the cord hook, as 
shown in the illustration.

Inserting or replacing batteries

Eight AA batteries are required to run the AX-Synth on 
battery power. We recommend the use of rechargeable 
AA-type Ni-MH batteries. With these batteries you can 
expect about 6 hours of continuous operation, although 
this depends on how the AX-Synth is being used.

Note: 

If you plan to use batteries, please disconnect the AC 

adaptor from the AX-Synth.

Note: 

If batteries are installed, disconnecting or reconnecting 

the AC adaptor’s power cord or the adaptor plug from the 
AX-Synth’s DC IN socket while the power is on will cause the 
AX-Synth to turn off. You must turn off the power before con-
necting or disconnecting the power cord or AC adaptor.

Note: 

Avoid using new batteries together with old ones. In 

addition, avoid mixing different types of batteries (e.g. regular 
carbon and alkaline batteries).

Note: 

When replacing batteries, be sure to insert them cor-

rectly (ensure correct polarity).

Note: 

Remove the batteries whenever the AX-Synth is to 

remain unused for an extended period of time.

(1) Switch off the AX-Synth.

(2) Remove the battery cover located on the bottom 

of the instrument.

Note: 

When turning the AX-Synth upside-down, get a 

bunch of newspapers or magazines, and place them under 
the four corners or at both ends to prevent damage to the 
buttons and controls. Also, you should try to orient the unit 
so no buttons or controls get damaged.

Note: 

When turning the AX-Synth upside-down, handle 

with care to avoid dropping it, or allowing it to fall or tip 
over.

3. Making connections

AC adaptor

Power cord

to an AC outlet

Indicator

AX-Synth rear panel

Cord hook

(a) Press the tabs forward.

(b) Lift up.

AX-Synth_e2  Page 13  Monday, October 12, 2009  3:41 PM

Содержание AX-Synth

Страница 1: ...r Owner s Manual ...

Страница 2: ... is subject to the following two conditions 1 This device may not cause harmful interference and 2 This device must accept any interference received including interference that may cause undesired operation Unauthorized changes or modification to this system can void the users authority to operate this equipment This equipment requires shielded interface cables in order to meet FCC class B Limit T...

Страница 3: ...rs and computers with sequencer software talk about MIDI instruments to signify both isolated monotimbral instruments and parts timbres voices multi channels of a multitimbral module or synth The explanations in this manual include illustrations that depict what should typically be shown by the dis play Note however that your unit may incorporate a newer enhanced version of the system e g includes...

Страница 4: ...iately turn the power off disconnect the adaptor from the outlet and request servicing by your retailer the nearest Roland Service Center or an authorized Roland distributor as listed on the Information page when The AC adaptor the power supply cord or the plug has been damaged or If smoke or unusual odor occurs Objects have fallen into or liquid has been spilled onto the unit or The unit has been...

Страница 5: ...ds when plugging into or unplugging from an outlet or this unit Before moving the AX Synth disconnect the AC adaptor and all cords coming from external devices Before cleaning the unit turn off the power and unplug the AC adaptor from the outlet see p 13 Whenever you suspect the possibility of lightning in your area disconnect the AC adaptor from the outlet If used improperly batteries may explode...

Страница 6: ...y Maintenance For everyday cleaning wipe the AX Synth with a soft dry cloth or one that has been slightly dampened with water To remove stub born dirt use a mild non abrasive detergent Afterwards be sure to wipe the instrument thoroughly with a soft dry cloth Never use benzene thinners alcohol or solvents of any kind to avoid the possibility of discoloration and or deformation Repairs and data Ple...

Страница 7: ... from a tap Battery fluid can cause skin damage When a battery is no longer usable dispose of it in accordance with all applicable local laws and regulations If a battery leaks fluid changes color or shape or changes in any other way do not use it otherwise it may cause heat generation bursting or fire Battery handling Incorrect handling of batteries rechargeable batteries or a battery charger can...

Страница 8: ...Controller 22 Aftertouch 23 Using the D Beam controller 23 Portamento 24 Sustaining notes 25 6 Editing Tone settings 26 Editing the volume and Reverb Send levels 26 7 Using the AX Synth as MIDI controller 27 MIDI messages that can be transmitted received 27 Activating the AX Synth s MIDI transmission 27 Setting the MIDI transmit channel 27 Transmitting Program Change numbers 28 Using the Bulk Dump...

Страница 9: ... used with a computer Dedicated editor and librarian software is also available The AX Synth Editor software which includes librarian software can be downloaded free of charge from Roland s website http www Roland com All performance controls within reach The AX Synth provides control functions that are conveniently and ergonomically built into its neck The AX Synth puts you in control of your sou...

Страница 10: ... the AX Synth s V LINK control function see p 33 E SHIFT button Pressing this button allows you to select the second ary hidden function of some of the other buttons F Display This three character display keeps you posted about the selected Tone mode or the parameter value you set G TONE buttons These buttons are used to select the desired Tone family SuperNATURAL SPECIAL or FAVORITE Tone the butt...

Страница 11: ... towards the left or right on this ribbon to change the pitch of the notes O D Beam controller PITCH FILTER ASSIGNABLE buttons This controller allows you to influence the pitch or timbre of the notes you play or to create unique effects by moving one hand up down or left right above the two eyes The buttons to its left allow you to assign the desired function to the D Beam controller see p 24 P PO...

Страница 12: ...This hook is intended to secure the MIDI cable con nected to the MIDI OUT socket when you are using the AX Synth as a shoulder keyboard This is a safe guard against accidental disconnection Y MIDI OUT IN sockets Connect the MIDI IN socket to the device that should transmit MIDI messages to the AX Synth Connect the MIDI OUT socket to the MIDI instrument you wish to control with your AX Synth Z USB ...

Страница 13: ...anchor the power cord using the cord hook as shown in the illustration Inserting or replacing batteries Eight AA batteries are required to run the AX Synth on battery power We recommend the use of rechargeable AA type Ni MH batteries With these batteries you can expect about 6 hours of continuous operation although this depends on how the AX Synth is being used Note If you plan to use batteries pl...

Страница 14: ...es Note that it is normal for the batteries to last increasingly shorter as time goes by At the end of their life cycle they may only last one hour for example But that is a gradual process Connecting the AX Synth Connecting the AX Synth to an amplifier mixer etc using cables The AX Synth needs to be connected to audio equip ment such as a keyboard amplifier a mixing console active speakers etc 1 ...

Страница 15: ...Connect the wireless receiver s audio output s to the mixing console amplifier etc Controlling a MIDI compatible sound source 1 Connect the AX Synth s MIDI OUT socket to the MIDI IN socket of the module or synthesizer you want to control Note Do not forget to connect the module synthesizer etc to an amplifier See its manual for details 2 Switch on the TX ON button Note See page 27 for details abou...

Страница 16: ...eadphones from other manufacturers may be unable to provide sufficient volume 2 The headphone volume can be adjusted with the VOLUME knob Some notes on using headphones To prevent damage to the cord handle the head phones only by the headset or the plug Connecting headphones when the volume of con nected equipment is turned up may result in damage to the headphones Lower the volume on the AX Synth...

Страница 17: ... If the AX Synth is connected to a keyboard amp or audio amp turn on the power of the AX Synth first and then switch on your amp 3 Turn the VOLUME knob to adjust the volume of the AX Synth The AX Synth has a sleep function for reduced power consumption when you are using batteries After several minutes of inactivity all LEDs go dark and only a dot will scroll through the display To wake the AX Syn...

Страница 18: ...ral times to call up the sound you need The display shows the number of the Tone you selected 1 32 To scroll through the available Tones of the active family you can hold down either VARIATION INC or DEC To scroll even faster press and hold the other VARIATION button You can also use the OCTAVE VARIATION but tons on the neck to select Tones To do so you first need to assign them the Uar function a...

Страница 19: ...TRINGS and JAZZ SCAT These sounds are based on a different technology than SuperNATURAL Tones 1 Connect the AX Synth to your amplifier page 14 and switch it on page 17 2 Press the SuperNATURAL SPECIAL TONE button 3 Press one of the last four TONE buttons to select the corresponding SPECIAL Tone Note Switch off the SuperNATURAL SPECIAL TONE but ton if you want to select a regular Tone again Groupin...

Страница 20: ...to select the desired FAVORITE memory in the currently selected bank You can also use the VARIATION DEC INC but tons to select the FAVORITE memories sequentially which may be handy for live performances This procedure does not allow you to change banks from A to B and vice versa however Note When the Uar function is selected see p 18 you can also use the OCTAVE VARIATION buttons to select FAVORITE...

Страница 21: ...ugh the available values you can hold down either VARIATION INC or DEC To scroll even faster press and hold the other VARIATION button You can play on the keyboard to check whether you have selected the correct interval Feel free to change it again before confirming you setting see below 3 Press the WRITE button to confirm your setting 4 Release the SHIFT button Transpose Your AX Synth comes with ...

Страница 22: ...CTAVE VARIATION or button When you release the button the keyboard s pitch returns to normal This can be used to quickly play a few notes in a higher or lower octave before returning to the keyboard s normal pitch 1 Check whether the OCTAVE VARIATION but tons are assigned to the OCH function a Hold down the SHIFT button and press OCTAVE VARIATION or If the display reads OCH there is nothing you ne...

Страница 23: ...te The usable range of the D Beam controller will become extremely small when used under strong light 1 Select the function you want the D Beam control ler to perform by pressing one of the following buttons 2 While you play the keyboard to produce sound place your hand above the D Beam controller and move it slowly up and down The button you pressed in step 1 above flashes 3 To turn off the D Bea...

Страница 24: ... it glides from one note to the next The speed of those pitch changes can be set for each Tone individually using the AX Synth Editor software For regular Tones Portamento can be switched on or off by pressing the PORTAMENTO button repeatedly press it once to switch it on the button lights press it again to switch it off For the SuperNATURAL Tones VIOLIN TROMBONE however you can select one of two ...

Страница 25: ...te or chord and press HOLD to sustain the note s FOOT PEDAL socket Also called sustain or damper an optional footswitch you connect to the FOOT PEDAL socket allows you to hold the notes you play on the keyboard in much the same way as on an acoustic piano For obvious reasons connecting a footswitch to the AX Synth while using it to move around on stage seems impractical In such cases we recommend ...

Страница 26: ...ge the Reverb Send level 4 Wait until the volume value is displayed 5 Keep holding the SHIFT button and use VARIATION DEC INC to select the desired setting 0 127 Note You can hold down VARIATION DEC or INC or hold one while pressing the other to speed up this opera tion Note If you don t need to change the Reverb Send level skip to step 9 6 Press the TONE button used in step 3 again The reU messag...

Страница 27: ... to con trol MIDI provides sixteen channels numbered 1 16 Even if two MIDI devices are connected you won t be able to select or play sounds on the other device unless both devices are set to the same MIDI channel 1 Press and hold the SHIFT button 2 Keep holding the SHIFT button and press the TX ON button The TX ON button flashes 3 Keep holding the SHIFT button and press a key in the TX MIDI CHANNE...

Страница 28: ... transmit 1 128 The display briefly shows the number you selected and then reverts to the last internal Tone number you selected Press INC to select the next number or DEC to select the previous one You may have to press the selected button several times to call up the sound you need To scroll through the available Program Change numbers you can hold down either PGM CHANGE INC or DEC To scroll eve...

Страница 29: ...ts settings The display now shows the Snd sending message and the FAVORITE WRITE button flashes 5 Wait until dNE appears in the AX Synth s display and the FAVORITE WRITE button goes dark then stop the sequencer 6 Save your song or data file on the sequencer computer 7 Switch the AX Synth off wait a moment then switch it back on again Sending your settings back to the AX Synth Note The Bulk Dump pr...

Страница 30: ...he Err message appears during the reception of bulk data the AX Synth was unable to process the data correctly then stop the sequencer The FAVORITE WRITE button will go dark at that time In such a case please repeat the entire procedure 6 Switch the AX Synth off wait a moment then switch it back on again Note We recommend using the librarian software included in the AX Synth Editor to transmit and...

Страница 31: ...smitted and received via USB A USB cable is not included If you need to obtain one ask the dealer where you purchased the AX Synth Switch on the AX Synth before you start up the MIDI application on your computer Don t turn the AX Synth s power on off while your MIDI application is running Connect the AX Synth to your computer as shown below Refer to the Roland website for system requirements http ...

Страница 32: ...w shows the name of the driver that is currently active Gen or Uen and the WRITE button flashes 2 Keep holding the SHIFT button and press the PGM CHANGE INC button to switch between Gen or Uen 3 Press the WRITE button to confirm your selection 4 Release the SHIFT button 5 Switch the AX Synth off wait a few seconds then switch it on again Uen Select this if you use the supplied driver Gen Select th...

Страница 33: ...t of your optional Edirol video device Note V LINK communication is not possible via the USB port 2 Press the V LINK button it lights Operations on the AX Synth V LINK messages are transmitted on MIDI channel 10 The following functions can be controlled from the AX Synth Video clip selection the keys in the lowest octave allow you to switch clips on an optional Edirol device Those keys are tempora...

Страница 34: ...ore certain settings thereby overwriting its original settings Furthermore in depth editing using the AX Synth Edi tor software may cause one AX Synth to sound and behave radically different from another This may become a problem when you are using someone else s AX Synth This function returns all of the AX Synth s parameters to their factory settings Note Consider archiving your settings using th...

Страница 35: ...ed MIDI device Are MIDI messages being transmitted The AX Synth only transmits MIDI messages when the TX ON button lights Please switch it on Does the MIDI transmit channel of the AX Synth match the MIDI receive channel of the connected MIDI device Set the MIDI channel of the connected external device to match the AX Synth or change the AX Synth s transmit channel See page 27 The AX Synth no longe...

Страница 36: ...rol 2 LSB CC46 Undefined CC47 Undefined CC48 General Purpose Controller 1 LSB CC49 General Purpose Controller 2 LSB CC50 General Purpose Controller 3 LSB CC51 General Purpose Controller 4 LSB CC52 63 Undefined CC64 Damper Hold Sustain CC65 Portamento on off CC66 Sustenuto on off CC67 Soft pedal on off CC68 Legato Footswitch CC69 Hold 2 CC70 Sound Controller 1 CC71 Harmonic Content Resonance CC72 R...

Страница 37: ...oSqu Bs 87 0 86 23 Acoustic Bs1 87 0 87 24 Acoustic Bs2 87 0 88 25 Finger EBs 1 87 0 89 26 Finger EBs 2 87 0 90 27 Finger EBs 3 87 0 91 28 Finger EBs 4 87 0 92 29 Pick Bs 1 87 0 93 30 Pick Bs 2 87 0 94 31 Fretnot Bs 87 0 95 32 Slap Bass 87 0 96 Lead Guitar CC00 CC32 PC 1 SearingGtr 1 87 0 97 2 SearingGtr 2 87 0 98 3 SearingGtr 3 87 0 99 4 SearingGtr 4 87 0 100 5 OctSearingGt 87 0 101 6 Dist Finger...

Страница 38: ... 28 AX Vibe 87 1 92 29 Marimba 87 1 93 30 Xylophone 87 1 94 31 Steel Drums 87 1 95 32 Ethno Keys 87 1 96 Choir Piano CC00 CC32 PC 1 Angels Choir 87 1 97 2 Aerial Choir 87 1 98 3 Humming 87 1 99 4 Gospel Hum 87 1 100 5 Vox Pad 1 87 1 101 6 Vox Pad 2 87 1 102 7 80s Vox 87 1 103 8 SynVox 1 87 1 104 9 SynVox 2 87 1 105 10 Sample Opera 87 1 106 11 Jazz Dooos 87 1 107 12 AX Grand 87 1 108 13 AX Mono Pno...

Страница 39: ...am controller MODULATION BAR TOUCH CONTROLLER ribbon VOLUME knob AFTER TOUCH knob PORTAMENTO button 2 modes for SuperNATURAL Tones BENDER MODE button 2 modes HOLD button OCTAVE VARIATION buttons Connectors OUTPUT L MONO R 1 4 phone jacks x2 PHONES 1 4 TRS phone jack x1 FOOT PEDAL for Roland DP series or BOSS FS 5U footswitch USB port COMPUTER supports USB MIDI See http www Roland com for the suppo...

Страница 40: ...O Reverb 1 O Chorus 1 O 1 X 1 O O O O O O O O O O O O O O O O O O O X O Bank Select Modulation Portamento Time Data entry Volume Panpot Expression Breath type Hold 1 Portamento SW Sostenuto Harm Content Reso Release Time Attack Time Brightness Cutoff Sound Control Portamento Control Effect 1 Depth Effect 3 Depth D Beam RPN LSB MSB Program Change True O O O 127 Program no 1 128 System Exclusive O O...

Страница 41: ...Receive channel 27 TX Channels 27 Modulation Bar 22 N Numeric Keypad 18 28 O OCH 22 OCS 22 Octave 22 OCTAVE VARIATION 18 P Pedal 25 PGM CHANGE 28 PHONES 16 Pitch 21 Bend 22 D Beam 23 Portamento 24 Mode 24 POWER 17 Program Change 28 R rCV 29 Receive channel 27 Rev 26 Reverb Send 26 Ribbon 22 RX channel 27 S Sleep function 17 Sleep mode 34 Snd 29 Sounds 18 Special 19 SuperNATURAL 19 Sustain 25 Sut 2...

Страница 42: ... Instrumentos Musicales J E Olear y ESQ Manduvira Asuncion PARAGUAY TEL 595 21 492147 PERU Audionet Distribuciones Musicales SAC Juan Fanning 530 Miraflores Lima Peru TEL 511 4461388 TRINIDAD AMR Ltd Ground Floor Maritime Plaza Barataria Trinidad W I TEL 868 638 6385 NORWAY Roland Scandinavia Avd Kontor Norge Lilleakerveien 2 Postboks 95 Lilleaker N 0216 Oslo NORWAY TEL 2273 0074 POLAND ROLAND POL...

Страница 43: ...r AX Synth Owner s Manual 43 ENGLISH ENGLISH ENGLISH ENGLISH ENGLISH ENGLISH For China ...

Страница 44: ...R 602 00 0354 02 RES 750 09 AX Synth Owner s Manual E ...

Отзывы: