Roland 5100013104-02 Скачать руководство пользователя страница 28


28


Preparing a CD


Here’s how to prepare a CD-R/RW disc for recording or a music CD for playback. 


1


Press the [CD EJECT (

)] button.


The tray will open partially. Use your hand to pull it open.


2


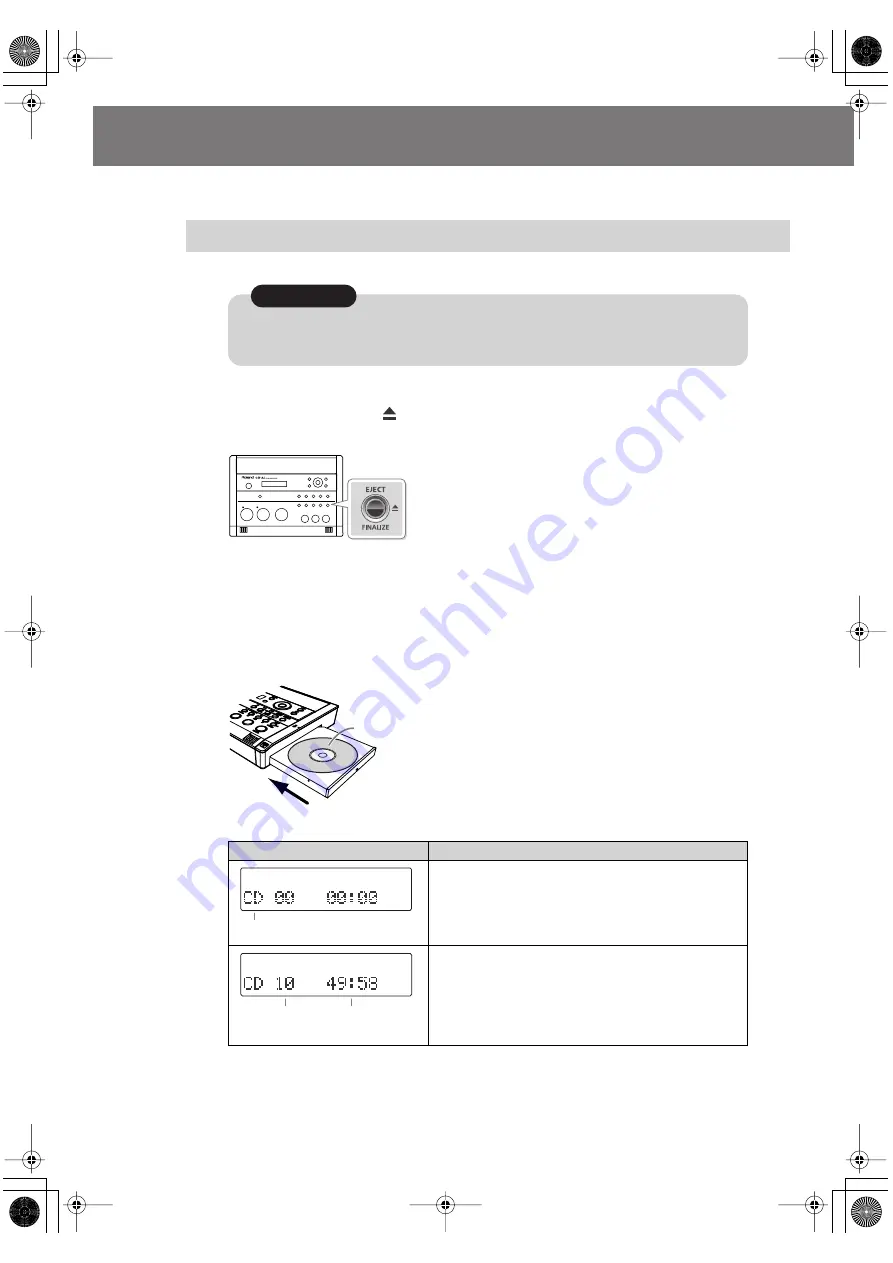
Place the CD in the tray.


Make sure that the CD is securely locked onto the spindle.


3


Press the tray inward to close it.


fig.CD01.eps


Inserting a CD


Screen display

CD status


Nothing has been recorded yet.

Songs have been recorded (or written).

* In the case of an already-recorded (or written) CD-R/

RW disc or music CD, the total number of songs and 
the total playback time will be displayed once the CD 
information has been read.

Do not use CDs that have a CD label or sticker affixed to them. You may be unable to remove 
the CD, or it may cause the CD-2i to malfunction.

Note

Insert with the label surface facing upward.

Audio source

Total number 
of tracks

Total playback time

CD-2i_e.book 28 ページ 2010年3月15日 月曜日 午前10時15分

Содержание 5100013104-02

Страница 1: ...s granted you permission to copy Accordingly reproduction of Music CD or other copyrighted material without permission of the copyright owner avoiding technical prohibiting features of second generati...

Страница 2: ...ss B digital apparatus meets all requirements of the Canadian Interference Causing Equipment Regulations Cet appareil num rique de la classe B respecte toutes les exigences du R glement sur le mat rie...

Страница 3: ...butor in your country CD 2i Remote controller AC Adaptor Power cord The shape of the power cord s plug varies depending on the country SD memory card The SD memory card contains sample songs Blank CD...

Страница 4: ...for Recording 64 Automatically Starting Recording When Audio is Detected 64 Assigning Song Numbers While Recording Marker 66 Preventing Loud Sounds from Distorting Limiter 69 Inserting a Count Before...

Страница 5: ...ing a Track 107 Joining Songs 109 Maximizing the Volume of a Song 110 Creating a Copy of a Song in a New Key 111 Creating a Copy of a Song in a New Pitch 112 Creating a Copy of a Song at a New Playbac...

Страница 6: ...ge 123 Internal Mics Balance Record without distortion Page 69 Limiter Return a CD RW disc to a recordable state Page 96 Unfinalize Check how much recording time is left Page 115 Remaining Time Check...

Страница 7: ...ast stopped Page 73 Resume Apply reverb Page 75 Reverb Boost a softly recorded song to maximum volume Page 110 Normalize Creating a CD Make a duplicate of an original music CD you created Page 103 Bac...

Страница 8: ...st not be used with any other device 009 Do not excessively twist or bend the power cord nor place heavy objects on it Doing so can damage the cord producing severed elements and short circuits Damage...

Страница 9: ...rt or thrown into fire or water 020 Keep lithium batteries out of reach of small children If a child has accidentally swallowed a battery see a doctor immediately 021 Lithium batteries must never be r...

Страница 10: ...aces hairpins etc 112 Used batteries must be disposed of in compliance with whatever regulations for their safe disposal that may be observed in the region in which you live 113 Use only the specified...

Страница 11: ...ould relocate such wireless devices so they are at a greater distance from this unit or switch them off 354a Do not expose the unit to direct sunlight place it near devices that radiate heat leave it...

Страница 12: ...memory cards are constructed using precision components handle the cards carefully paying particular note to the following To prevent damage to the cards from static electricity be sure to discharge...

Страница 13: ...e LINE PHONO knob all the way to the left no sound will be input from the LINE PHONO IN jacks Recording an Electronic Instrument Page 49 Recording a Cassette or MD Page 52 VOLUME Knob This knob adjust...

Страница 14: ...e on screen instructions About Easy Guide Page 36 Metronome Button This turns the metronome on off Making Fine Adjustments to the Playback Pitch Pitch Page 78 KEY button This button changes the pitch...

Страница 15: ...is button accesses the menu screen Here you can make settings for recording playback and settings for the CD 2i itself Menu Operations Page 32 EXIT Button After you ve modified the setting for a menu...

Страница 16: ...ound Terminal Connect this to an external electrical ground Right Side Panel Left Side Panel Depending on the circumstances of a particular setup you may experience a discomforting sensation or percei...

Страница 17: ...here will be no sound from the speakers Step 4 on Recording with the Internal Mics Page 40 fig unit03 eps AC Adaptor Connector Connect the dedicated AC adaptor included here Using the Dedicated AC Ada...

Страница 18: ...ms record playback operations for the CD or SD memory card These have the same function as the buttons on the CD 2i itself The VOLUME knob of the CD 2i itself does not move when you adjust the volume...

Страница 19: ...nufacturers may not record or play back properly on the CD 2i Unlike conventional music CDs both of these discs allow recording A song recorded on a CD R Compact Disc Recordable disc cannot be erased...

Страница 20: ...n above are approximate The actual time may be slightly less depending on the number of tracks that are recorded You can view the remaining time in the display Page 115 Viewing the Remaining Recording...

Страница 21: ...hen you plug the AC adaptor into an AC outlet fig ACadaptor e esp 2 Press and hold the POWER switch When the screen appears in the display release the switch fig power on eps0 1 Press and hold the POW...

Страница 22: ...access the menu screen Use the buttons to choose Auto Power off Press the ENTER button to confirm your choice 2 Use the buttons to change the value for the Auto Power off function fig menu automarker...

Страница 23: ...t the unit so no buttons or controls get damaged Also handle with care and avoid dropping it fig battery01 e esp 3 Install six AA batteries fig battery02 e esp 4 Close the battery cover and turn the C...

Страница 24: ...AC adaptor Note If you want to use batteries disconnect the dedicated AC adaptor The batteries will not be used as the power supply if the dedicated AC adaptor is connected Carefully follow the instal...

Страница 25: ...ong way may damage the CD 2i or the SD memory card fig SDcard02 eps Inserting an SD Memory Card Displayed screen Status of the SD memory card Nothing has been recorded yet A song has been recorded If...

Страница 26: ...o use this SD memory card with the CD 2i you ll need to format the card Proceed as follows to format the card 1 To begin formatting press the ENTER button fig SDcard05 eps 2 If you re sure you want to...

Страница 27: ...card while this unit s power is on Doing so may corrupt the unit s data or the SD memory card Note You can use the included SD memory card protector to prevent theft of an SD memory card inserted in...

Страница 28: ...Screen display CD status Nothing has been recorded yet Songs have been recorded or written In the case of an already recorded or written CD R RW disc or music CD the total number of songs and the tota...

Страница 29: ...o Making a CD R RW Disc for Playback on Another CD Player Finalize Page 102 Removing a CD If the screen shows Finalize Are You Sure Finalize Response Yes Press the ENTER button The CD RW disc will be...

Страница 30: ...ote sensor detects a remote control operation the ENTER button will blink fig remote02 e eps Even if the remote control is within range it may not work if there is an obstruction between it and the re...

Страница 31: ...to access the menu screen and choose Remote Control Press the MENU button to access the menu screen Use the buttons to choose Remote Control Press the ENTER button to confirm your choice 2 Use the bu...

Страница 32: ...refer to List of Settings on the following page 1 Press the MENU button to access the menu screen fig menu01 e eps 2 Use the buttons to choose the item you wish to set fig menu02 eps 3 Press the ENTER...

Страница 33: ...On Page 69 LINE PHONO Input Selects line input or phono input LINE PHONO OUTPUT Select Specifies the audio source that will be output from the LINE OUT jack Mix MIC LINE SD CD Page 127 RECORDING Auto...

Страница 34: ...io heard from the center of the song and creates a new song On1 On2 Page 114 Overdub CD SD Layers a performance or vocal onto a CD song Page 58 Overdub SD SD Records another performance or vocal onto...

Страница 35: ...alues Battery Playback Reference page METRONOME Sound Specifies the metronome sound Silent Bell Click Voice Page 83 Tempo Specifies the metronome tempo 20 120 250 Page 83 Beat Specifies the timing of...

Страница 36: ...ide refer to Setting Items in Easy Guide Page 37 Item Explanation 1 Recording Record a vocal or instrumental performance to either an SD memory card or a CD R RW disc 2 Erase Erase a track on either a...

Страница 37: ...onic musical instrument e g digital piano or synthesizer Casette Tape Choose this if you re recording from a cassette tape or a MD Record Player Choose this if you want to record from a record Speech...

Страница 38: ...screen Explanation Select a song Make settings for Center Cancel Page 80 The setting will turn on off each time you press the CENTER CANCEL button On1 and On2 provide different center cancellation eff...

Страница 39: ...nt e g piano guitar string instrument or wind instrument Vocal Choose this if you re recording a vocal Digital Piano Choose this if you re recording an electronic musical instrument e g digital piano...

Страница 40: ...ers You ll need to use headphones if you want to monitor the sound being recorded Use the VOLUME knob to adjust the headphone volume fig connect headphone e eps Recording with the Internal Mics If You...

Страница 41: ...ng the sound that you ll actually be recording turn the MIC knob to adjust the input level Adjust the level so that the PEAK indicator located above the MIC knob lights briefly at the loudest moments...

Страница 42: ...lems you can try lowering the input level of the internal mics If you re recording to an SD memory card no CD R RW drive operating noise will be recorded Depending on where the CD 2i is positioned in...

Страница 43: ...he input level automatically during recording in response to the loudness of the audio signal Auto Level is particularly suitable for recordings that are mainly of human voices such as a conference or...

Страница 44: ...for Recording If You re Recording to an SD memory Card If You re Recording to a CD R RW Disc 1 Turn on the power Page 21 23 1 Turn on the power Page 21 2 Insert the SD memory card Page 25 2 Insert th...

Страница 45: ...just the level so that the PEAK indicator located above the MIC knob lights briefly at the loudest moments of the performance or vocal you ll be recording When using the MIC knob or LINE PHONO knob yo...

Страница 46: ...he speakers while in recording standby mode or while recording If you want to listen to the sound that s being recorded you ll need to use headphones Refer to Step 4 on Page 40 If you hear acoustic fe...

Страница 47: ...ress the ENTER button to confirm your choice 2 Use the buttons to change the external mic sensitivity setting 3 Press the EXIT button twice You re returned to the audio source screen Selecting the Ext...

Страница 48: ...cations of the mic you re connecting This device s phantom power supply DC 48 V 10 mA max 1 Press the MENU button to access the menu screen and choose Phantom Power fig menu micsens02 eps Press the ME...

Страница 49: ...the menu screen Use the buttons to choose LINE PHONO Input Press the ENTER button to confirm your choice Use the buttons to change the value to select LINE With the factory settings this is set to Li...

Страница 50: ...ording When using the MIC knob or LINE PHONO knob you might hear a slight noise when the recording level changes this does not indicate a malfunction fig rec line e eps 7 Press the Record button to en...

Страница 51: ...on cables that do not contain resistors If you ve finished recording a CD R RW disc and would like to play that disc on another CD player you ll need to execute the Finalize operation You can finalize...

Страница 52: ...Press the ENTER button to confirm your choice Use the buttons to change the value to select LINE With the factory settings this is set to Line If You re Recording to an SD Memory Card If You re Recor...

Страница 53: ...assages of the song that s being recorded When using the MIC knob or LINE PHONO knob you might hear a slight noise when the recording level changes this does not indicate a malfunction fig rec line e...

Страница 54: ...es but this is not a malfunction When connection cables with resistors are used the volume level of equipment connected to the LINE PHONO IN may be low If this happens use connection cables that do no...

Страница 55: ...layer should be connected to the ground terminal on the side of the CD 2i 5 Press the MENU button to access the menu screen and select LINE PHONO Input fig menu overdub e eps Press the MENU button to...

Страница 56: ...O knob you might hear a slight noise when the recording level changes this does not indicate a malfunction fig rec line e eps 7 Press the Record button to enter recording standby mode fig rec intmic04...

Страница 57: ...E PHONO knob you may hear a faint noise when the input level changes but this is not a malfunction When connection cables with resistors are used the volume level of equipment connected to the LINE PH...

Страница 58: ...side panel fig connect extmic e eps 4 Select the External mics fig menu overdub e eps Press the MENU button to access the menu screen Use the buttons to choose MIC Select Press the ENTER button to co...

Страница 59: ...SD CD Level setting screen Use the buttons to adjust the CD s playback level SD CD Level fig player level eps Turn the MIC knob to adjust the input level of the external mics As a guideline adjust the...

Страница 60: ...ely after you stop recording Blinking CD song number to record Recording destination song number on the SD memory card Lit During recording the upper right of the screen will show CD SD Remote control...

Страница 61: ...ics internal mics and LINE PHONO input can be overdubbed with a song on the SD memory card Make settings as appropriate for your instruments and your setup 1 Turn on the power Page 21 23 2 Insert the...

Страница 62: ...playback fig overdub SD01 eps 6 Press the MENU button to access the menu screen and choose Overdub SD SD Press the MENU button to access the menu screen Use the buttons to choose Overdub SD SD fig men...

Страница 63: ...the Play button immediately after you stop recording Lit During recording the upper right of the screen will show SD SD Remote control Key Page 77 Pitch Page 78 and Speed Page 79 settings will automat...

Страница 64: ...you re setting the input level it s a good idea to check how the level meter moves at the beginning of the performance To avoid losing any of the beginning of your performance set this trigger level l...

Страница 65: ...audio recording will begin automatically In order to avoid losing any audio at the beginning of the performance recording will actually begin up to 0 5 seconds earlier than the point at which audio e...

Страница 66: ...s the Record button to assign the song number This page Automatically assign song numbers at fixed intervals Page 67 Assign track numbers when silence is detected Page 68 Press the Record Button to As...

Страница 67: ...ps Press the EXIT button to return to the menu screen Use the buttons to choose Auto Marker Time Press the ENTER button to confirm your choice Use the buttons to change the value to the interval of ti...

Страница 68: ...XIT button to return to the menu screen Use the buttons to choose Auto Marker Lvl Press the ENTER button to confirm your choice Use the buttons to specify the audio level that will be considered to be...

Страница 69: ...choose Limiter fig menu limiter01 eps Press the MENU button to access the menu screen Use the buttons to choose Limiter Press the ENTER button to confirm your choice 2 Use the buttons to turn the limi...

Страница 70: ...Fine Adjustments to the Playback Pitch Pitch Page 78 3 Press the MENU button to access the menu screen and choose Count in Beat fig menu countin01 e eps Press the MENU button to access the menu screen...

Страница 71: ...you ve specified a count in the procedure for starting to record will be as follows 1 Press the Record button The CD 2i will be in recording standby mode fig autorec01 e eps 2 Press the Play button T...

Страница 72: ...to resume playback from the point at which you paused Go to the beginning of a track Skip Press the button Each time you press this button you go back by one track If you press this button during pla...

Страница 73: ...to access the menu screen and choose Resume fig menu resume01 e eps Press the MENU button to access the menu screen Use the buttons to choose Resume Press the ENTER button to confirm your choice 2 Us...

Страница 74: ...ose Bass or Treble fig menu key01 e eps Press the MENU button to access the menu screen Use the buttons to choose Bass or Treble Press the ENTER button to confirm your choice 2 Use the buttons to chan...

Страница 75: ...enu screen and choose Reverb fig menu key01 e eps Press the MENU button to access the menu screen Use the buttons to choose Reverb Press the ENTER button to confirm your choice 2 Use the buttons to ad...

Страница 76: ...you won t hear any sound from the speakers when you re recording or are in recording standby mode even if you press the SPEAKER button to turn them on get them to produce sound This is to prevent the...

Страница 77: ...k to displaying the Source Sound Source screen fig menu key01 e eps Press the KEY button to access the menu screen Use the buttons to choose Key 2 Use the buttons to adjust the value changing the key...

Страница 78: ...ound Source screen fig menu pitch01 e eps Press the KEY button to access the menu screen Use the buttons to choose Pitch 2 Use the button to adjust the Pitch setting If you press the button the value...

Страница 79: ...e You re returned to the audio source screen fig remote icon e eps fig speed remote e eps When you turn off the power the Speed setting will return to Off If Tape Mode is turned on the key pitch setti...

Страница 80: ...e Sound Source screen fig menu centercancel01 e eps Press the CENTER CANCEL button to access the menu screen 2 Use the buttons to change the CENTER CANCEL setting fig menu centercancel02 e eps 3 Press...

Страница 81: ...u repeat02 e eps 3 Press the EXIT button twice You re returned to the audio source screen fig icon repeat e eps The or symbol will disappear if you set the Repeat to Off in Step 2 Value Explanation Of...

Страница 82: ...stered and the Point A icon blinks fig ABrepeat01 e eps 2 Press the REPEAT button once again at the point where you want A B Repeat to end The end point B of A B Repeat playback is registered and the...

Страница 83: ...turn off unlit 2 Setting the sound fig menu metro01 e eps Press the Metronome button to access the menu screen Use the buttons to choose Sound Use the buttons to select the desired metronome sound 3...

Страница 84: ...Every second beat is emphasized 3 Every third beat is emphasized 4 factory setting Every fourth beat is emphasized 5 Every fifth beat is emphasized 6 Every sixth beat is emphasized 7 Every seventh be...

Страница 85: ...buttons to change the value to select Internal 2 Press the EXIT button twice You re returned to the audio source screen 3 Press the MENU button to access the menu screen and choose Tuner Tone fig men...

Страница 86: ...frequency of the A4 note This is the pitch of the middle A note on a piano 1 Press the MENU button to access the menu screen and choose Tuner Tone fig menu tuner01 e eps Press the MENU button to acce...

Страница 87: ...While the tuner screen is displayed press the ENTER button The tuner screen and the guide tone screen will alternate each time you press the ENTER button fig menu tuner05 e eps You ll hear the guide...

Страница 88: ...f you re sure you want to proceed press the ENTER button If you decide to cancel press the EXIT button fig SDerase mssg e eps The display will show Processing and the song will be deleted When the del...

Страница 89: ...oose SD Erase All Press the ENTER button to confirm your choice 3 If you re sure you want to proceed press the ENTER button fig SDeraseall mssg01 e eps 4 If you re still sure you want to proceed press...

Страница 90: ...the menu screen Use the buttons to choose Trim In Press the ENTER button to confirm your choice 4 Press the Play button to play back the selected song fig menu trimin02 e eps 5 When you come to the po...

Страница 91: ...on with caution Note You can t specify Start Point locations that would cause the edited song to be less than four seconds long The Trim In editing process will take a certain amount of time In genera...

Страница 92: ...choose Trim Out Press the ENTER button to confirm your choice 4 Press the Play button to play back the selected song fig menu trimout02 e eps 5 When you come to the point that you want to be the end...

Страница 93: ...with caution Note You can t specify End Point locations that would cause the edited song to be less than four seconds long The Trim Out editing process will take a certain amount of time In general th...

Страница 94: ...l press the EXIT button fig menu RWerase mssg e eps The display will show Processing and the last song will be deleted During this process a timer is displayed counting down the time until the operati...

Страница 95: ...our choice 3 If you re sure you want to proceed press the ENTER button fig RWeraseall mssg01 e eps 4 If you re still sure you want to proceed press the ENTER button If you decide to cancel press the E...

Страница 96: ...lize fig menu finalize e eps Press the MENU button to access the menu screen Use the buttons to choose Unfinalize Press the ENTER button to confirm your choice 3 If you re sure you want to proceed pre...

Страница 97: ...D R RW disc fig writeCD mssg01 e eps 4 The CD 2i asks whether you want to write all of the songs fig writeCD mssg02 e eps This message won t appear if it s not possible for all of the songs on the SD...

Страница 98: ...nalize later to complete your music CD Making a CD R RW Disc for Playback on Another CD Player Finalize Page 102 If you selected Finalize Yes If you selected Finalize No Press the ENTER button If you...

Страница 99: ...RW discs music CDs you create may not play correctly Two seconds of silence are automatically inserted between tracks on the CD R RW disc when you create a music CD The time required for writing will...

Страница 100: ...for these effects before you proceed For details on the CD creation procedure refer to Selecting Songs from an SD Memory Card to Create a CD Page 97 For mix recording as well you can adjust the tone...

Страница 101: ...CD R RW disc it can automatically be divided across multiple CD R RW discs If you want to automatically divide a large song and write it across multiple discs make the following setting in Step 5 on...

Страница 102: ...finalization is completed When finalization is completed the CD R RW disc is ejected Your music CD is now ready Finalization is the process of writing final information the number of songs the song n...

Страница 103: ...ss the MENU button to access the menu screen Use the buttons to choose Make Backup Press the ENTER button to confirm your choice 3 When you see this screen insert the music CD that you want to back up...

Страница 104: ...reate another identical CD If you are finished backing up Press the ENTER button When you see this screen insert a blank or appendable CD R RW disc fig writeCD mssg01 eps Return to Step 5 and continue...

Страница 105: ...er s manual and if you consent to the terms and want to continue the procedure press the ENTER button If you decide to cancel the procedure press the EXIT button Carefully read the section License agr...

Страница 106: ...on fig menu move02 e eps Use the buttons to select the move destination song number Press the ENTER button to confirm your choice In the example screen shown here the song will be moved so it becomes...

Страница 107: ...uttons to choose Divide Press the ENTER button to confirm your choice 4 Press the Play button to play back the selected song fig menu divide02 e eps 5 At the approximate location at which you want to...

Страница 108: ...order to edit a four minute song it will take approximately two minutes for the editing process to be completed Dividing a song will require free space equal to the size of the song you re editing For...

Страница 109: ...button If you decide to cancel press the EXIT button fig combine mssg e eps The display will show Processing and the songs will be joined When the operation is completed you re returned to the audio s...

Страница 110: ...ll show Processing and the volume of the song will be raised When the operation is completed you re returned to the audio source screen If the volume of the song has already been maximized the display...

Страница 111: ...cribed in Changing the Key of the Playback Page 77 that value will be applied fig menu divide02 e eps 5 If you re sure you want to proceed press the ENTER button If you decide to cancel press the EXIT...

Страница 112: ...value will be applied fig menu divide02 e eps 5 If you re sure you want to proceed press the ENTER button If you decide to cancel press the EXIT button fig divide mssg e eps The display will show Proc...

Страница 113: ...ER button If you decide to cancel press the EXIT button fig divide mssg e eps The display will show Processing and the operation will be performed When processing has been completed you re returned to...

Страница 114: ...ibed in Making Fine Adjustments to the Playback Pitch Pitch Page 78 that value will be applied fig menu divide02 e eps 5 If you re sure you want to proceed press the ENTER button If you decide to canc...

Страница 115: ...witch between the available choices for the time indicator as follows fig remain01 e eps fig remain02 e eps During recording or recording standby During playback or while stopped Elapsed recording tim...

Страница 116: ...the menu screen and choose Card Info fig menu SDinfo01 e eps Press the MENU button to access the menu screen Use the buttons to choose Card Info Press the ENTER button to confirm your choice 2 View t...

Страница 117: ...to access the menu screen and choose Disc Info fig menu CDinfo01 e eps Press the MENU button to access the menu screen Use the buttons to choose Disc Info Press the ENTER button to confirm your choice...

Страница 118: ...menu screen Use the buttons to choose Contrast Press the ENTER button to confirm your choice 2 Use the buttons to adjust the contrast of the screen fig menu contrast02 e eps 3 Press the EXIT button t...

Страница 119: ...im if you re using the dedicated AC adaptor Page 21 1 Press the MENU button to access the menu screen and choose Backlight Timer fig menu backlight01 e eps Press the MENU button to access the menu scr...

Страница 120: ...e the button fig language01 e eps 3 Turn the power off then on again After this the screen display will be in the language you selected in Step 2 Display language Button Screen that appears when you s...

Страница 121: ...ute the Initialize operation 1 Press the MENU button to access the menu screen and choose Factory Reset fig menu reset e eps Press the MENU button to access the menu screen Use the buttons to choose F...

Страница 122: ...ess the ENTER button to confirm your choice 3 If you re sure you want to proceed press the ENTER button fig format mssg01 e eps 4 If you re still sure you want to proceed press the ENTER button If you...

Страница 123: ...ton to access the menu screen and choose INT MIC Balance fig menu format e eps Press the MENU button to access the menu screen Use the buttons to choose INT MIC Balance Press the ENTER button to confi...

Страница 124: ...ll be reversed in comparison to the ears of the listeners causing the recorded sound to be heard with a reversed stereo field In such cases you can exchange the left and right channels of the internal...

Страница 125: ...your choice 2 Use the buttons to change the setting specifying whether you want the left and right channels to be exchanged for the internal mics fig menu micexchange02 e eps 3 Press the EXIT button...

Страница 126: ...Turn on the power of the CD 2i 5 Turn on the power of your external speakers or digital piano 6 Turn the VOLUME knob to adjust the output level of the LINE OUT jack Adjust the volume of your external...

Страница 127: ...to access the menu screen Use the buttons to choose OUTPUT Select Press the ENTER button to confirm your choice 2 Use the buttons to choose the audio source 3 Press the EXIT button twice You re return...

Страница 128: ...ning battery power be insufficient Once the battery runs low the power may not turn on Install fresh batteries 24 Are the batteries installed in the correct orientation Check the and orientation of th...

Страница 129: ...sound during recording The input source audio source is not output Could the input level be turned down If you ve connected external mics turn the MIC knob to raise the input level If you re inputting...

Страница 130: ...so that the PEAK indicator lights briefly when loud sounds are input 41 45 50 56 Could the input level be raised for a jack to which no device is connected Even if no device is connected we recommend...

Страница 131: ...Could you be using repeat playback Turn the repeat setting Off so that the or symbol is not shown 81 Could you be using A B Repeat playback Press the REPEAT button to get the A B Repeat icon to disapp...

Страница 132: ...nce You can t record for less than four seconds 20 After recording the CD won t play back on a conventional CD player Did you finalize the disc after recording Execute the Finalize operation 102 Is yo...

Страница 133: ...d Reformat the SD memory card 122 Normal playback does not work Is the mode set to SD Press the SD CARD button to choose SD mode 72 Could you have inserted an SD memory card on which nothing has been...

Страница 134: ...that the card is oriented correctly and that it s pushed all the way into the slot 25 Could you be attempting to record an extremely short performance You can t record for less than four seconds 20 I...

Страница 135: ...RW disc Confirm that the disc can be used Page 19 Count in REC Recording will begin after a count in Divide Multiple The track will be divided for writing on multiple discs Finalized Disc The disc is...

Страница 136: ...ase format the SD memory card Confirm that the SD memory card can be used Page 19 SD Track Full You ve reached the maximum number of tracks 99 that can be recorded on an SD memory card No more tracks...

Страница 137: ...LINE OUT Jacks RCA phone type PHONES Jack Stereo miniature phone type Frequency Response 20 Hz 20 kHz 0 dB 2 dB Nominal Input Level variable EXT MIC Jacks 51 to 14 dBu LINE PHONO IN Jacks L R 24 to 0...

Страница 138: ...RW 95 all tracks SD 89 region at the beginning of the song SD 90 region at the end of the song SD 92 the last track CD RW 94 Trim In SD 90 Trim Out SD 92 Disc Info 117 Divide 107 E Easy Guide 36 37 Ed...

Страница 139: ...yback Level 59 62 Power on off batteries 23 dedicated AC adaptor 21 R Recording Adjusting the input level automatically 43 Maximum recording times 20 Overdubbing 58 61 Recording a Cassette or MD 52 55...

Страница 140: ...metronome 83 Time indication 115 Track numbers 66 67 68 Trim In 90 Trim Out 92 Tuner 85 Tuner Tone 85 U Unfinalize 96 V Viewing information 116 117 Volume balance 123 W Write SD CD 97 Writing creatin...

Страница 141: ...AMA TEL 315 0101 PARAGUAY DistribuidoraDeInstrumentos Musicales J E Olear y ESQ Manduvira Asuncion PARAGUAY TEL 595 21 492147 PERU Audionet Distribuciones Musicales SAC Juan Fanning 530 Mira ores Lima...

Страница 142: ...For EU Countries For China CD 2i_e book 142...

Страница 143: ...ss B digital apparatus meets all requirements of the Canadian Interference Causing Equipment Regulations Cet appareil num rique de la classe B respecte toutes les exigences du R glement sur le mat rie...

Страница 144: ...s granted you permission to copy Accordingly reproduction of Music CD or other copyrighted material without permission of the copyright owner avoiding technical prohibiting features of second generati...

Отзывы: