


1
2
3
4
5
6
6
7
8
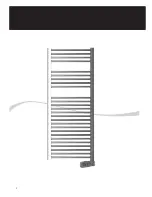
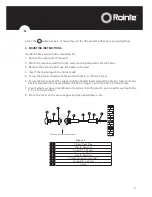
1
10 mm Rawl Plug
2
Plastic Fastener
3
Screw 2.9 x 9.5 mm
4
Screw 6.3 x 50 mm
5
Plastic Fastener
6
Profile of Heated Towel Rail
7
Screw 3/8” x 40 mm
8
Cover
Cross section of the towel rail
Figure 1.
11
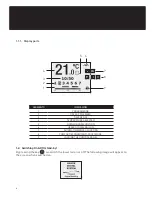
press the
button to exit, or leave the unit for 30 seconds without pressing anything.
3. MOUNTING INSTRUCTIONS
Inside the box you will find a mounting kit.
1. Choose the right part of the wall.
2. Place the mounting stencil on the wall, marking the places for the holes.
3. Remove the stencil and make the holes in the wall.
4. Insert the rawl plugs in the holes made.
5. Screw the plastic fastener to the wall with the 6.3 x 50 mm screw.
6. Screw the two brackets for supporting the heated towel rail and the plastic fastener to the
horizontal tube of the heated towel rail like in Figure 1 with the 3/8” x 40 mm screw.
7. Insert what you have assembled in Section 6 into the plastic piece and fix well with the
2.9 x 9.5 mm stud bolt.
8. Place the cover on the piece supporting the heated towel rail.
Содержание T.CHROME 030
Страница 2: ...2 ...
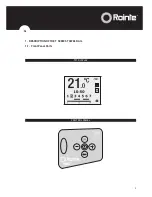
Страница 5: ...TFT DISPLAY CONTROL PANEL 5 1 Description of the T Series Towel Rail 1 1 Front Panel Parts ...
Страница 17: ...DISPLAY TFT PANEL DE CONTROL 17 1 Descripción del Secatoallas Serie T 1 1 Partes del panel frontal ...
Страница 27: ...27 ...
Страница 29: ...29 1 Beschreibung Des HandtuchtrocknerS Serie T 1 1 Teile der vorderen Verkleidung TFT DISPLAY TASTENFELD ...
Страница 41: ...VISOR TFT TECLADO 41 1 Descrição do seca toalhas Serie T 1 1 Painel frontal ...