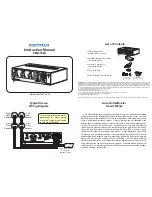


TWEAKER
Locks Cable
Into Place
Allows for Cable
Insertion or Removal
1. DO NOT strip wire. This is not
optional. If wire is striped, cut
off exposed copper.
2. Make sure levers are in the
“open” position. (The RapidLock
connector typically comes with
the levers flipped out or “open”.)
3. Each lever has two holes, one
is square and one is round.
Insert the cable into the round
hole while inserting the tweaker
into the square hole. Once both
are fully inserted, pull the tweaker
so that the lever is completely
closed.
New RapidLock Connector
RapidLock Instructions
INPUT 1
L R
RCA STEREO
www.roemtech.com
AUX
INPUT 2
AUX
PWR
PWR
Min Max
Min Max
Min Max
PMA-350H
www.roemtech.com
REMOTE
PANEL
ONLY
HUMM-
BUSTER
AUTO
PUSH
Front Panel
Rear Panel
P/A
SENSE
INPUT 2
3.5MM
3.5MM
STEREO
STEREO
P/A
PMA-350H
SPEAKERS PWR
+ L - + R -
+/- +/-
DUCK
LEVEL
MONO
ALL
STEREO
ALL
25V - 100V
Features
Features Explained
7
2
3
4
5
6
9
10
11
12
13
14
1 Input 1 Volume Control:
Sets attenuation level for input 1 (aka - stereo RCA input).
2 Input 2 Volume Control:
Sets attenuation level for input 2 (aka - stereo 3.5mm input).
3 AUX Input Volume Control:
Sets attenuation level for AUX input (aka - stereo 3.5mm input).
4 Auto HummBuster Button:
This button initiates the Auto HummBuster feature. For more
information on this feature, see the section “Auto HummBuster - How it Works”. This button
also doubles as an EQ preset. If this button is held down for two seconds, the light will flash
once, twice or three times. If the light flashes once, this indicates that the internal EQ is flat,
if it flashes twice, this indicates the internal EQ has been set to perfectly match the SP-230N
Roemtech ceiling speakers, if the light flashes three times, this indicates that the EQ has been
set to perfectly match the Roemtech SP-340 cabinet speakers
5 Auto HummBuster Light:
This yellow LED flashes quickly five times while the amplifier
executes the Auto HummBuster feature to indicate that the function is successfully running.
6 Remote Volume Control Jack:
This jack can
ONLY
be attached to a ROEMTECH wall
volume control. The jack supplies 5V over one of the wires and uses it to be controlled by a
10K potentiometer. In addition, three of the wires can be used for an analog line level stereo
signal that gets mixed in with Input 2 and is also attenuated by its volume knob. For more
information regarding this feature, contact Roemtech technical support.
7 Power Light:
This light indicates three possible conditions for the amplifier. 1). Steady on
indicates amplifier is powered up and internal processor is functioning. 2). One short blink each
second indicates that amplifier is in sleep mode (see “Sleep Mode” for more information). 3).
Fast blinking indicates that the PA Override is currently engaged (see “PA Sense” for more
information).
8 AUX Input:
This input is a stereo 3.5mm jack that accepts most unbalanced stereo signals.
9 Input 1:
This input is a stereo RCA jack that accepts most unbalanced stereo signals.
10 Input 2:
This input is a stereo 3.5mm jack that accepts most unbalanced stereo signals.
11 Mono All - Stereo All:
This switch determines whether the output will be separated stereo or
combined mono. In the mono mode, all speakers output the same exact audio. In stereo mode,
you get true stereo separation for left and right channels as indicated at the terminal block.
12 Duck Level:
This feature allows you to control the sensitivity of the PA ducking threshold.
For example: If there is some constant noise on the PA system that is tied to the amplifier, then
the sensitivity can be decreased by turning the control clockwise until the noise no longer triggers
the PA override function.
13 PA Sense:
This connection should be made to the public address or alarm system via a two
conductor wire. Polarity is not important. The impedance of this input is in the mega-Ohm range
and will not create a detectable load on any system that it is tied to. This input is designed to
automatically detect and adapt to any signal it sees from 3Vrms to 100Vrms (standard high-level
distributed audio) without issue.
14 Speaker/Power Terminal Block Connector:
This amplifier contains the new RapidLock
connector. It is designed to eliminate the need to strip the incoming wires (see illustration to the
left). It allows for incredibly fast installations without worrying about stray “hair” wires or stripping
the wire. In addition we include the standard “screw” type terminal block for those that are more
comfortable with the traditional connectors. Use caution not to connect the power cables into the
speaker terminals, this will most likely destroy the amplifier and is
not
covered by the warranty.
INPUT 1
1
8


