background image

EVISION - HD101 & HD102 

www.roevisual.com 

V1.13, 

2020-05-20 | Copyright © 2020 ROE Visual Co., Ltd. All Rights Reserved. 


26

  / 

41


6.13


Hot Backup 

HD101 and HD102 both support hot backup, while ONLY HD102 provides the option to specify the 
Backup Port on control system software. 
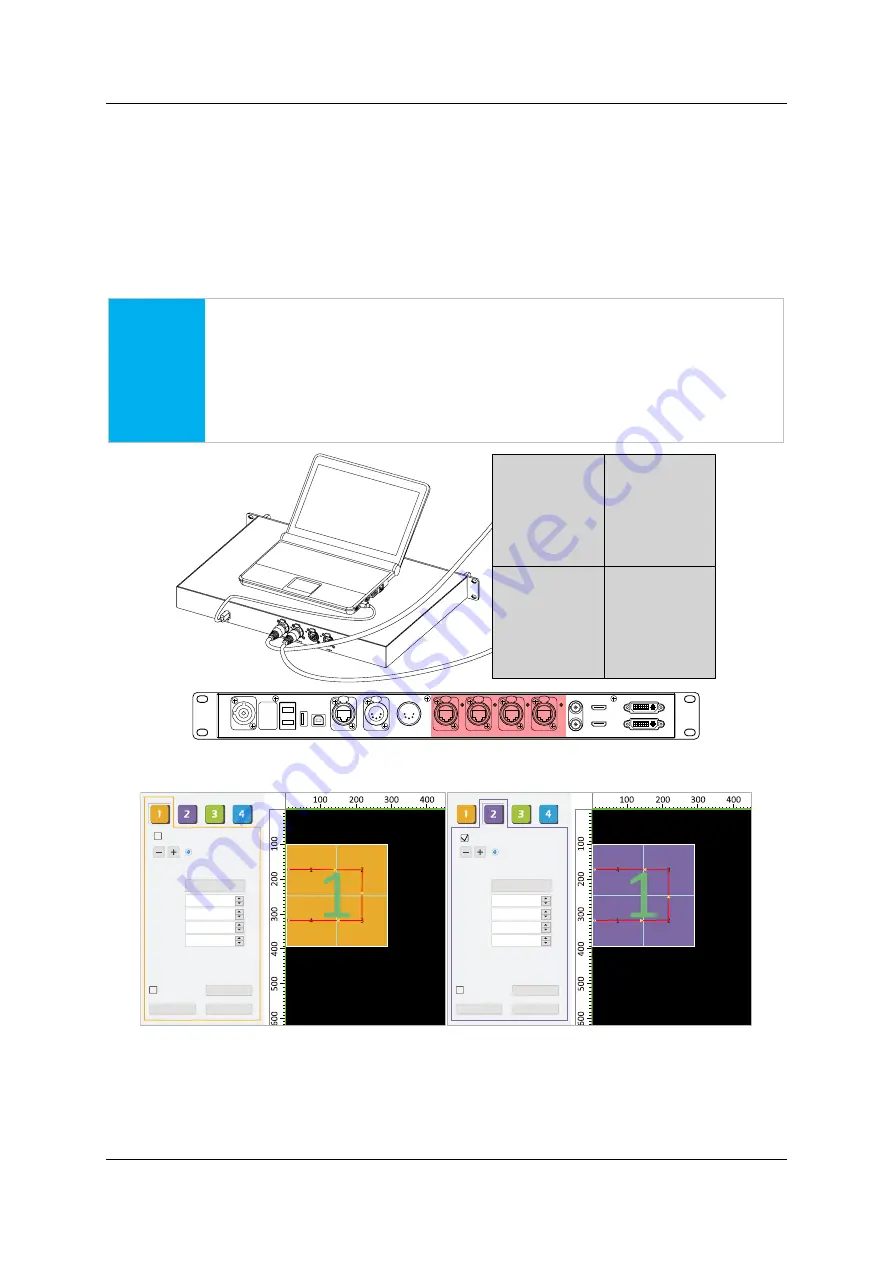
Create an output data loop from one port to its next, pair port1-port2 or port3-port4 recommended as 
shown i

Figure 6-16. HD102 hot backup cabling.


Setup mapping accordingly on both port1 and port2, as shown i

Figure 6-17. Hot Backup using port1 & 

port2

Click 

Save Settings

 to confirm config, to establish a hot backup data loop. 

NOTICE


Please pay attention to the mapping sequence of tiles. If using pair port1-port2, port2 
should have the reversed mapping of port1. Apart from the sequence, other settings 
like type, QTY and location should be the same. 
 
For HD101, disconnect port2 when mapping port1, vice versa. Detailed steps can be 
referred to below. 


Figure 6-16. HD102 hot backup cabling 


Figure 6-17. Hot Backup using port1 & port2 and port2 as a backup port 


HDMI IN

USB
OUT

P ORT1

P ORT 2

P ORT 3

P ORT4

INPUT 100-240V AC 50/60 Hz

DVI IN

DVI LOOP

HDM I LO OP

RE F IN

RE F OUT

DMX IN

DMX OUT

NE T

USB

IN

FIBER2

F IBE R1

LED Wall

Mapping

Save Setting

Preview

288
288

1

3.4-MBI5153(NS).r

Tile Type

H Count
V Count

H Position
V Position

H Size
V Size

Hybird (port1)

3

0
100

3

Mapping

Save Setting

Preview

288
288

1

3.4-MBI5153(NS).r

Tile Type

H Count
V Count

H Position
V Position

H Size
V Size

Hybird (port2

)

3

0
100

3

Backup Port

Backup Port

Содержание EVISON HD101

Страница 1: ...EVISON User Manual for Processor HD101 HD102 Version 1 13 Update Date 2020 05 20...

Страница 2: ...ill be the responsibility of the customer at standard industry rates 4 The warranty will be voided in the case of a Accidents or human error b Any modifications disassembly repairs maintenance or test...

Страница 3: ...8 2 4 Performance de s curit 8 3 Introduction 9 3 1 About Manual 9 3 2 About EVISION System 9 4 General Information 9 4 1 HD101 9 4 2 HD102 11 4 3 Basic Comparison of HD101 and HD102 14 4 4 System Ca...

Страница 4: ...t 25 6 12 Import New Tile types 25 6 13 Hot Backup 26 6 14 Multiple Processors Control 28 6 15 Multiple Tile Types Control 28 6 16 Edge Correction 29 6 17 Gamut Adjustment Only HD102 supported 31 7 Fi...

Страница 5: ...ry risk appropriate to these levels is also involved CAUTION Caution Indicates s a hazardous situation which if not avoided could result in minor moderate injury or result in property damage NOTICE No...

Страница 6: ...l during installing powering operating or servicing the product The installation should be performed after you are thoroughly familiar with all safety guidelines instructions warnings and cautions Oth...

Страница 7: ...e une situation dangereuse qui si elle n est pas vit e pourrait entra ner des blessures l g res ou mod r es ou des dommages mat riels REMARQUER REMARQUER Il est pr f rable d aborder des pratiques NON...

Страница 8: ...allation de la mise sous tension de l utilisation ou de la maintenance du produit L installation doit tre effectu e une fois que vous tes familiaris avec toutes les consignes de s curit les instructio...

Страница 9: ...iendly UI and experience 4 General Information 4 1 HD101 4 1 1 Front panel Figure 4 1 HD101 front 4 1 2 Rear panel Figure 4 2 HD101 rear 4 1 3 Dimensions Dimension L485 x W240 x H45mm 1U Figure 4 3 HD...

Страница 10: ...Processor Only 2 3kg Nominal pixel capacity 2 1M pixels Equivalent to 1920 px x 1080 px 60 Hz Input Input Ports DVI 1 HDMI 1 DVI In Loop Max Input Loop Width 2560 px 2560 x 810 60 Hz Max Input Loop H...

Страница 11: ...on card A B C D E F G H J A Screw Hole B Handle C Nameplate F Output Indicators E USB In Port Type B D Power Button G LCD Screen J Setting Knob H Function Keys USB Input Port Type B K Power Port L Nam...

Страница 12: ...ported HDMI In Loop Max Input Loop Width 4095 px 4095 x 562 60 Hz Max Input Loop Height 1600 px 1440 x 1600 60 Hz EIA CEA 861 Standard HDMI1 4 Type A HDCP1 4 supported HDMI In Only Output Output Ports...

Страница 13: ...g List Table 4 5 Items in HD102 package Parts QTY Remarks 1 Processor HD102 1 NA 2 Power Input Cable 1 CN US EU Standard 3 User Manual for EVISION Control System 1 4 USB Cable 1 Type A male Type B mal...

Страница 14: ...095 x 506 60 Hz HDMI Max Input Loop Height 1600 px 1296 x 1600 60 Hz Output Ports Ethernet Gigabit Ethernet 4 RJ45 Cat5e Cat6 supported Max Output Width 2 560 px 4 095 px Max Output Height 1 600 pixel...

Страница 15: ...her steps Figure 5 1 PC to processor connection 5 2 Processor Output Cabling Connect the processor with the LED tiles using Gigabit Ethernet cables Cat5e or Cat6 Figure 5 2 Processor to LED connection...

Страница 16: ...the processor with the power source and turn on the processor LED tiles WARNING Make sure the power cable is correctly connected before turning the power on Figure 5 4 Processor power cabling HDMI IN...

Страница 17: ...y Sender Card 1 HD102 1 02 Language Detect Sender Card Detect Receive Card Cancel Detected Manual Port1 Detect 4 receiver cards Port1 Detect the 4 card is i6 10 0 temperature 41 00 Net Line OK Port1 D...

Страница 18: ...Left click on tiles to establish links while a right click will remove ones Figure 5 9 Tile mapping 5 10 Output Capacity The outer border of the tiles indicates the output capacity of one output port...

Страница 19: ...White Gray Increased Others Alternate Black and White RGBW Color Bar Auto Cycle Test Pattern 10s 5 12 Preview Save Mapping Save Setting Figure 5 12 Preview save mapping setting Click Preview button to...

Страница 20: ...6 2 HD102 multi function 6 3 Tile Status in EVISION Table 6 1 Tile status Inactive Selected Individual tile positioning will be enabled Active configured The physical tiles will receive corresponding...

Страница 21: ...an empty one Left click to set a tile empty and a click again will undo the action Please be noted that once a tile was set to empty the mapping topology on it will be discarded 6 5 2 Forbid Moving Al...

Страница 22: ...t output contrast Figure 6 7 Light output profiles and adjustment 6 7 Tile Reset Click Rest Mapping button to discard current mapping topology Click Rest All Tile button to discard all settings config...

Страница 23: ...ing High grayscale under low brightness will improve greyscale when output bright was low Please be noted that only i6 receiving cards available for this function 6 9 2 Low Latency Enabling Low Latenc...

Страница 24: ...data in senders This will allow no need for re mapping after swapping tiles on the project side 6 9 6 DMX Click DMX Set to access DMX related settings Figure 6 13 DMX setup Fiber Cable Fiber Convert...

Страница 25: ...efault config file format for import If trying to import rcvbp files please specify file type to rcvbp before the file can be selected Figure 6 15 Tile import HDMI IN USB OUT PORT1 PO RT2 PORT 3 PORT4...

Страница 26: ...of tiles If using pair port1 port2 port2 should have the reversed mapping of port1 Apart from the sequence other settings like type QTY and location should be the same For HD101 disconnect port2 when...

Страница 27: ...ngs for port2 G Reconnect tile to port1 keeping port2 also connected H Hot backup established 6 13 2 HD102 Hot Backup Steps A Connect tiles to port1 port2 B Enable Backup Port option for port2 C Setup...

Страница 28: ...rol 6 15 Multiple Tile Types Control Recommend to connect different types of tiles to different output ports Figure 6 20 Different tiles on different ports HDMI IN USB OUT PORT1 PO RT2 PORT 3 PORT4 IN...

Страница 29: ...ight output contrast Setting Cabinet Information Weight Kg Power W Voltage V Width cm Height cm Pixel Width Pixel Height Save 100 100 624 2 4 Gamma TileAddress NONE H Position 0 0 0 0 0 V Position H V...

Страница 30: ...t the edge to adjust the brightness Select the edge that stands out either brighter or darker Figure 6 24 Select an edge of panels Figure 6 25 Bright edge and dark edge on an LED screen Sending Card O...

Страница 31: ...ns Gamut Adjustment data is separated from the original calibration data stored on receiving cards It can apply color display changes without damaging the original calibration data 6 17 1 Read Screen...

Страница 32: ...0 137 0 051 Show Module Edge Select Receiving Card Enable Edge Calibration Gamut Adjustment Enable Gamut Adjust Read Screen Information Coefficient 1 Sending Card Offset Setting 5 2 1 1 2 5 1 Offset...

Страница 33: ...tting 5 2 1 1 2 5 1 Offset X Y Screen Display Red Brightness Adjust Brightness Module Size px 11 Scaling 100 Gradual Adjustment Height 64 Width 64 Show Module Edge Enable Edge Calibration Select Recei...

Страница 34: ...the processor s for firmware upgrade Figure 7 4 Select processor Figure 7 5 Detailed info on processor firmware 7 1 7 Select a firmware file or preset for the upgrade You can either browse desired fi...

Страница 35: ...e processor Select Net Card Mode if panels connecting to the PC Figure 7 7 Net Card Mode 7 2 2 Select the Receiver Card tab Figure 7 8 Receiver Card Mode 7 2 3 Select panel s for upgrade Figure 7 9 Se...

Страница 36: ...e using Ethernet cable for control 8 1 1 Cables are not correctly connected Check the Ethernet cable for control and connect it again 8 1 2 IP setup unsuccessful Please refer to page 39 9 3 IP Setup t...

Страница 37: ...Temperature 40 85 C Operating Temperature 0 70 C Voltage Supply 3 0 3 6V Data Rate 2 5Gb s Mode Single mode Distributed Feedback Laser DFB LD Fiber Connector Duplex LC Transmission Distance 5km 9 1 2...

Страница 38: ...rt 2 5G Gigabit Ethernet Port LAN1 LAN2 RJ45 9 1 3 Multi function Card 9 1 3 1 Device Picture Figure 9 3 Multi function card brightness sensor 9 1 3 2 Specification Table 9 4 Specification of iM9 mult...

Страница 39: ...g IP address key in IP address and subnet mask OK H otkey List Key Left Mouse Right Mouse Mouse Whell Ctrl Mouse Wheel Shift Mouse Wheel Ctrl Left Mouse Ctrl Left Mouse Double Clicked Ctrl A Ctrl Up L...

Страница 40: ...02 Refresh Rate Product 60Hz 50Hz BO2 176 x 176 px 17 pcs 20 pcs BO3 144 x 144 px 25 pcs 30 pcs BP3 128 x 128 px 32 pcs 38 pcs BP5 96 x 96 px 57 pcs 68 pcs MC5H 104 x 104 px 49 pcs 58 pcs MC7H 80 x 80...

Страница 41: ...just 1 Enable o 2 Hue 0 3 Saturation 100 4 Compensating 0 5 Contrast 100 6 Save 7 Reset 4 Gen Lock o 5 Output Setting 1 Fiber Cable 1 By Cable o Output Mode By Cable 2 By Fiber o Output Mode By Fiber...

Отзывы: