Rocstor R106SH4 Скачать руководство пользователя страница 14

Wall Mounting the Enclosure

Rocstor recommends the cabinet enclosure installation to be performed by professional or qualified

technician. Plan for the installation and make sure there are no equipment installed in the cabinet

during installation. Prior wall mounting and rack installation, first use a tape measure and precisely

mark the position of the rack. Then use a level and make sure the rack will be installed in the straight

position. Use correct fasteners which are not included and place the rack and secure the cabinet to the

wall. Your installer or technician must use the correct mounting equipment for installation of the rack

to cinder block, concrete, drywall or wood studs.

Warning: Make sure you follow the installation manual carefully. Failure to incorrectly installing the

cabinet, it will cause bodily injury, cabinet, and property damages. Make sure the supporting surface

can safely handle the combined load of the equipment and attached

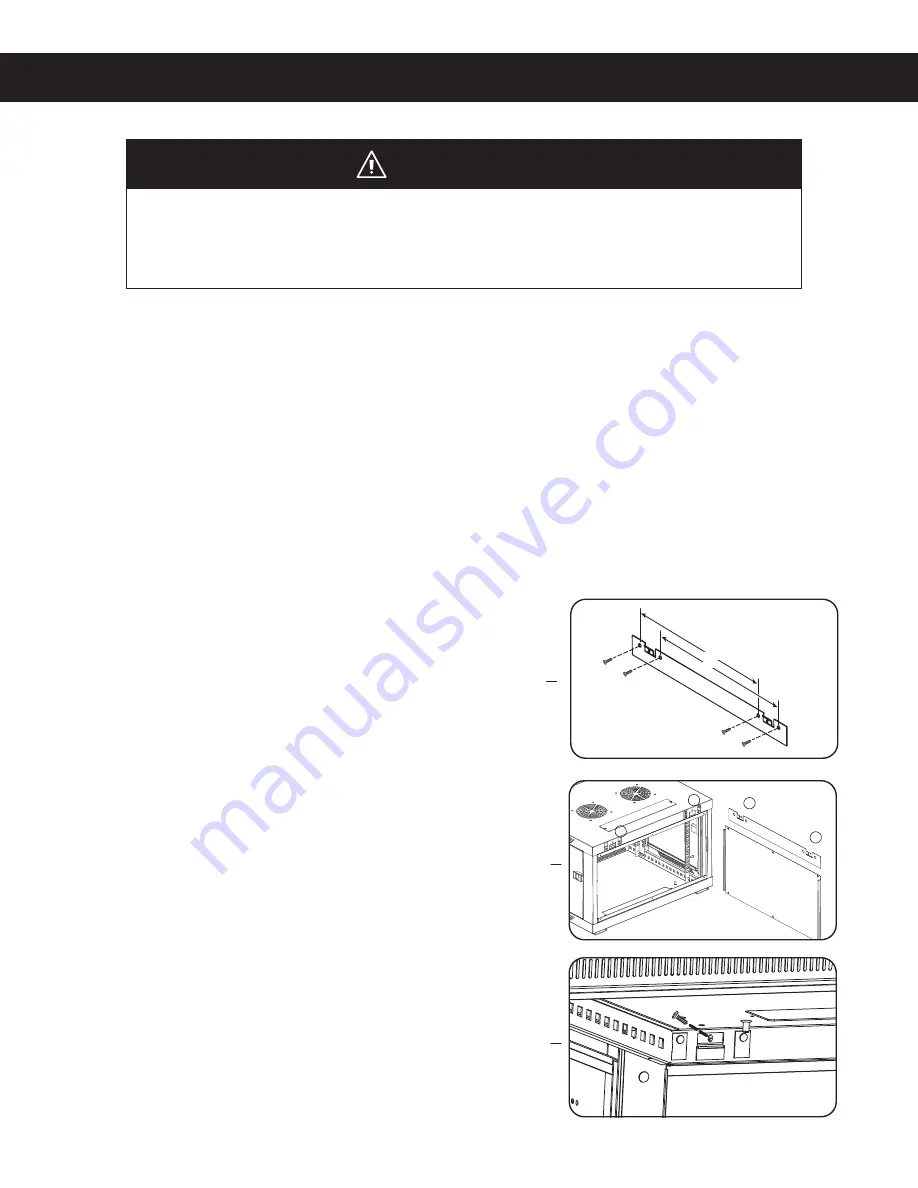
1- Make sure the mounting plate hooks are facing outward

and away from the wall when mounting the plate to the

wall. Attach the mounting plate to the wall with hardware

(not included). The installation plate mounting hole is

designed to accommodate an M8 or 5/16” bolt. The holes

on the plate are spaced 16" apart to accommodate

standard stud.

2- After the plate has been securely positioned and

installed, hang the cabinet’s two mounting notches onto the

two mounting hooks on the attached wall plate. Slide down

the cabinet notches onto the hooks. The cabinet should easily

slide down and mount on the plate. The enclosure can be

mounted in standard or reversed positions.

3- Use the (3) supplied screws to secure the cabinet.

Tighten the screws in the holes on the mounting hooks

after the mounting plate has been installed and the cabinet

has been securely hung.

3

16”

16”

1

2

3

Install the appropriate hardware (not included) to the wall. Follow all local

regulations. Refrain from mounting the enclosure cabinet to the wall with 

equipment in the cabinet.

WARNING

Page

 12

A

A

B

B

Содержание R106SH4

Страница 1: ...SolidRack Wall Mount Rack Enclosure User Manual Y10E004 B1 Y10E005 B1 Y10E006 B1 6U Model R106SH4 9U Model R109SH4 12U Model R112SH4...

Страница 2: ...Important Safety Information Introduction Feature Identification Hardware and Accessories Cage Nut installation Enclosure Installation Ground The Cabinet Enclosure Configuration Wall Mounting the Enc...

Страница 3: ...FOLLOW INSTRUCTIONS IN THE MANUAL FURTHERMORE ROCSTOR SPECIFICALLY DISCLAIMS ANY AND ALL IMPLIED WARRANTIES INCLUDING WITHOUT LIMITATION WARRANTIES OF MERCHANTABILITY AND FITNESS FOR A PARTICULAR PURP...

Страница 4: ...that will block ventilation openings in all sides including front and top of the enclosure The content of this packaging is easily tipped Please be extra careful and use extreme caution When moving or...

Страница 5: ...serious injury Please follow instructions carefully CAUTION This symbol indicates a potentially hazardous situation which if not avoided can result in minor or moderate injury CAUTION This symbol is...

Страница 6: ...floor with an optional rolling caster kit for easy maneuvering of the enclosure The cabinet s door is reversible Optional 120V dual fan that can be mounted on top sold separately Rocstor SolidRack cab...

Страница 7: ...w Installing cage nuts in the incorrect orientation can cause injury or equipment damage Cage Nut Installation Note You may wish to use a cage nut tool user supplied to aid cage nut installation and r...

Страница 8: ...to the building structure The following tools are required for proper installation Level not included Phillips head screwdriver not included Appropriate tools for wall mounting not included Appropriat...

Страница 9: ...install the equipment To remove a cage nut squeeze the sides to release it from the square hole Move the Cabinet Be extremely cautious when moving or unpacking this rack cabinet When moving or unpack...

Страница 10: ...ult in death or serious injury DANGER Ground Connection SolidRack use the most reliable and quality products All doors and parts of the enclosure are grounded to the frame of the enclosure To connect...

Страница 11: ...is located on the side panel and at that time you may remove it from the enclosure 2 In order to lock the side panels back on the cabinet first place it and secure it in the correct position then lift...

Страница 12: ...pening can easily be removed or installed back by unscrewing or screwing in the removable cable access panel Mounting Rails Installation Before you mount rails or install any hardware please make sure...

Страница 13: ...t mounting depth This versatile rack provides adjustment for front and rear set of of rails They rails are independently adjustable in a inch 6mm increments 1 The SolidRack enclosure includes an upper...

Страница 14: ...e combined load of the equipment and attached 1 Make sure the mounting plate hooks are facing outward and away from the wall when mounting the plate to the wall Attach the mounting plate to the wall w...

Страница 15: ...his warranty extends only to the original purchaser who must have properly registered the product The product may be registered at the Rocstor Web site https rocstor com customer support warranty regi...

Страница 16: ...s goal is to help our U S A and Canadian customers find a storage solution that best serves their needs We will help you determine your best purchasing options For more information please contact the...

Отзывы: