background image


                                        - 3 - 

Front Panel 


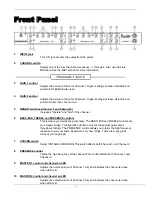
1.   INPUT jack 
                                         

This 1/4" jack accepts the output from the guitar.


2.   CHANNEL switch 
                                         

Selects one of the four channels in sequence - 1 through 4. Also used to store 

                                          MIDI data. See the MIDI section for more information.


3.   GAIN 1 control 
                                         

Adjusts the amount of drive for Channel 1. Higher settings increase distortion and 

                     sustain. 60's British Style clean.


4.   GAIN 2 control


                     Adjusts the amount of drive for Channel 2. Higher settings increase distortion and 
                                          sustain. Hotter than channel one.


5.      BRIGHT switches (Channel 1 and Channel 2) 
                                         

Increases "sparkle" and "bite" of the channel.


6.      BASS, MID, TREBLE and PRESENCE controls 
                                         

This is where 

you 

decide the personality. The BASS, MID and TREBLE controls are 

                     your classic bridge-T configuration (found in most of the popular guitar amps 
                     throughout history). The PRESENCE control allows you to tailor the high frequency 
                     response to suit your taste. Experiment...try new things. There are many great   
                                          tones at your fingertips!


7.   VOICING switch 
                                         

Select VINTAGE or MODERN. This switch affects both Channel 1 and Channel 2.


8.   PRESENCE control 
                                         

Tailors the high frequency of the channel. This control affects both Channel 1 and     

                     Channel 2. 

 
9.      MASTER 1 control and channel on LED 
                                         

Adjusts the overall volume of Channel 1 only and indicates the channel is active 

                     when LED is lit.


10.    MASTER 2 control and channel on LED 
                                         

Adjusts the overall volume of Channel 2 only and indicates the channel is active 

                     when LED is lit. 

Содержание Vendetta

Страница 1: ...is a trademark of GHS Corporation Battle Creek MI USA May be covered by one or more of the following U S Patents 4538297 4647876 4696044 4745309 4881047 4893099 5124657 5263091 5268527 5319713 5333201 5402498 5493617 and 5638452 Other patents pending Foreign patents pending ...

Страница 2: ...uct with any case stand tripod bracket or table that is not specified by the manufacturer Where it is specified by the manufacturer insure that the case stand tripod bracket etc is properly adjusted and setup Extra care and caution should be taken to avoid tip over and injury 13 Unplug this apparatus during lightning storms or when unused during long period of time 14 Refer all servicing to qualif...

Страница 3: ...s This is where you decide the personality The BASS MID and TREBLE controls are your classic bridge T configuration found in most of the popular guitar amps throughout history The PRESENCE control allows you to tailor the high frequency response to suit your taste Experiment try new things There are many great tones at your fingertips 7 VOICING switch Select VINTAGE or MODERN This switch affects b...

Страница 4: ...ffects both Channel 3 and Channel 4 17 MASTER 3 control and channel on LED Adjusts the overall volume of Channel 3 only and indicates the channel is active when LED is lit 18 MASTER 4 control and channel on LED Adjusts the overall volume of Channel 4 only and indicates the channel is active when LED is lit 19 MAIN LEVEL control This is a master level control which determines the overall output lev...

Страница 5: ... types can be used by readjusting the bias Please see section on Power Tube Test Points for additional information 5 IMPEDANCE switch This switch selects the proper impedance to match the output of the amplifier to the load See the section on Impedance Settings for more details 6 MAIN SPEAKER output This jack connects to the internal speaker on the COMBO version of the VENDETTA or to the primary s...

Страница 6: ... use the MAIN SPKR jack first for the speaker connection Do not operate below 4 ohms Never operate the VENDETTA without a load on the output Always have a speaker cabinet plugged into the speaker output before turning on the unit Always be certain to use speakers or speaker cabinets capable of withstanding the power that the VENDETTA is capable of providing Rocktron is not responsible for speaker ...

Страница 7: ...r it is a 4 button controller or a Rocktron MIDI Mate the VENDETTA channels 1 4 will correspond with the MIDI controller buttons 1 4 VENDETTA Channel 1 MIDI Controller Button 1 VENDETTA Channel 2 MIDI Controller Button 2 VENDETTA Channel 3 MIDI Controller Button 3 VENDETTA Channel 4 MIDI Controller Button 4 Pressing Button 1 on your MIDI Controller will call up VENDETTA Channel 1 Pressing button 2...

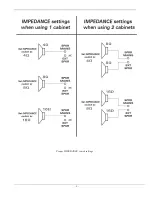
Страница 8: ...onnected a slight distortion of the MIDI signal can occur due to signal degradation which can cause an error in MIDI signal transmission Should this problem arise a MIDI box can be used which connects directly to the MIDI device which transmits MIDI information and has multiple connectors for the multiple devices receiving MIDI MIDI cables should not exceed 50 feet 15 meters in length Impedance Se...

Страница 9: ... 9 Proper IMPEDANCE switch settings ...

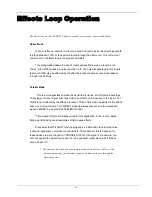
Страница 10: ...g your direct signal intact even when an effects unit is inserted in the loop Your TONE is not hindered by the effects processor Think of this mode as similar to the effects buss on a mixing console Your DIRECT signal is always present and the processed signal is MIXED in using the FXLEVEL MIX control Time based effects are ideally suited for this application Echo reverb delay flanging and phasing...

Страница 11: ...ng a small screw driver open the fuse tray by prying open the small tab as shown in the drawing above Please note that the tray will not come all of the way out Remove the old fuse and replace with a comparable new fuse and close the tray being sure that the tray snaps into position You will find the information on the fuse used in the specifications section of this manual Fuse Replacement 11 ...

Страница 12: ...rn the power on and allow 5 minutes for warm up 3 Place the standby switch in the on position and allow another 5 minutes for the tubes to stabilize 4 You are now ready to measure Set your voltmeter to the 200 millivolt scale Insert the black test probe into the common test point Insert the red test probe into the 1 test point You should now see a reading within the range shown in the chart below ...

Страница 13: ...lectable Maximum Gain over 80dB Operating Voltages 110 VAC Dimensions 29 1 4 x 9 1 2 x 10 1 2 Weight 55 lbs Speaker 4x12 Cabinet Available Separately uses two 12 Celestion Vintage 30 Speakers and two 12 customed Eminence speakers Equalization 3 Band Bridge T Treble Middle Bass Plus Presence and Density ...

Страница 14: ...mp boxes FootControllers MIDI Mate MIDI Foot Controller MIDI XChange MIDI Foot Controller All Access MIDI Foot Controller HEX Expression Pedal RMM900 7 pin Din MIDI Cable RM4 MIDI Controller for Vendetta amps RFS1 and RFS2 Single and Double Latching Footswitches for Rampage Amps ElectricGuitar AcousticGuitarandBassAmplifiers Vendetta Head 100 W Head 4 ChannelsAll Tube MIDI Switchable Vendetta Comb...

Страница 15: ... 15 ...

Страница 16: ... 16 Rocktron A Division of GHS Corporation 2813 Wilber Ave Battle Creek MI 49037 USA Tel 1 269 968 3351 Fax 1 269 968 6913 8am to 5pm Eastern Standard Time 2007 0001 Rev 12 28 07 ...

Отзывы: