SERVICE MANUAL
GEN.0000000006305 Rev B © 2020 SRAM, LLC
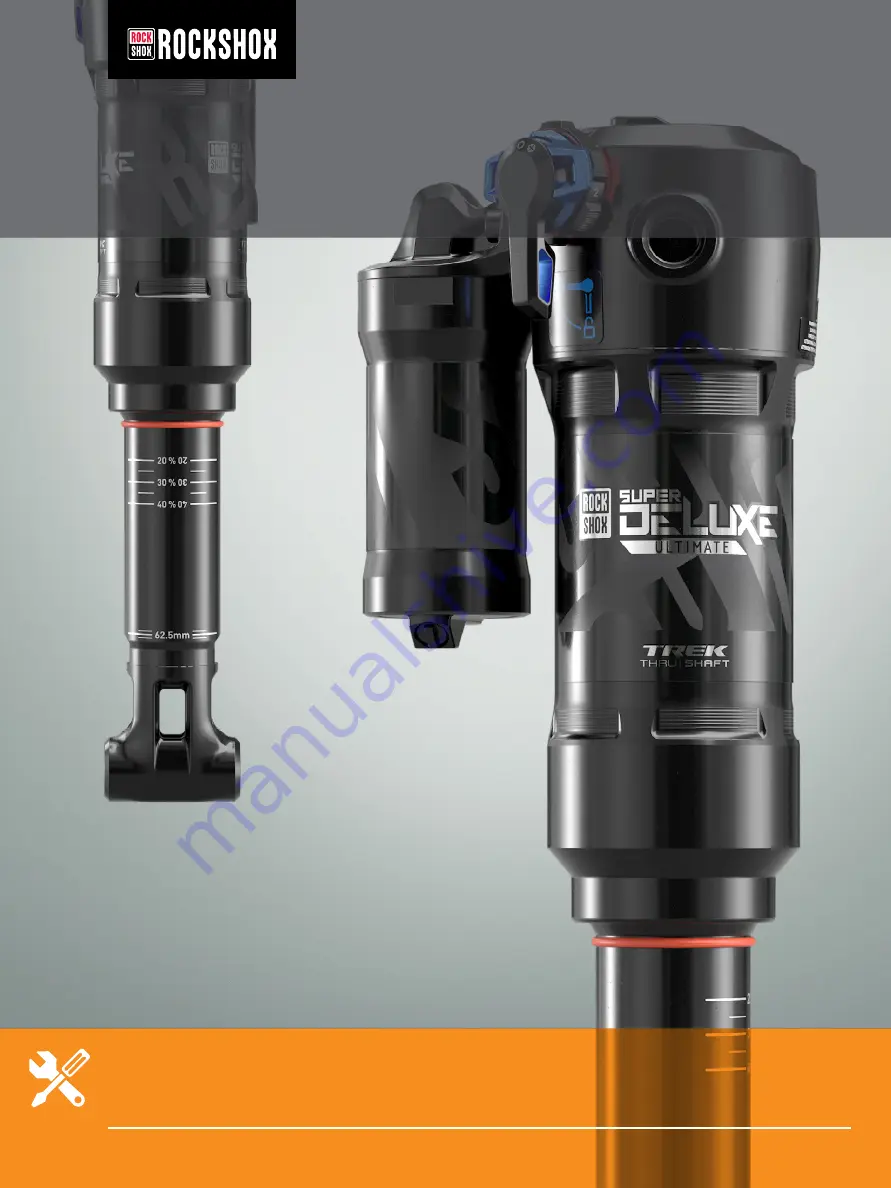
2021 SUPER DELUXE THRUSHAFT
Страница 1: ...SERVICE MANUAL GEN 0000000006305 Rev B 2020 SRAM LLC 2021 SUPER DELUXE THRUSHAFT...
Страница 2: ...ty does not apply to products that have been incorrectly installed adjusted and or maintained according to the respective SRAM user manual The SRAM user manuals can be found online at sram com service...
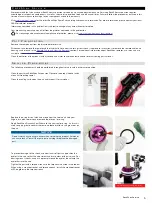
Страница 3: ...SAFETY FIRST We care about YOU Please always wear your safety glasses and protective gloves when servicing RockShox products Protect yourself Wear your safety gear...
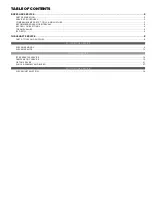
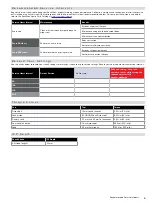
Страница 4: ...SERVICE INTERVALS 6 RECORD YOUR SETTINGS 6 TORQUE VALUES 6 IFP DEPTH 6 THRUSHAFT SERVICE 8 PARTS TOOLS AND SUPPLIES 8 50 200 HOUR SERVICE AIR CAN REMOVAL 9 AIR CAN SERVICE 13 200 HOUR SERVICE IFP RESE...
Страница 5: ...ean lint free shop towel clean lint free shop towel Clean the sealing surface on the part and inspect it for scratches Clean the sealing surface on the part and inspect it for scratches Replace the o...
Страница 6: ...e Reduces friction Restores small bump sensitivity Every 200 Hours Perform damper and spring service Extends suspension lifespan Restores suspension lifespan R e c o r d Y o u r S e t t i n g s Use th...
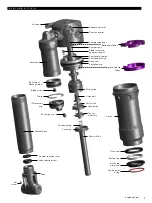
Страница 7: ...Seal head air piston Bleed screw and compression ball Compression lever Trunnion eyelet Rebound adjuster Piston bolt Shim stack Lock piston Top hat assembly Damper shaft Bleed screw Circlip IFP Inter...
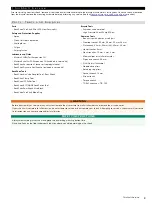
Страница 8: ...in service kit RockShox Tools RockShox Air Valve Adapter Tool Rear Shock RockShox Clamp Tool RockShox IFP Puller Tool RockShox RCT NUDE Lock Piston Tool RockShox Rear Shock Vise Block RockShox ThruSha...
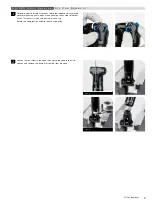
Страница 9: ...it stops while counting the number of detent clicks This will assist you with post service set up clicks This will assist you with post service set up Rotate the compression knob to the minus positio...
Страница 10: ...pressure from the air can and slowly release all air pressure from the air can CAUTION Do not disassemble a pressurized shock this can cause suspension fluid or debris to forcefully eject from the sho...
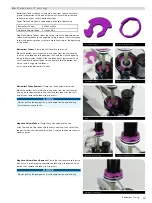
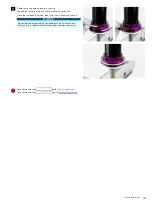
Страница 11: ...wrench counter clockwise to unthread the air can counter clockwise to unthread the air can Vacuum pressure will increase as you pull the air can along the Vacuum pressure will increase as you pull the...
Страница 12: ...ottom out until it contacts the other tokens or the eyelet Slide the bottom out washer and o ring onto the tokens washer and o ring onto the tokens Install up to three Bottomless Tokens Install up to...
Страница 13: ...ase and install a new o ring Apply a light layer of grease and install a new o ring Remove and discard the air can wiper seal located in the top groove Remove and discard the air can wiper seal locate...
Страница 14: ...ing one end into the deepest groove in stall a new quad seal by inserting one end into the deepest groove in the air can then push the remainder of the ring into the groove the air can then push the r...
Страница 15: ...glide ring and seal Clean the seal head air piston then install a new glide ring and seal NOTICE Do not remove or replace the seal head bushing The seal head bushing ring is sized at the factory and d...
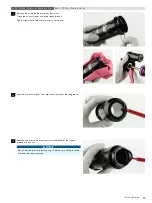
Страница 16: ...d and will need to be sent to an authorized RockShox service center for further service service center for further service CAUTION EYE HAZARD Verify all pressure is removed from the shock before proce...
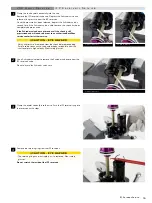
Страница 17: ...w o ring Remove the bleed screw Remove the bleed screw Thread the RockShox IFP Puller Tool into the IFP then remove the IFP Thread the RockShox IFP Puller Tool into the IFP then remove the IFP Puller...
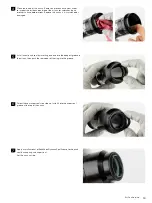
Страница 18: ...pply grease to the o ring and IFP Install a new o ring Apply grease to the o ring and IFP Remove the shock from the vise and hold it over an oil pan to drain the Remove the shock from the vise and hol...
Страница 19: ...en the seal head air piston assembly from the damper body Loosen the seal head air piston assembly from the damper body NOTICE Do not scratch the damper shaft while removing the seal head air piston S...
Страница 20: ...e rod wiper seal from the damper Apply grease to the new rod wiper seal Apply grease to the new rod wiper seal Use the bleed plug to block the port and install the new rod wiper seal Use the bleed plu...
Страница 21: ...jaws Slowly Slowly remove the dummy shaft and spring remove the dummy shaft and spring NOTICE To prevent the spring from rapidly ejecting from the dummy shaft remove the dummy shaft slowly Use needle...
Страница 22: ...et the lock piston lock shim s and spacer shims aside in the order they were removed lock shim s and spacer shims aside in the order they were removed from the piston from the piston The lock shim may...
Страница 23: ...the seal Remove the inner o ring located at the base of the threads in the seal head air piston head air piston Install a new inner o ring into the seal head air piston Install a new inner o ring into...
Страница 24: ...n step 7 onto the Install the main piston assembly that was removed in step 7 onto the damper shaft Center the shim stack under the main piston damper shaft Center the shim stack under the main piston...
Страница 25: ...ims lock shim s and lock piston in that order onto the piston assembly making sure each item is centered on the piston the piston assembly making sure each item is centered on the piston bolt bolt NOT...
Страница 26: ...t ball Press on the top hat assembly nut to install the compression rod and Press on the top hat assembly nut to install the compression rod and top hat into the main piston assembly then align the gu...
Страница 27: ...IFP into the reservoir until oil starts to emerge from the bleed hole the IFP into the reservoir until oil starts to emerge from the bleed hole CAUTION Oil can eject from the IFP bleed port Wear safet...
Страница 28: ...h the reservoir Use a finger to block the bleed port in the seal head then squeeze Use a finger to block the bleed port in the seal head then squeeze the large lever on the clamp to slowly compress th...
Страница 29: ...und the damper body and place an oil pan Wrap a shop towel around the damper body and place an oil pan beneath the shock beneath the shock Install the seal head air piston onto the damper body and smo...
Страница 30: ...nto the reservoir Squeeze the large black clamp tool inserted gently into the reservoir Squeeze the large black lever until the base of the tool is clamped on top of the reservoir lever until the base...
Страница 31: ...e bleed port until you feel it touch the compression ball then tighten the bleed screw an additional turn compression ball then tighten the bleed screw an additional turn NOTICE Overtightening the ble...
Страница 32: ...and Install the RockShox air valve adaptor tool onto the shock pump and thread the adaptor tool into the reservoir air valve Inflate the reservoir thread the adaptor tool into the reservoir air valve...
Страница 33: ...eed Install a new IFP reservoir fill cap o ring and install the fill cap into the Install a new IFP reservoir fill cap o ring and install the fill cap into the IFP reservoir cap IFP reservoir cap Schr...
Страница 34: ...f of the pillow pack of Maxima Extra 15w50 Inject 1 mL or half of the pillow pack of Maxima Extra 15w50 Suspension Oil into the air can before installing the air can onto the Suspension Oil into the a...
Страница 35: ...ten and tighten Remove the shock from the vise Clean the shock Remove the shock from the vise Clean the shock Install the sag indicator o ring Install the sag indicator o ring Pressurize the shock eno...
Страница 36: ...eed to be equalized between the shock chambers Record the air pressure value on the pump then unthread it from the shock Slowly but firmly press or sit on the saddle to compress the shock until there...
Страница 37: ...MatchMaker Maxle Maxle 360 Maxle DH Maxle Lite Maxle Lite DH Maxle Stealth Maxle Ultimate Micro Gear System Mini Block Mini Cluster Monarch Monarch Plus Motion Control Motion Control DNA MRX Noir NX O...
Страница 38: ...1598 8 Chung Shan Road Shen Kang Hsiang Taichung City Taiwan R O C WORLD HEADQUARTERS SRAM LLC 1000 W Fulton Market 4th Floor Chicago Illinois 60607 U S A EUROPEAN HEADQUARTERS SRAM Europe Paasbosweg...