B. IMPORTANT!!! Refer to the driver documentation to determine
whether to use a sealed or ported enclosure. If the manufacturer
recommends a sealed enclosure continue to step C. If the
manufacturer recommends a ported enclosure, refer to the tuning
chart on the back for porting procedures.
C. Connect the speaker leads from the woofers to the terminal cups.
Be sure to wire the positive to red and the negative to black.
D. Align the mounting holes on the driver with the recesses in the
Q-Ring. If necessary, rotate the Q-Ring and the driver to properly
align printing on the dustcap.
E. Using the supplied screws, securely mount the driver in the
enclosure. It is recommended to start all screws and then come
back and retighten screws to prevent the driver basket from being
bent or distorted during mounting.
A. Experiment to find the best location for your new subwoofer system. Subwoofers for hatchbacks can
fire either upward, forward or backward for the best sound. Positioning makes a big difference in
sound quality.
B. FLYING SPEAKERS ARE DANGEROUS!! Permanent mounting is not only the safest installation, but
usually produces the best sound quality too. However, if you decide to mount your speakers so that
they can be easily removed, there are many suitable types of brackets available at most hardware
stores. The key to selecting such hardware is to make sure that the mounting will hold the speaker
securely. Good luck and enjoy your new subwoofer!
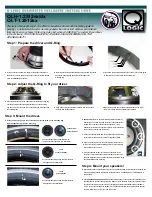
QLH-1.2512sx/dx
QLT-1.2512sx
Thanks for choosing Q-Logic! - the ONLY subwoofer enclosure with the Q-Ring (patent-
pending), a multi-diameter woofer mounting adapter that can extract optimum performance
from any driver you choose! Follow the 4-step instructions CAREFULLY to custom fit your driver
to the enclosure. YOUR INSTALLATION CAN MAKE A HUGE DIFFERENCE IN THE
SOUND QUALITY!
A. Using one of the supplied rolls, apply the foam tape to the back of
the driver. Use care to apply the foam tape so that all of the mounting
holes are COMPLETELY covered.
B. Place ring face down with tabs sticking up. Apply foam tape to the
back of the mounting ring against the inside edge of the
mounting ring.
C. If you know the mounting diameter of your driver, use the trim guide
to determine if you need to trim the mounting ring.
A. Place the driver face down on a flat surface. Place the mounting ring
over the driver with the locating tabs pointing up. If the mounting
ring does not rest on the foam tape on the driver you will need to trim
the centering tabs.
B. Using a pair of diagonal cutters or scissors, trim each of the 6
centering tabs. Recheck the fit.
Step 1: Prepare the driver and Q-Ring.
C. When the mounting ring fits against the foam tape on the driver,
the driver is ready to be mounted into the enclosure.
A. Place the mounting ring in the enclosure and align the arrow on the mounting ring
with the alignment mark on the silver ring.
Use this position for mounting drivers with offset
hole alignment. (see illustration)
Use this position for mounting drivers with offset
hole alignment. (see illustration)
Step 2: Adjust the Q-Ring to fit your driver.
Step 3: Mount the driver.
CONVENTIONAL
HOLE ALIGNMENT
8 HOLE
OFFSET ALIGNMENT
6 HOLE
OFFSET DRIVERS
Use this position for mounting drivers with
conventional hole alignment. (see illustration)
Step 4: Mount your speakers!
11.36
11.12
11.00
10.75
TM
Содержание Punch Z RFZ3408
Страница 1: ...700RFP4112 This is a Package that consists of 575RFP4112 044H1212SX...
Страница 2: ......
Страница 3: ......
Страница 4: ......
Страница 5: ......
Страница 6: ......
Страница 7: ......
Страница 8: ......
Страница 9: ......
Страница 10: ......
Страница 11: ......
Страница 12: ......
Страница 13: ......

