


4
fig1
fig2
1.
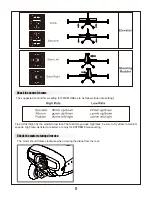
Unpack the elevator parts bag and assembl PA 2.3*10 mm and connecting pipe as shown in Figure 3 and 4.
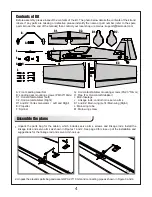
Unpack the parts bag for the aileron, which includes servo arms, screws and linkage rods. Install the
linkage rods and servo arms as shown in Figures 1 and 2. See page 9 for close up of the installation and
suggestions for the linkage rod and servo arm hook up.
Assemble the plane
2.
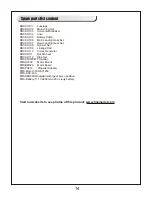
Before assembly, please inspect the contents of the kit. The photo below details the contents of the kit and
labels. If any parts are missing or defective, please indentify the name or part number (refer to the spare
parts list near the end of the manual) then contact your local shop or email us: [email protected]
Contents of Kit
A: Front Landing Gear Set
B: Landing gear mounting screws (PM3.0*10mm)
C1: Horizontal stabilizer (Left)
C2: Horizontal stabilizer (Right)
D1 and D2:
Vortex Generator
(
Left and Right
)
E: Propeller
F: Spinner
G: Horizontal stabilizer mounting screws (PA2.3*10mm)
H: Pipe (For Horizontal Stabilizer)
I: Main fuselage
J : Linkage rods, control horns, servo arms
K1 and K2: Main wing (Left) /Main wing (Right)
L:
Main wing tube
M: Main wing screw
A.
B.
E.
F.
G.
H.
J.
K1.
K2.
L.
M.
I.
C1.
C2.
D1.
D2.
Содержание 1100MM MXS 3D
Страница 1: ...1100MM MXS 3D 1100 1080 42 5 43 3 1 1 00g 38 8 35 7 30 8 478 7 0 081 4...
Страница 13: ...13 Troubleshooting...
Страница 15: ...15 ESC instruction...
Страница 16: ......


