ROBOT CONSTRUCTION KIT
ROBOT CONSTRUCTION KIT
ROBOT CONSTRUCTION KIT
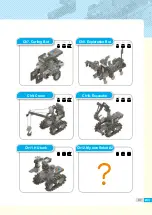
Construct more than 30 models with RQ+110, RQ+120 and RQ+130
Address:
B-611, DMC Hi-tech Industry center, Seongam-ro 330, Mapo-gu, Seoul, Korea 03920
e-mail:
website:
www.robobuilder.net
RQ
Q
+
110
R
RQ
+120
RQ
Q
+
130
Q
O
Q
RQ
RQ
Q
RQ
RQ
RQ
Q
+
+
+
+
0
11
1
0
0
11
11
0
0
Q
RQ
R
RQ
RQ
RQ
Q+
+
+
0
120
20
120
Q
RQ
Q
RQ
RQ
Q
Q+
+
+
0
130
0
130
RQ
HUNO
RQ
HUNO
RQ HUNO
RQ HUNO
로보빌더 RQ130 교재표지_앞_182*257 책등 10mm
로보빌더 RQ130 교재표지_뒤_182*257 책등 10mm
Publication Date : May. 2017.
REV. 01
Copyright by ROBOBUILDER CO., LTD. All rights reserved. Printed in Korea.
No part of this publication may be reproduced or distributed in any form or by any means,
without the prior written permission of the publisher.
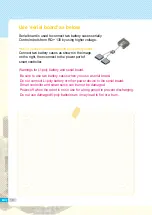
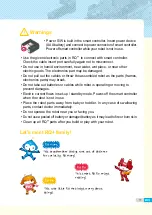
Power S/W is built in the smart controller. Insert power device (AAA battery)
and connect to power connector of smart controller.
Power off smart controller while your robot is not in use.
Use the given electronic parts in RQ+ to connect with smart controller.
Check the cable insert port carefully again not to misconnect.
Do not use in humid environment, near water, wet place, or near other electric goods.
The electronic parts may be damaged.
Do not pull out the cables or throw the assembled robot as the parts (frames,
electronics parts) may break.
Do not take out batteries or cables while robot is operating or moving to prevent damages.
Electric current flows in set-up / standby mode.
Power-off the smart controller when the robot is not in use.
Place the robot parts away from baby or toddler.
In any case of swallowing parts, contact doctor immediately.
Do not operate the robot near you or facing you.
Do not use a peeled off battery or damaged battery as it may lead to fire or burn skin.
Clean up all RQ+ parts after you build or play with your robot.
Warnings
Publisher : ROBOBUILDER CO., LTD.
Address : B-808, DMC Hi-tech Industry Center, Seongam-ro 330, Mapo-gu, Seoul,
Korea 03920.
TEL : +82-2-3141-5101
E-mail: [email protected]
Содержание RQ PLUS 130
Страница 1: ...ROBOT CONSTRUCTION KIT Construct more than 30 models with RQ 110 RQ 120 and RQ 130 ...
Страница 2: ...List BASICS Tank Bot Four wheeled Bot Dino Vulcan Bot Forklift 06 12 30 48 68 88 ...
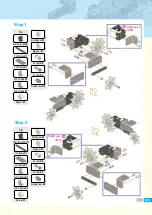
Страница 20: ...Step 16 Tip Tip 3s rivet X4 2s rivet X1 Step 15 22 ...
Страница 22: ...Smart servo ID00 Smart servo ID01 Smart servo ID02 Tip Double rivet X4 Step 20 Step 19 24 ...
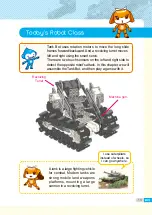
Страница 23: ... Tank Bot is ready completion 25 ...
Страница 27: ...MEMO 29 ...
Страница 37: ...Step 14 Tip Tip 2s rivet X2 2s rivet X8 Step 13 Step11 39 ...
Страница 45: ...MEMO 47 ...
Страница 52: ...Step 8 Tip Tip 3s rivet X3 3s rivet X3 Step 7 Step5 54 ...
Страница 54: ...Step 12 Tip Double rivet X2 Step 11 R motor ID30 R motor ID29 R motor ID30 Power Check the cable connection 56 ...
Страница 59: ...Step 22 Tip Tip 3 4 L frame X2 Spacer X2 2s rivet X6 3s rivet X4 7 7 frame X1 2s rivet X4 Step 21 Step19 61 ...
Страница 60: ...Step 24 Tip Tip 2s rivet X4 Double rivet X2 Step 23 Step17 Step18 62 ...
Страница 61: ... Dino robot is ready completion 63 ...
Страница 65: ...MEMO 67 ...
Страница 71: ...Step 6 Tip Tip 3 7 frame X2 3 9 frame X3 3s rivet X8 2s rivet X4 Step 5 73 ...
Страница 81: ... Vulcan Bot is ready completion Tip Double rivet X4 Step 25 83 ...
Страница 85: ...MEMO 87 ...
Страница 94: ...Step 13 Step 12 Tip Tip 2s rivet X4 2s rivet X8 Step6 96 ...
Страница 99: ...Step 23 Step 22 Tip 5 5 frame X2 2s rivet X8 Smart servo ID03 Smart servo ID02 Power Step14 101 ...
Страница 102: ...Step 29 Step 28 Tip Tip 2 5 frame X2 3s rivet X6 1 8 frame X4 Rubber pad X4 2s rivet X8 Fork for forklift Step26 104 ...
Страница 103: ... Forklift robot is ready completion Do not force the forklift to move It may damage the smart servo and gear 105 ...
Страница 106: ... Complete of an additional battery case for Forklift Step 4 completion 108 ...
Страница 113: ...MEMO 115 ...
Страница 122: ...Tip Tip 2s rivet X2 2s rivet X2 Step 11 Step 12 Step7 Smart servo ID02 Smart servo ID03 It becomes the tongs 124 ...
Страница 126: ...Tip Tip 3 4 L frame X2 2s rivet X4 3 4 L frame X2 2s rivet X4 Step 19 Step 20 128 ...
Страница 129: ... Curling Bot is ready completion 131 ...
Страница 133: ...MEMO 135 ...
Страница 142: ...Tip Tip Battery case X1 Double rivet X4 2s rivet X8 Step 11 Step 12 144 ...
Страница 146: ...Tip Tip 7 7 frame X1 2s rivet X6 2s rivet X4 Step 19 Step 20 Step17 148 ...
Страница 152: ...Tip 2s rivet X4 Step 31 Step 32 Smart servo ID00 Smart servo ID01 Smart servo ID03 Smart servo ID02 154 ...
Страница 153: ... Exploration Bot is ready completion Do not fold the solar light panel by force 155 ...
Страница 155: ...Take out the smart controller and connect the serial board then reassemble 157 ...
Страница 156: ...Tip Tip 2s rivet X4 Battery case X4 1 5 frame X1 Double rivet X4 Step 4 Step 5 158 ...
Страница 157: ...Step 6 Complete of an additional battery case for Exploration Bot completion 159 ...
Страница 161: ...MEMO 163 ...
Страница 165: ...Tip Tip 2s rivet X4 2 5 frame X2 2s rivet X6 Step 3 Step 4 167 ...
Страница 173: ...Tip Tip 2 15 frame X2 2s rivet X8 2s rivet X2 Step 17 Step 18 Step15 175 ...
Страница 180: ...Step 31 Tip Double rivet X2 Step 32 Smart servo ID00 Smart servo ID03 Smart servo ID02 Smart servo ID01 182 ...
Страница 183: ...Tip Serial board X1 Double rivet X2 Step 2 Step 3 185 ...
Страница 184: ... Complete of an additional battery case for Crane completion 186 ...
Страница 199: ...Tip Tip 2s rivet X2 1 12 frame X1 2s rivet X2 Step 25 Step 26 Step19 Smart servo ID03 Smart servo ID02 201 ...
Страница 200: ...Tip Tip 1 3 frame X1 1 5 frame X1 1 12 frame X1 2 5 frame X1 3s rivet X3 2s rivet X3 Step 27 Step 28 Step26 202 ...
Страница 205: ...Tip Battery case X1 Double rivet X2 Step 2 Step 3 207 ...
Страница 206: ...completion Complete of an additional battery case for Excavator 208 ...
Страница 214: ...Step 10 Take out 2s rivets Smart servo ID00 to the 12 o clock direction Tip 2 5 L frame X2 3s rivet X4 Step 11 216 ...
Страница 215: ...Step 12 Step 13 Disconnect smart servo ID00 Disconnect 3 6 L frame Take out 2s rivet Take out 3s rivet 217 ...
Страница 217: ...Tip Tip IR sensor X1 Double rivet X2 2s rivet X4 Step 16 Step 17 219 ...
Страница 220: ...Tip Tip 2s rivet X4 2s rivet X6 Step 22 Step 23 Step19 222 ...
Страница 222: ...Tip Tip 2s rivet X1 3s rivet X2 2 5 frame X1 Spacer X1 2s rivet X1 3s rivet X2 Step 26 Step 27 Step23 224 ...
Страница 225: ...Tip Tip Spacer X1 Small gear X1 2s rivet X4 3s rivet X1 2s rivet X4 Step 32 Step 33 Step27 227 ...
Страница 229: ...Tip Battery case X1 Double rivet X2 Step 2 231 ...
Страница 230: ... Complete of an additional battery case for Hu tank completion 232 ...
Страница 242: ...MEMO 244 ...
Страница 243: ...MEMO 245 ...


