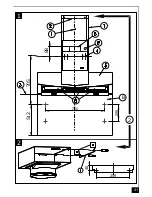


34
de motor is gestoken (
Afb. 5
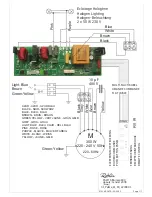
). Maak de elektrische aansluitingen van de afzuigkap (zie hoofdstuk
Elektrische aansluiting) en controleer de goede werking van de verlichting, de motor en de overs
-
chakeling van de verschillende afzuigsnelheden.
d- Plaats de cassettes met de actief koolstoffilters in het hiertoe bestemde compartiment door op de
lipjes (
A
) te drukken (
Afb. 4
).
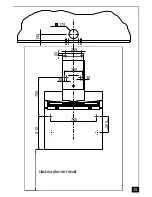
e- Steek het bovenste deel van de schacht in het onderste deel van de telescopische schacht (
Afb. 1
- ref. 7a en b
) door het te laten met minstens 150 mm overschrijden, het handhaven in deze positie
met een plakband (teneinde de strepen tussen de schacht te vermijden). De schacht op de afzui
-
gkap plaatsen en bevestig het bovenste deel van de schacht op de steun (
2
) met 2 meegeleverde
M4 schroeven (
12c
). Schuif het onderste deel van de schacht door tot het motorblok.
De aandacht
dreigt van strepen op het niveau van de verbinding van de afzuigkap met de schacht. Niet de
beschermende film van de afzuigkap voor de volledige vaststelling van de schacht.
f- 3 déflecteurs bepalen
ref 9
.
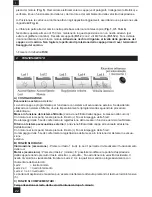
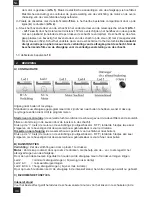
4 BEDIENING
A) CONFIGURATIE
Uitgang naar buiten of recyclage
Standaard is uw afzuigkap geprogrammeerd om zijn afvoer naar buiten te hebben, wenst U deze op
recyclage te zetten dient U dit te programmeren.
Starten van recirculatie
(de vervuilde lucht wordt door de schouw gevoerd via de vetfilters en de koolstof
-
filters en komt terug in de keuken door de roosters in de schacht).
Druk op de “+” toets (de motor en de verlichting zijn uitgeschakeld- ‘OFF’) totdat de 5 ledjes twee keer
knipperen om te bevestigen dat de wasemschouw gebruiksklaar is voor recirculatie.
Omzetten naar afzuiging
(de wasemschouw is geschikt voor luchtafvoer naar buiten).
Druk op de “+” toets (de motor en de verlichting zijn uitgeschakeld - ‘OFF’) totdat de 5 ledjes één keer
knipperen om te bevestigen dat de wasemschouw gebruiksklaar is voor afvoer naar buiten.
B) BASISFUNCTIES
Verlichting :
Zet de verlichting aan door op toets 1 te drukken
Motor :
Zet de kap in dienst door op toets 2 te drukken, met behulp van de – en + toets regelt U het
afzuigvermogen van de afzuigkap.
Door één van deze toetsen ingedrukt te houden zal de afzuigkap meer of minder vermogen krijgen.
Led 2 = minimum afzuigvermogen ( bij weinig rook & damp)
Led 2 & 3 = normaal afzuigvermogen
Led 2 & 3 & 4 = hoog afzuigvermogen ( bij veel rook & damp)
Door op toets 5 te drukken zet U de afzuigkap in de intensief stand, het volle vermogen wordt nu gebruikt.
C) BIJKOMENDE FUNCTIES
Intensief stand
Voor het beste effect geldt het advies de schouw enkele minuten vóór het koken in te schakelen (in de
NL
Содержание Lotus M 900 EE INOX
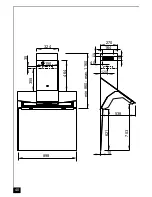
Страница 41: ...39 170 120 259 260 30 30 700 512 705 40 Hauteur plan de travail 250 ...
Страница 42: ...40 min 860 max 1160 164 56 40 0 5 270 324 538 4 6 4 120 10 355 150 5 3 898 703 621 ...
Страница 43: ...41 2 2 1 88 705 259 40 700 512 B 250 ...
Страница 44: ...42 3 4 10 10 30 1217 260 4 A ...
Страница 45: ...43 5 6 6 R 7b 7a ...
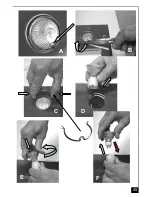
Страница 47: ...45 A B C D E F F ...
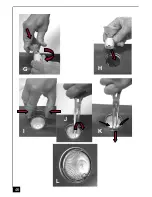
Страница 48: ...46 G H I J K L ...
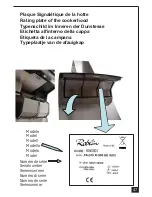
Страница 50: ...48 Composants Components Bauelemente Componenti Componentes Onderdelen 2 4 6 5 9 7 8 R B ...
Страница 51: ......