background image

16

GB

INSTALLATION

Wall drilling and bracket fixing

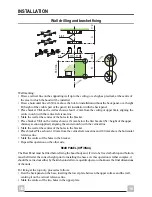
Wall marking:
• Draw a vertical line on the supporting wall up to the ceiling, or as high as practical, at the centre of 

the area in which the hood will be installed.

• Draw a horizontal line at 650 mm above the hob for installation without the back panel, or at height 

H (height of the visible part of the panel) for installation with the back panel.

• Place bracket 7.2.1 on the wall as shown about 1-2 mm from the ceiling or upper limit, aligning the 

centre (notch) with the vertical reference line.

• Mark the wall at the centres of the holes in the bracket.
• Place bracket 7.2.1 on the wall as shown at X mm below the first bracket (= height of the upper 

chimney section supplied), aligning the centre (notch) with the vertical line.

• Mark the wall at the centres of the holes in the bracket.
• Place bracket 7.1 as shown 110 mm from the vertical reference line and 180 mm above the horizontal 

reference line.

• Mark the centres of the holes in the bracket. 
• Repeat this operation on the other side.

REAR PANEL (OPTIONAL)

The Rear Panel must be fitted before fixing the hood body and, if it is to be fixed at both top and bottom, 
must be fitted at the correct height prior to installing the bases. As this operation is rather complex, it 
should be carried out either by the kitchen installer or a qualified person who knows the final dimensions 
of the units. 

For fixing at the top only, proceed as follows:
• Rest the back panel on the base, inserting the lower plate between the upper surface and the wall, 

centring it on the vertical reference line.

• Mark the centres of the two holes in the upper plate.

H

180

X

1÷2

650 min.

7.2.1

7.1

110

110

Содержание DIVA 900 S

Страница 1: ...FR Manuel d Instructions 2 GB Instruction Manual 12 Diva 900 S...

Страница 2: ...tentivement les recommandations contenues dans ce mode d emploi votre hotte restera toujours efficace et fournira constamment les m mes performances SOMMAIRE CONSEILS ET SUGGESTIONS 23 CARACTERISTIQUE...

Страница 3: ...nte du milieu Si la cuisine en est d pourvue pratiquez une ouverture qui communique avec l ext rieur pour garantir l infiltration de l air pur UTILISATION La hotte a t con ue exclusivement pour l usag...

Страница 4: ...Isolement Puissance Tension alimentation 220 240 V 6 40K A 1 IIme 150 W Fr quence alimentation 50 Hz 6 50K A 1 IIme 190 W Poids 12 kg 8BS 28K A P 1 IIme 205 W PRO 1 Ire 330 W Hotte Type 60 90 L 598 89...

Страница 5: ...rection Droite Sortie Air 8b 1 Grille en Direction Gauche Sortie Air 9 1 Flasque de R duction 150 120 mm 15 1 Raccord Sortie Air R f Q t Composants pour l installation 7 1 2 Brides Fixation Corps Hott...

Страница 6: ...des trous de la bride Poser comme indiqu la bride 7 1 110 mm de la ligne verticale de rep re et 180 mm au dessus de la ligne horizontale de rep re Marquer les centres des trous de la bride R p ter cet...

Страница 7: ...d M4 x 25 fournies Accrocher le corps hotte aux brides 7 1 en le centrant sur la ligne verticale Agir sur les vis 12d par le dessous de la hotte pour en niveler le corps En cas de branchement avec un...

Страница 8: ...fournies Chemin e inf rieure Elargir l g rement les deux bords lat raux de la Chemin e et les accrocher entre la Chemin e sup rieure et la paroi refermer jusqu la but e Fixer lat ralement la partie i...

Страница 9: ...3 Vitesse maximum pour faire face aux missions maximum de vapeur de cuisson m me pendant des temps prolong s L Lumi res Allume et teint l clairage S Led Led allumage moteur V1 Moteur Met en marche et...

Страница 10: ...es un par un en agissant sur les crochets pr vus cet effet Laverlesfiltresen vitantdelesplieretleslaisser s cher avant de les remonter Les remonter en veillant tenir la poign e vers la partie visible...

Страница 11: ...ACEMENT LAMPES Lampes incandescence de 40 W Retirer les filtres anti graisse m talliques D visser les lampes et les remplacer par de nouvelles avec les m mes caract ristiques Remonter les filtres anti...

Страница 12: ...tions contained in this Instruction Manual your appliance will give you constant high performance and will remain efficient for many years to come CONTENTS RECOMMENDATIONS AND SUGGESTIONS 13 CHARACTER...

Страница 13: ...order to prevent the backflow of exhaust gas The kitchen must have an opening communicating directly with the open air in order to guarantee the entry of clean air USE The extractor hood has been desi...

Страница 14: ...ty Insulation Class Power Supply Voltage 220 240 V 6 40K A 1 IIa 150 W Supply Frequency 50 Hz 6 50K A 1 IIa 190 W Weight 12 kg 8BS 28K A P 1 IIa 205 W PRO 1 Ia 330 W Hood Type 60 90 L 598 898 P 469 49...

Страница 15: ...Outlet Grill 8b 1 Left Air Outlet Grill 9 1 Reducer Flange 150 120 mm 15 1 Air Outlet Connection Ref Q ty Installation Components 7 1 2 Hood Body Fixing Brackets 7 2 1 2 Upper Chimney Section Fixing...

Страница 16: ...he centre notch with the vertical line Mark the wall at the centres of the holes in the bracket Place bracket 7 1 as shown 110 mm from the vertical reference line and 180 mm above the horizontal refer...

Страница 17: ...UTLET Screw the two screws 12d M4 x 25 supplied onto the brackets 7 1 Hook the hood body onto bracket 7 1 centring it around the vertical line Use the adjusting screws 12d underneath the hood to level...

Страница 18: ...2e 2 9 x 9 5 supplied Lower chimney section Slightly widen the two sides of the section and hook them between the upper section and the wall making sure that they are properly housed Fix the sides of...

Страница 19: ...3 Maximum speed used for eliminating the highest cooking vapour emission including long periods 1 1 0 1 0 2 3 L M V L Light Switches the lighting system on and off S Led Motor running led V1 Motor Sw...

Страница 20: ...Remove the filters by releasing the fixing hooks Wash the filters taking care not to bend them Allow them to dry before refitting When refitting the filters make sure that the handle is visible on th...

Страница 21: ...1 GB Lighting LIGHT REPLACEMENT 40 W incandescent light Remove the metal grease filters Unscrew the bulbs and replace them with new ones having the same characteristics Replace the metal grease filter...

Страница 22: ...europ enne en mati re de basse tension C E E 73 23 de s curit lectrique ainsi qu aux normes europ ennes C E E 89 336 en mati re de compatibilit lectromagn tique et C E E 93 68 en mati re de label CE...

Отзывы: