background image


Electrical connection 


LOCAL AUTHORITY REQUIREMENTS 

Installation is only permitted by a licensed electrician and carried out according to 
instructions provided by the manufacturer.  Incorrect installation might cause harm 
and damage, for which the manufacturer accepts no responsibility. 


Electrical Installation 
Before carrying out the connection to the power supply, the voltage rating of the appliance (stamped on the 
appliance identification plate) must be checked for correspondence to the available mains supply voltage, and the 
main

s electric wiring should be capable of handling the oven’s power rating (also indicated on the identification 

plate). If you have any doubts, call in a qualified technician. 
 
NOTE: For connections to the mains power supply, never use adapters, reductions or multiple power points as these 
may overheat and catch fire. Do not install separate timers. 
After having installed the appliance, the switched outlet must always be in an accessible position. The electrical 
safety of this appliance can only be guaranteed if the cooktop is correctly and efficiently earthed, always ensure that 
the earthing is efficient; if you have any doubts call in a licensed electrician to check the system. The manufacturer 
declines all responsibility for damage resulting from an installation which has not been correctly earthed. 
 
WARNING: If any damage occurs to the power cable during or after installation, it must be replaced immediately by 
a licensed electrician with a replacement cable from your Service Centre. 
 
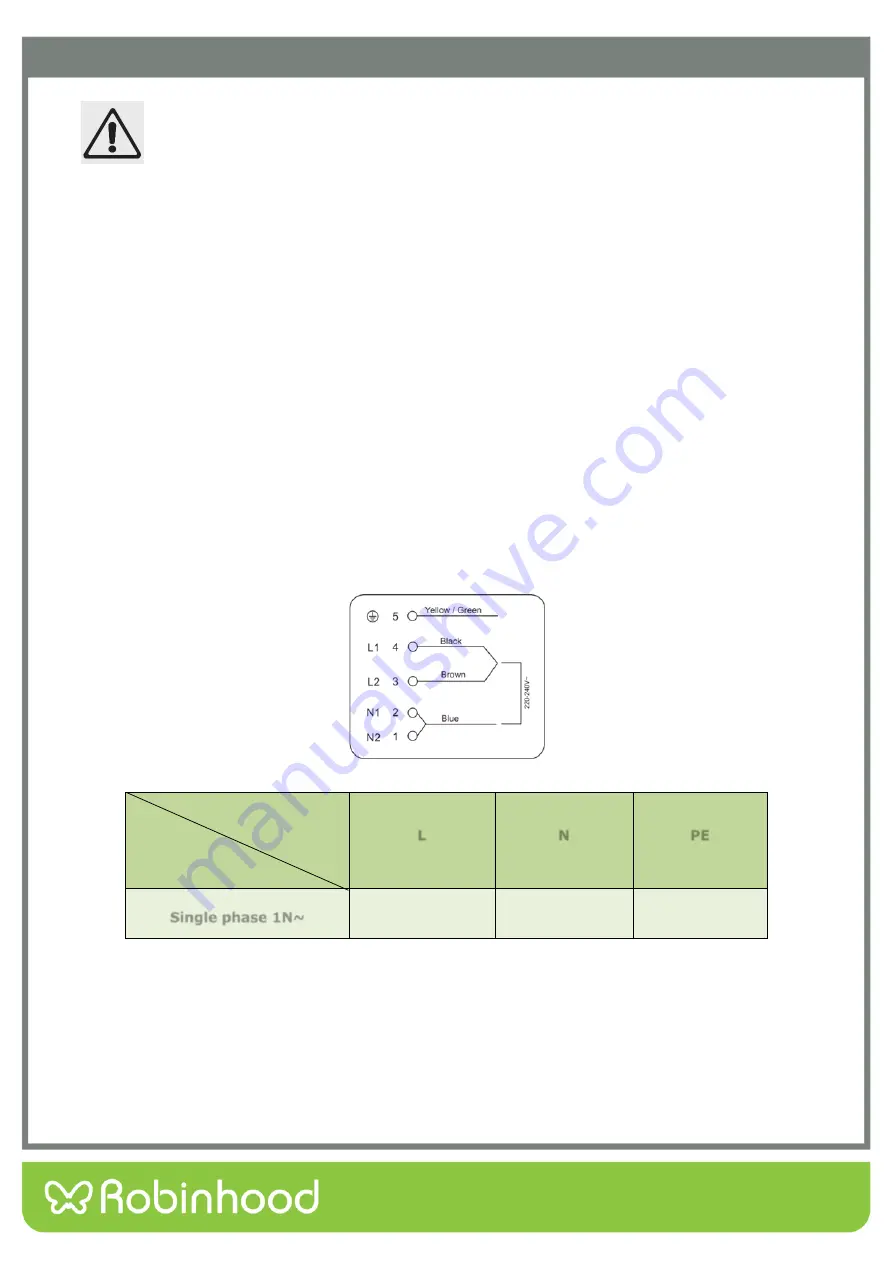
The cooktops are to be connected to a single phase 220-240Vac 50 Hz supply.  
 
The appliance is designed for fixed connection to the mains.  Means for disconnection with a suitable - isolating 
switch must be incorporated in the fixed wiring in accordance with the wiring rules. The power supply cord must not 
touch against any hot surfaces and must be placed so that its temperature does not exceed 75 °C at any point along 
its length. 


Wire cross-sectional 

 area 

Connection mode 

PE 

Single phase 1N~ 

Minimum 2.5mm 

Minimum 2.5mm  Minimum 2.5mm 


Содержание HIC604TFG

Страница 1: ...Installation and Operating Instructions Issue 1 Description ROBINHOOD 60CM INDUCTION COOKTOP Model Number HIC604TFG ...

Страница 2: ...r proof of purchase along with any other important documents about this product for future reference Due to continual product development Robinhood reserves the right to alter specifications or appearances without notice Important Safety Instructions 1 Installation 3 Appliance details 5 Electrical connection 6 Operating Instructions 7 Cleaning and Maintenance 11 Warranty Certificate New Zealand 13...

Страница 3: ... Metallic objects such as knives forks spoons and lids should not be placed in the hob surface since they can get hot The appliance may be built in and connected to the power supply only by a qualified technician Particular areas of the cooktop surface adjacent to the hotplates are hot during operation Hot oil ignites readily so be sure have the preparation of such food fries under constant contro...

Страница 4: ...wed in case the minimum distance remains as indicated on the installation illustrations Minimum distance between the built in cooktop and rear wall is indicated at the illustration for the installation of the built in cooktop Induction cooktop may be installed into benchtop between 25mm to 40mm thick Kitchen cabinet must not have a drawer directly below cooktop It must be fitted with a horizontal ...

Страница 5: ... and larger deformation caused by heat radiation from the hotplate Note The safety distance between the sides of the hob and the inner surfaces of the worktop should be at least 3mm Important Ensure that the cooktop is well ventilated and that the air inlet and outlet are not blocked B mm C mm D E 50 min 20 min Air inlet Air outlet 5mm To avoid accidentally touching the hot underside of the cookto...

Страница 6: ...ar wall adjacent and surrounding surfaces must therefore be able to withstand a temperature of 90 C Before locating the fixing brackets The unit should be placed on a stable smooth surface use the packaging Do not apply force onto the controls protruding from the hob Fix the hob to the bench by screwing the four brackets to the bottom of the cooktop see image after installation Note The brackets s...

Страница 7: ...consultations Specifications Model HIC604TFG Cooking Zones 4 Zones Supply Voltage 220 240V 50 Hz Rated Power 7200W Product Size D W H mm 590X520X62 Top View 1 Max 1300 1500W Zone 4 Max 1800 2000W Zone 2 Max 2300 2600W Zone 5 Glass plate 3 Max 1800 2000W Zone 6 Control panel Control Panel 1 ON OFF control 2 Timer control 3 Boost 4 Heating zone selection controls 5 Power Timer regulating key 6 Key l...

Страница 8: ...outlet must always be in an accessible position The electrical safety of this appliance can only be guaranteed if the cooktop is correctly and efficiently earthed always ensure that the earthing is efficient if you have any doubts call in a licensed electrician to check the system The manufacturer declines all responsibility for damage resulting from an installation which has not been correctly ea...

Страница 9: ...d base Make sure that the base of your pan is smooth sits flat against the glass and is the same size as the cooking zone Always centre your pan on the cooking zone Always lift pans off the cooktop do not slide or they may scratch the glass If the display flashes alternately with the heat setting This means that you have not placed a pan on the correct cooking zone or the pan you re using is not s...

Страница 10: ...he control B for boost function the indicator will show P for selected zone To cancel boost function touch control B or touch Select a heat setting by touching the or control You can modify the heat setting at any time during cooking By holding down either of these controls the value will adjust up or down Note If you don t choose a heat setting within one minute the cooktop will automatically swi...

Страница 11: ...ff a cooking zone after the timer has finished The timer can be set to a maximum of 99 minutes Using the Timer as an Alarm Adjust the timer with the and buttons The timer display will start flashing When the time is set the timer will begin counting down immediately The display will show the remaining time and the timer indicator will flash for five seconds To cancel the timer hold the and buttons...

Страница 12: ...he timer display will show the shortest time remaining The red dot n next to the power indicator will flash to show to currently displayed timer When the shortest timer has elapsed the corresponding the display will show the next shortest time Over Temperature Protection This cooktop is equipped with a temperature sensor which can detect when the cooktop is at an excessive heat If this happens the...

Страница 13: ...cooktops but beware of hot cooking zone surfaces 1 Switch the power to the cooktop off at the wall 2 Hold the blade or utensil at a 30 angle and scrape the soiling or spill to a cool area of the cooktop 3 Clean the soiling or spill up with a dish cloth or paper towel 4 Follow steps 2 to 4 for Everyday soiling on glass above Remove stains left by melts and sugary food or spillovers as soon as possi...

Страница 14: ... This may be caused by the construction of your cookware layers of different metals contracting and expanding differently This is normal for cookware and does not indicate a fault The induction hob makes a low humming noise when used on a high heat setting This is caused by the technology of induction cooking This is normal but the noise should quieten down or disappear completely when you decreas...

Страница 15: ...g products such as abrasive cream or powder cleansers furniture polish bleach mentholated spirits drain cleaners sugar soap metal pads and strongly alkaline or acidic cleaners Heat damage including from washing the product at high temperatures Impact or mishandling the product including the impact caused by objects scraped along thrown or dropped on the product surface or excessive weight being pl...

Страница 16: ...d com au www robinhood com au Attention Customer Services Manager Warranty exclusions 1 The warranty does not apply where in Shriro s opinion The defect is caused by misuse wear and tear dirt fire or accidental damage The product has been repaired or serviced by an unauthorised person The product was not installed in accordance with our instructions The product was purchased overseas or was not de...

Отзывы: