background image

55

Automatically updating the clock

Your radio will normally update the clock automatically when connected to 

the internet. If you enter a time setting manually, the radio will calculate a 

local time offset so that whenever it synchronises using the internet, the 

correct local time is stored in the radio. In the event of a power failure, 

your radio will connect to the internet and then set the clock automatically 

based on this information.
You may wish to use the radio away from the internet, in which case you 

may specify that the radio sets its clock from DAB+ or FM radio broadcasts. 

After a power failure the radio will then set its clock the next time that you 

turn on the radio in DAB+ or FM mode.
Alternatively you may specify that the time is not automatically updated. 

In  this  case  the  clock  must  always  be  set  manually  after  a  power 

interruption.

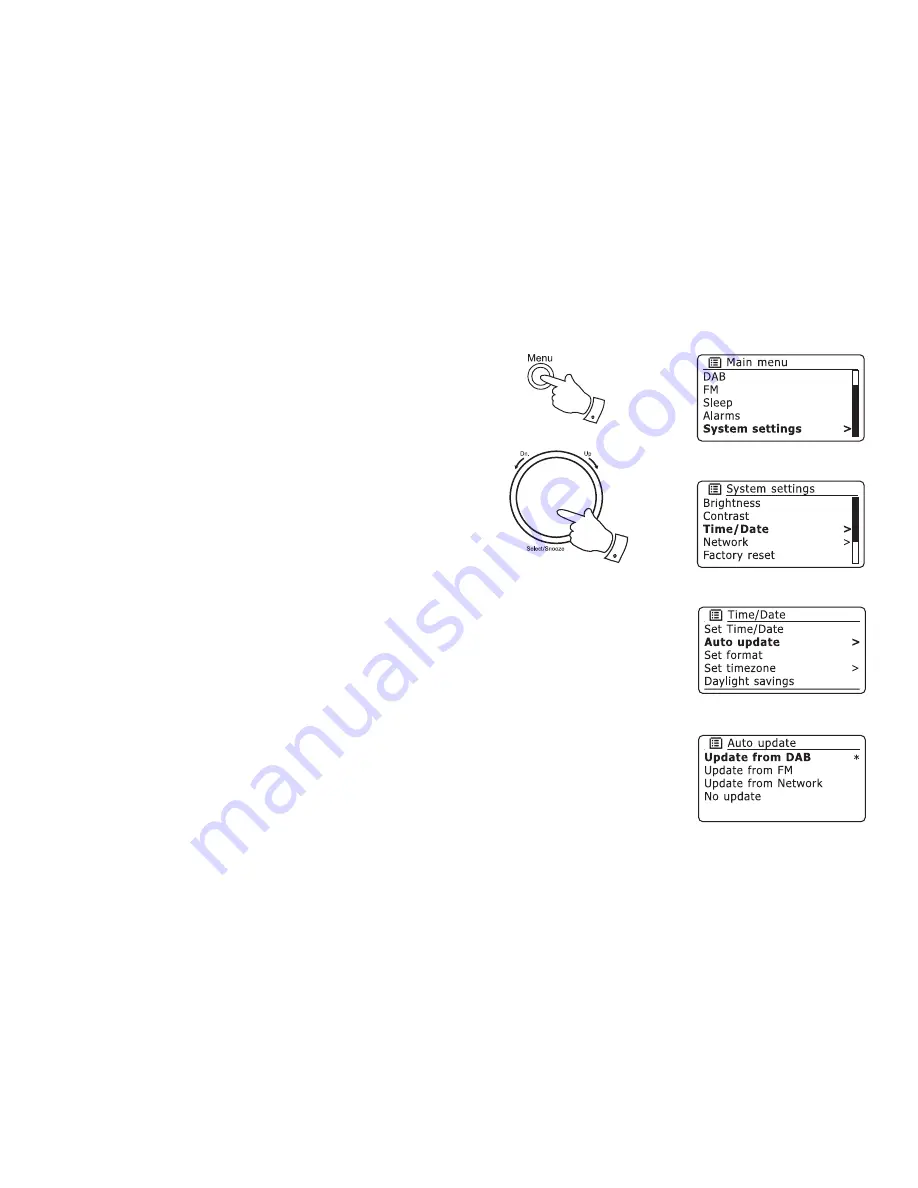
1.   With your radio switched on, press the 

Menu 

button to access the 

menu for the current mode. 

2.  Rotate the 

Tuning/Select 

control until 'System settings' is highlighted 

on the display. Press the control to enter the system settings menu.

3.  Rotate the 

Tuning/Select 

control until 'Time/Date' is highlighted on 

the display. Press the control to enter the time setup.

4.  Rotate the 

Tuning/Select 

control until 'Auto update' is highlighted on 

the display. Press the control to enter the auto-update menu.

5.   Rotate the 

Tuning/Select 

control to choose an update option from 

'Update  from  DAB',  'Update  from  FM',  'Update  from  Network'  or 

'No update' as required. Press the control to confi rm your choice. The 

radio will then exit to the previous menu display.

2-5

1

Содержание WM-202

Страница 1: ...WM 202 DAB FM WiFi Internet Radio with MP3 WMA Media Streaming Please read this manual before use ROBERTSSound for Generations with Enhanced User Interface ...

Страница 2: ...hares 31 Locate the shared audio files using the radio 32 33 Setup a windows PC via UPnP server 34 Connecting the radio using UPnP 35 Locating and playing media files using UPnP 36 37 Media selection 38 39 Controlling playback 39 Display mode Media Player 40 Contents Operating your radio DAB 41 48 Selecting a station DAB 42 Secondary services DAB 42 Display modes DAB 43 44 Finding new stations DAB...

Страница 3: ...r UPnP servers e g Windows Media Player 11 Connection to Apple and Linux based computers is also possible MP3 WMA and Real Audio formats are supported The WM 202 connects to your home computer network either using WiFi or via a wired Ethernet connection All radio station presets network configuration details and user settings are retained in the event of a power failure 2 Large clock display with ...

Страница 4: ...ta encryption then you need to know the WEP or WPA key used for encryption so you can get the Internet radio to communicate with the network If connecting using WiFi the Internet radio will typically work within a 10 20 metre radius from your wireless access point The actual range achieved will depend upon the building type other nearby wireless networks and possible interference sources DAB and F...

Страница 5: ...ornewstationsyoumaysearchfor Youmaysetupstations that you like as Favourites so that they are more readily accessible The section for the Media Player describes the two methods by which the radio can access music files that you may have stored on a computer connected to your network The use of Shared Folders or Shared Media using UPnP is explained The two sections for DAB Radio and FM Radio descri...

Страница 6: ...5 Preset 1 Rewind button 6 Mode button Top 2 1 4 11 3 5 6 7 8 9 10 12 13 14 15 16 7 Preset 2 Fast forward button 8 Menu button 9 Back button 10 Forward button 11 Tuning Select Snooze control 12 Volume Up button 13 Volume Down button 14 Info button 15 Preset 5 Play button 16 Preset 4 Pause button ...

Страница 7: ... call our Technical Helpline on 1300 556 816 6 Controls and connections Rear 17 Battery compartment 18 Ethernet socket RJ 45 19 USB socket 20 Auxiliary input socket 21 Headphone socket 22 DC input socket 18 19 20 21 22 Your radio 17 Aux In ...

Страница 8: ... possible with battery operation for occasional or stand by use only If using batteries only alkaline types should normally be used Battery life will vary according to the use of the radio but between 35 and 50 hours should be possible WiFi use takes more power than DAB listening for example Rechargeable Nickel Metal Hydride NiMH cells can be used in the radio but must be charged using an external...

Страница 9: ...menu then the display will automatically scroll up or down so that the additional items become visible A sliding bar on the right will give an indication showing the current portion of the menu that is displayed If there are many items in a menu then the radio allows the menu to wrap around in either direction This can make it easier to reach items at the end of a long menu such as a list of count...

Страница 10: ...4 When you apply power the display on the radio will light up and say ROBERTS and STARTING withaprogressindicator Thefirsttimethat you use your radio or after a Factory Reset after a few seconds the display will show a default date and time of 00 00 0000 and 00 00 5 Press the On Off button to take your radio out of stand by You should see the main mode menu Use the rotary Tuning Select control to ...

Страница 11: ...st need to identify your network in the list of network names presented by the Network Wizard If the radio cannot find any networks then you will have to get your wireless router working please see the instructions supplied with it or you may be too far from the router When the radio finds your wireless network it displays the Network Name SSID forthewirelessaccesspointonthescreen Thisisaname that...

Страница 12: ... When the SSID for the wireless network you wish to connect to is highlighted on the screen press the Tuning Select control 10 If your network is configured without an encryption code the screen should say Connecting and then show the main Internet Radio menu If this is the case then you have successfully connected your radio to your network so please proceed to paragraph 13 on the next page 11 If...

Страница 13: ...y exactly or the radio will not connect to the network The three controls on the right hand side of the screen have special functions select to erase a character or key previously entered select when the key is complete select to cancel and re run the Network Wizard If a WEP or WPA key has previously been entered for the selected SSID then the display will show Key Set If you have previously enter...

Страница 14: ...From the radio s Network settings menu select Network wizard This will present you with details of any WiFi networks that are found Scroll down the list using the Tuning Select control to the desired network name Press the control to select this network The radio will then use its WiFi system to communicate with the network Depending on the settings for that particular network you may need to ente...

Страница 15: ...ed and then DHCP enable your radio should now establish a connection to the router using the Ethernet cable Please skip to step 11 on page 16 If you chose Wireless and DHCP enable please skip to step 6 on page 15 in order to set up the wireless connection details If you chose DHCP disable for either connection method the next step is to set up the IP address 3 The IP address used should be chosen ...

Страница 16: ...is as needed until the complete network name has been entered The SSID setting is sensitive to upper and lower case characters and symbols You must enter it exactly as set up in your router The three controls on the right hand side of the screen have special functions select to erase a character or key previously entered select when the SSID is complete select to cancel and go back to the DNS sett...

Страница 17: ...tical to the key which has been entered into your router Note the encryption key is sensitive to the use of upper and lower case letters and symbols Take care to enter the key exactly or the radio will not be able to connect to your router The three controls on the right hand side of the screen have special functions select to erase a character or key previously entered select when the encryption ...

Страница 18: ...ion by Location If you know the name of the station and the country from which a station is broadcast this may be the easiest method to find a station It is also a great way to experience radio from other parts of the world You may also search for an internet radio station by Genre If you prefer a particular type of music Blues for example you may search for a radio station that broadcasts that ty...

Страница 19: ... Tuning Select control to select 5 RotatetheTuning Selectcontroltoscrollthroughthelistofcontinents When the desired continent is highlighted press the Tuning Select control 6 The display will show the list of countries within the chosen continent If there are many countries shown you can scroll through the list continually in either direction For example if the chosen continent was Europe then to ...

Страница 20: ...f the week The examples shown here are typical Podcasts and On Demand content can also be accessed separately from the main Internet Radio menu see page 23 If your radio cannot connect to a radio station Note If your radio is unable to connect to an internet radio station it will generally either display Network Error or Stopped This can be for many reasons but typically will be due to one of the ...

Страница 21: ...oll through the list of content types This menu is normally cyclic you can scroll the list continually in either direction When the chosen genre is highlighted press the Tuning Select control 5 You then have the choice of All Stations of the chosen genre or a list of countries Note if a country is not shown then the station may still appearinthe AllStations list RotateandthenpresstheTuning Select ...

Страница 22: ...arch word rotate the Tuning Select control to highlight each character for the search in turn and press the Tuning Select control to enter each character If you make an error use the Back button or the delete character on the screen After the final character of the search has been entered locate the symbol on the screen and press the Tuning Select control to finish 5 The radio will search for radi...

Страница 23: ... 1 Press the Menu button to enter the main Internet Radio menu Rotate the Tuning Select control until Station list is highlighted on the display Press the Tuning Select control to select 2 Rotate the Tuning Select control until Stations is highlighted on the display Press the Tuning Select control to select 3 Rotate theTuning Selectcontroluntil Popularstations orNewstations is highlighted on the d...

Страница 24: ...ghtedonthedisplay Press the Tuning Select control to select 2 Rotate the Tuning Select control until Podcasts is highlighted on the display Press the Tuning Select control to select 3 You may then search by location genre or using part of the name of the podcast The searches operate in exactly the same way as when searching for a conventional radio station Searching by location is done first by co...

Страница 25: ...button to switch on your radio Tune to the required station using one of the methods described on the preceding pages 2 To store the currently playing radio station as a preset press and hold the required Preset button 1 5 until the display shows Preset stored The station will be stored using the chosen preset button Repeat this procedure as needed for the remaining presets 3 Stations which are al...

Страница 26: ... control 2 The display will then show a list of the last ten Internet radio stations or podcasts Rotate the Tuning Select control to highlight whichever you wish to listen to and then press the control to cause your radio to reconnect to that radio station or podcast Display modes Internet Radio YourradiohasarangeofdisplayoptionswheninInternetRadiomode Note that not all information may be availabl...

Страница 27: ...are no bars shown to the right of the dividing line then the data stream reliability is poor and you may find that there are many breaks in the audio f Date Displays the current date Additional or alternative information may be displayed when listening to Podcasts Categories displayable can include Episode name Show description Show genre Show language Episode URL Bit rate Codec Sampling rate When...

Страница 28: ...the Register here link and follow the on screen instructions to register an account Please note during the registration process the web site asks for an access code This allows it to uniquely identify your radio from the many others that it also provides data for To obtain the access code please follow these steps 2 WithyourradioswitchedonandinInternetradiomode presstheMenu button then select Stat...

Страница 29: ... stations list on the web site use thelink Myaddedstations inthe Myaccount area Todeleteanadded radio station click on the icon with a heart and minus symbol Customising your radio cont Configuring My Favourite Stations 1 Using the web site at http www wifiradio frontier com it is possible to search among the many radio stations that are available by location genre or language You may also choose ...

Страница 30: ...ns list will appear on the display set up as described on page 28 4 Rotate the Select Tuning control to highlight the required station and then press the control to confirm your selection The display will show Connecting while it finds the new station If the station has On Demand content that is it gives the option of listening toprogrammeswhichhavealreadybeenbroadcast seepage 23 Selecting a podca...

Страница 31: ...Select control to select 3 Rotate the Tuning Select control to highlight the required station and then press the control to confirm your selection The display will show Connecting while it finds the new station Should you be unable to connect to a particular station please note that some radio stations do not broadcast 24 hours per day and some stations are not always on line Inaddition asmentione...

Страница 32: ... above Many users will find this a more convenient method of playing their files compared to using shared folders Both methods are described in this instruction manual Users of non Windows computers including Apple and Linux based devices can also use Shared Folders or a UPnP server to make media available to the radio However it is beyond the scope of this instruction manual to cover all hardware...

Страница 33: ...ain and then press the control to select 5 The radio will then display a list showing the different computers on the network which are sharing files Rotate the Tuning Select control to point to the desired computer and then press to select If your computer is not shown check its file sharing and firewall settings 6 PresstheTuning Selectcontrol Theradiowillthensearchtheselected computer for shared ...

Страница 34: ...ember to use upper and lower case characters as needed When the complete name is entered use the symbol 10 To change the password use the Tuning Select control to choose Password from the menu The default password in the radio is blank Select and enter characters for the required password Remember to use upper and lower case characters as needed When the complete name is entered use the symbol 11 ...

Страница 35: ...e of UPnP server applications available It is beyond the scope of this instruction book to cover all possible options for UPnP We explain the use of Microsoft s Windows Media Player since that will be the first choice for the majority of users Set up UPnP access on a Windows PC 1 If your PC is running Microsoft Windows XP or Windows Vista then you can use Microsoft s Windows Media Player version 1...

Страница 36: ...ge 6 Your PC may prompt you that there has been a connection to your UPnP server Whether prompted or not to allow the radio to access the media files you will need to click the Library tab in WMP 11 and select the Media Sharing item to open the Media Sharing window Make sure the box Share my media to is ticked 7 In the Media Sharing window the radio will be listed as an unknown device Click on the...

Страница 37: ...te that it may take a few seconds for the radio to complete its scan The radio will display Empty if no UPnP servers are found 5 After a successful scan rotate the Tuning Select control to highlight your UPnP server and then press the Tuning Select control If the display shows multiple media types select Music Some UPnP servers can serve pictures and video content to suitable devices 6 The radio w...

Страница 38: ... Such software can vary quite widely in its capabilities Windows Media Player 11 has limited flexibility compared to some UPnP servers but is generally easy to set up and reliable Some third party server applications allow customisation of the search criteria and indexing methods which can be useful if you have a very large collection of stored music files Many UPnP server applications are also ca...

Страница 39: ...s to represent artists and albums The searches described here are just examples of the possibilities Listening to a complete album 1 Use the Tuning Select control to choose content by Artist Album folder etc accordingtoyourneeds Sharedfolderaccesswillonlyallow you to search by folder name Press the Tuning Select control 2 When you reach the album or folder the menu will then switch to showing the ...

Страница 40: ... the Tuning Select control The track will begin playing The radio will then play subsequent tracks from the same album or folder Controlling playback 1 Press the Pause button to pause playback of the current track 2 If you press the Play button playback will resume from the point where it was paused 3 Press the Rewind button to start playback of the previous track in the list 4 Press the Fast forw...

Страница 41: ...urrent track c Format Displays the bit rate and format of the track currently being played d Buffer Displays the radios internal buffer status during media playback Wheneverthemediaplayerisdisplayinganinformationscreen asopposed to a menu screen the time is displayed in the top right corner of the display and a WiFi strength or Ethernet connection indicator is shown in the bottom right corner In a...

Страница 42: ...re the last used station will be selected 5 During the scanning process as new stations are detected the station counter will increase and stations will be added to the list of stations which is stored in the radio The bar graph indicates the progress of the scan 6 When scanning is completed the radio will tune to the first station in numeric alpha order 0 9 A Z unless it has previously been tuned...

Страница 43: ... a position giving better reception Aquestion markinfrontofthestationnamemerelyindicatesthatthestation has not recently been detected by the radio It may still be available The use of the radio station presets is described on page 54 Secondary services DAB Some radio stations can have one or more secondary stations associated with them Typically these are not broadcast continually If a station has...

Страница 44: ...am Type Displays the type of station being listened to such as Pop Classic News etc c Multiplex Name Displays the name of the DAB Frequency multiplex and frequency to which the current station belongs d Signal error strength Displays the signal error and strength for the station being listened to A lower error number indicates a better quality of radio signal The signal strength graph can be used ...

Страница 45: ... further advice please call our Technical Helpline on 1300 556 816 e Bit rate and audio type Displays the digital bit rate and audio type for the station being listened to f Date Displays the current date 44 DAB Radio ...

Страница 46: ... The display will show Scanning and your radio will perform a scan of the DAB frequencies Asnewstationsarefoundthestationcounterwillincrease and stations will be added to the list The bar graph indicates the progress of the scan 5 To carry out a full scan of the entire DAB band rotate the Tuning Select control until Full scan is highlighted on the display 6 Press the Tuning Select control to initi...

Страница 47: ...e to the chosen channel When the radio has tuned the display shows the channel number and frequency and the name of the DAB multiplex found if any A bar graph shows the signal strength and is useful if you need to reposition the radio or its aerial The minimum signal marker I which separatestheleftandrightpartsofthesignalgraphshowstheminimum signal level required for satisfactory reception Any new...

Страница 48: ... on the display 5 Press the Tuning Select control to enter the DRC adjustment mode The current DRC setting will be indicated with an asterisk 6 Rotate the Tuning Select control to highlight the required DRC setting the default is Off DRC Off DRC is switched off Broadcast DRC will be ignored DRC high DRC is set as sent by broadcaster DRC low DRC level is set to 1 2 that sent by broadcaster 7 Press ...

Страница 49: ...list 4 Rotate the Tuning Select control until Station order is highlighted Press the Tuning Select control to enter the station order adjustment mode 5 Rotate the Tuning Select control to choose between Alphanumeric Ensemble and Valid Alphanumeric sorts the station list alpha numerically 0 9 A Z Ensemble mode organises the station list by DAB multiplex Valid shows only those stations for which a s...

Страница 50: ...on is available after a few seconds the display will show the radio station name If you only hear hiss or interference simply press the Tuning Select controltoscanfurther Yourradiomayhavefoundaspuriousinterference signal 5 To find more FM stations press the Tuning Select control to repeat the scan operation To scan down in frequency rotate the Tuning Select control in a anti clockwise direction fi...

Страница 51: ...tton as needed to select the FM mode display 3 Rotate the Tuning Select to control the frequency that the radio will tune to The frequency will change in steps of 50kHz When the end of the waveband is reached the radio will recommence tuning from the opposite end of the waveband 4 Use the Volume buttons to adjust the sound level as needed 5 To switch off your radio press the On Off button 3 1 2 4 ...

Страница 52: ...Date Displays the current date Note If no RDS information is available then the radio will only be able to display the frequency There will be no text or programme type information available under these conditions The radio only provides displays when there is information available So if there is no text for example that display is not available The RDS indicator at the top of the display shows th...

Страница 53: ... Tuning Select control to enter the scan adjustment mode The current setting is indicated with an asterisk 4 To set your radio so that only the stations with the strongest signals are foundduringscanning normallylocalstations rotatetheTuning Select control until Yes is highlighted Press the Tuning Select control to confirm the setting Alternatively to set your radio so that all available stations ...

Страница 54: ...lect control until Audio setting is highlighted on the display Press the Tuning Select control to enter the audio setting mode The current setting is indicated with an asterisk 4 To switch to mono in order to reduce the hiss from a weak FM signal rotate the Tuning Select control until Yes is highlighted Press the Tuning Select control to confirm the setting Alternatively to return to the normal au...

Страница 55: ... be stored under the chosen preset button Repeat this procedure as needed for the remaining presets 4 Stations which are already stored in the presets may be over written by following the above procedure Note All the radio station presets are preserved in memory when the radio is switched off even if there are no batteries installed Recalling a preset DAB and FM radio 1 Press the On Off button to ...

Страница 56: ...r FM mode Alternatively you may specify that the time is not automatically updated In this case the clock must always be set manually after a power interruption 1 With your radio switched on press the Menu button to access the menu for the current mode 2 Rotate the Tuning Select control until System settings is highlighted on the display Press the control to enter the system settings menu 3 Rotate...

Страница 57: ...enu 4 Rotate the Tuning Select control until Time Date is highlighted on the display Press the control to enter the time setup 5 Rotate the Tuning Select control until Set format is highlighted on the display Press the control to enter the clock format menu The current clock display format is marked with an asterisk 6 Rotate the Tuning Select control to select either 12 or 24 hour format Press the...

Страница 58: ... enter the system settings menu 4 To change the time zone setting go to step 11 To change the Daylight Savings Time setting go to step 13 To change the current time or date setting rotate the Tuning Select control until Time Date is highlighted on the display then press the control to enter the time and date setting screen 5 Rotate the Tuning Select control until Set Time Date is highlighted on th...

Страница 59: ...the Menu button to exit or go to step 11 to set the time zone 11 Rotate the Tuning Select control until Set timezone is highlighted on the display then press the control 12 Rotate the Tuning Select control to highlight the time zone which is applicable to your location then press the control to confirm the setting Press the Menu button to exit or go to step 13 to set the summer winter time option ...

Страница 60: ...s the control to enter the main menu 2 Rotate the Tuning Select control until Alarms is selected on the display Pressthecontroltoseethecurrentalarmsettings Ifnochange is required press the Menu or Back buttons to exit 3 Rotate the Tuning Select control until the desired alarm 1 or 2 is highlighted on the display Press the control to enter alarm setup 4 Rotate the Tuning Select control until Time i...

Страница 61: ...sable the alarm 9 The alarm can be set to buzzer Internet radio DAB radio or FM radio For whichever radio mode is selected the radio alarm may be set to any of the stations which have been stored as presets or to the station most recently listened to Rotate the Tuning Select control to highlight the current Mode option for the alarm then press the control if you wish to change it Rotate the Tuning...

Страница 62: ... press the control Alarm not saved will show on the display Active alarms are shown by small alarm indicators on the bottom of the playing displays and on the clock display when in stand by Note If you make a mistake at any point while setting the alarms use the Back button to go back to the previous screen When the alarm sounds The buzzer or radio alarm will sound at the selected times for up to ...

Страница 63: ...Tuning Select control until the Save option is highlighted on the display then press the control to save the new setting The chosen alarm will now be disabled Snooze timer 1 Theradioorbuzzeralarmcanbesilencedfor5minutesbypressingthe Tuning Select Snooze control Should you wish for a longer snooze duration this can be extended by means of additional presses of the control The snooze time can be set...

Страница 64: ...e display then press the Tuning Select control 4 RotatetheTuning Selectcontroluntiltherequiredsleeptimesettingis selectedbetween15and120minutes orOff PresstheTuning Select control to confirm the setting 5 Your radio will switch off after the preset time has elapsed 6 To cancel the sleep time before the preset time has elapsed and to turn off the radio press the On Off button to turn the radio off ...

Страница 65: ...u 4 Rotate the Tuning Select control until Brightness is highlighted on the display Press the control 5 To adjust the display brightness when the radio is switched on rotate the Tuning Select control until Active is highlighted on the display To adjust the display brightness when the radio is in stand by rotate the Tuning Select control until Standby is highlighted Press the control to enter the s...

Страница 66: ... the Tuning Select control until System settings is highlighted on the display Press the control to enter the system settings menu 2 Rotate the Tuning Select control until Contrast is highlighted on the display and press the control 3 Rotate the Tuning Select control to adjust the contrast The contrast level on the screen will change at the same time Press the control to confirm the setting 4 Pres...

Страница 67: ...cause hearing loss Auxiliary input socket A 3 5mm Auxiliary Input socket located on the rear of your radio is provided for connecting the audio signal from an external audio source such as an MP3 or CD player 1 Connect a stereo lead from the headphone output of your MP3 or CD player to the Aux In socket Typically this lead will have a 3 5mm stereo plug at both ends 2 Switch on your radio and turn ...

Страница 68: ...d If you do not wish to carry out a system reset highlight NO and then press the control The display will revert to the previous menu 4 With YES highlighted press the Tuning Select control A full reset will be performed The station list together with any preset stations will be erased and your wireless network connection details will be lost All configuration settings will be restored to their def...

Страница 69: ...ress the control and select Yes If you do not want your radio to check for updates select the No option 2 To check if there are any software updates available currently rotate the Tuning Select control to highlight Check now and then press the control The radio will check to see if an update is available The display will show Checking for new versions If there are no updates then the display will ...

Страница 70: ... Troubleshooting If you have difficulty connecting the radio to your computer network some of these steps may help to resolve the problem 1 Confirm that a WiFi connected PC can access the Internet i e can browse the web using the same network 2 Check that a DHCP server is available normally a router function or that you have configured your radio to use DHCP Your radio will by default use DHCP Thi...

Страница 71: ...r via theradiostationdatabasewebsiteat http www wifiradio frontier com If you can play the station with a PC it may be that the internet feed or local network connection is poor However some broadcasters provide different data streams for PC users and internet radio listeners so this test is not always conclusive If you cannot play the station via your PC this may indicate that the problem is not ...

Страница 72: ...he menu for the current mode by pressing the Menu button Rotate the Tuning Select control until System settings is highlighted on the display Press the control to enter the system settings menu 2 Rotate the Tuning Select control until Info is selected on the display Press the control to enter the Info menu 3 Press the Menu button to exit 1 2 1 3 ...

Страница 73: ... exposed to water steam or sand Do not leave your radio where excessive heat could cause damage The name plate is located on the rear of the radio The Company reserves the right to amend the specification without notice The radio shall not be exposed to dripping or splashing and no objects filled with liquids such as vases shall be placed on the radio It is recommended to operate the product such ...

Страница 74: ...r means to discover the Source Code or otherwise replicate the functionality of the Client Code except to the extent that this restriction is expressly prohibited by applicable law b Disclaim on behalf of Real Networks Inc all warranties and conditions other than those set forth in this End User License express and implied including implied warranties or conditions of merchantability and fitness f...

Страница 75: ...ivers with removed or defaced serial numbers N B Damaged or broken aerials will not be replaced under warranty Procedure Any claim under this warranty should be made through the dealer from whom the radio was purchased It is likely that your Roberts dealer will be able to attend to any defect quickly and efficiently but should it be necessary the dealer will return the radio to the Company s servi...

Страница 76: ...ssue 2 AUS Glen Dimplex Australia Pty Ltd Unit 2 205 Abbotts Road Dandenong South Victoria 3175 Australia Ph 1300 556 816 Fax 1800 058 900 Website http www robertsradio com au 2009 Roberts Radio Limited ...

Отзывы: