background image

R9943

3 band  PLL

 Synthesised Radio

Please read this manual before use

ROBER

TS

Sound for Generations

Содержание R9943

Страница 1: ...R9943 3 band PLL Synthesised Radio Please read this manual before use ROBERTSSound for Generations ...

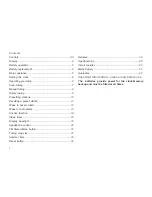
Страница 2: ... 11 Wake to buzzer alarm 12 Wake to radio alarm 13 Snooze function 14 Sleep timer 15 Display backlight 15 Headphone socket 16 FM Stereo Mono button 16 Tuning step size 17 Summer time 18 Reset button 19 Contents General 19 Specifications 20 Circuit features 20 Mains Supply 21 Guarantee 22 1 Important Information please read before use The batteries provide power for the clock memory backup and must...

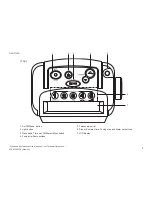
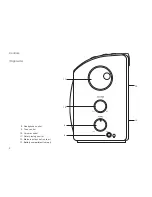
Страница 3: ...l Helpline on 020 8758 0338 Mon Fri 2 Controls 1 On Off Sleep button 2 Light button 3 Waveband Time set FM Stereo Mono button 4 Tuning Up Down buttons Top 1 2 3 4 5 6 7 5 Telescopic aerial 6 Preset Summer time Tuning step and Alarm set buttons 7 LCD display ...

Страница 4: ...3 Controls Rightside 8 Headphone socket 9 Tone control 10 Volume control 11 Rotary tuning control 12 Mains input socket on rear 13 Battery compartment on rear 11 10 9 8 12 13 ...

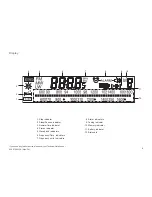
Страница 5: ...4 1 Step indicator 2 Sleep Snooze indicator 3 Summer time indicator 4 Stereo indicator 5 Waveband indicators 6 Frequency Time indicators 7 Frequency units indicators 8 Alarm indicators 9 Tuning indicator 10 Memory indicator 11 Battery indicator 12 Dial scale Display 4 5 6 7 8 9 10 11 12 3 2 1 ...

Страница 6: ...omy that the R9943 is used on the mains whenever possible with battery operation for occasional or stand by use only Mains operation 1 Place your radio on a flat surface 2 Plug the mains lead into the Socket located on the rear of your radio ensuring that the plug is pushed fully into the socket 3 Plug the other end of the mains lead into a wall socket and switch on the wall socket Battery replace...

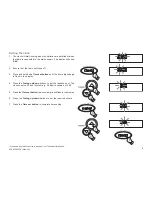
Страница 7: ...how 0 00 2 Ensure that the radio switched off 3 Press and hold down Time set button until the hours digits begin to flash in the display 4 Press the Tuning up down buttons to set the required hour The clock uses the 24 hour system e g 2 00pm is shown as 14 00 5 Press the Time set button the minute digits will flash in the display 6 Press the Tuning up down buttons to set the required minute 7 Pres...

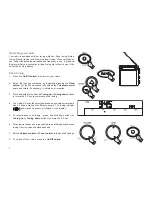
Страница 8: ...pic aerial angle and rotate if necessary to obtain best reception 3 Press and hold down either the Tuning up or Tuning down buttons for more the 0 5 sec to commence scan tuning 4 Your radio will scan the selected waveband and stop automatically when it finds a station of sufficient strength The tuning indicator and station frequency will appear in the display 5 To recommence scan tuning press and ...

Страница 9: ...if necessary to obtain best reception 3 A single press on either the Tuning up or Tuning down buttons will change the frequency in the following increments FM 50kHz or 100kHz MW 9kHz or 10 kHz LW 9kHz 4 When a station is correctly tuned the tuning indicator will appear in the display 5 When the waveband end is reached the radio will bleep and continue tuning from the opposite waveband end 6 Set th...

Страница 10: ...n best reception 3 Rotate the Tuning control to change the frequency in the following increments FM 50kHz MW 1kHz LW 1kHz 4 When a station is correctly tuned the tuning indicator will appear in the display 5 When the waveband end is reached the radio will bleep and continue tuning from the opposite waveband end 6 Set the Volume control and Tone controls to the desired settings 7 To switch off your...

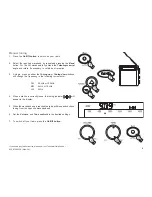
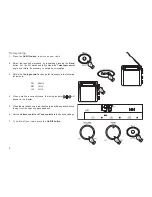
Страница 11: ...2 Tune to the required station using one of the methods previously described 3 Press and hold down the required Preset button until the radio beeps greater than 2 seconds The preset number will appear in the display and the station will be stored under the chosen preset button 4 Repeat this procedure for the remaining presets 5 Stations stored in preset memories may be overwritten by following the...

Страница 12: ... 1 Press the On Off button to turn on the radio 2 Select the required waveband by repeatedly pressing the Band button 3 Momentarily press the required Preset button the preset number and station frequency will appear in the display ...

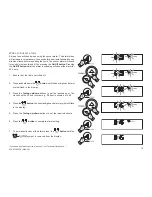
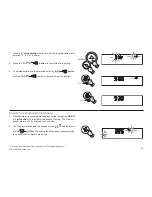
Страница 13: ... button whilst the alarm is sounding will cancel the alarm for 24 hours 1 Ensure that the radio switched off 2 Press and hold down the button until the hour digits and alarm symbol flash in the display 3 Press the Tuning up down buttons to set the required hour The clock uses the 24 hour system e g 2 00pm is shown as 14 00 4 Press the button the minutes digits and alarm symbol will flash in the di...

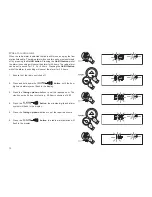
Страница 14: ...ressing the On Off button whilst the alarm is sounding will cancel the alarm for 24 hours 1 Ensure that the radio switched off 2 Press and hold down the button until the hour digits and alarm symbol flash in the display 3 Press the Tuning up down buttons to set the required hour The clock uses the 24 hour system e g 2 00pm is shown as 14 00 4 Press the button the minutes digits and alarm symbol wi...

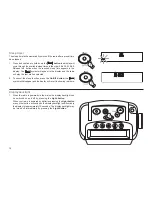
Страница 15: ...ently cancel the alarm press the button until the symbol is removed from the display Snooze function buzzer alarm only 1 Whilst an alarm is sounding pressing any button except the On Off or Light button will activate the snooze function The Radio or buzzer alarms will be silenced for 5 minutes 2 The Display will flash both the snooze symbol and the alarm symbol The snooze function can be repeated ...

Страница 16: ...l play the last station selected 2 To cancel the sleep function press the On Off button the symbol will disappear and the display will revert to showing real time Display backlight 1 When the radio is powered via the mains the display backlight can be switched on and off by pressing the Light button When your radio is powered by batteries pressing the Light button or any other button will switch o...

Страница 17: ...rpiece Inserting a plug automatically mutes the internal loudspeaker FM Stereo Mono button 1 If a station being received is weak some hiss may be audible To reduce the hiss press and hold down the FM St Mono button to switch to mono mode The stereo indicator will be removed from the display 2 Press and hold down the FM St Mono button to return to FM stereo operation Note FM stereo is only availabl...

Страница 18: ... size of 50kHz 1 Ensure that your radio is switched off Press and hold down 7sec the Step button until the FM step size begins to flash in the display and then release 2 Adjust the FM step size using the Tuning up or Tuning down buttons 3 Press the Step button the MW tuning step size will flash in the display 4 Adjust the MW step size using the Tuning up or Tuning down buttons 5 Press the Step but...

Страница 19: ...dvance the clock to summer time by pressing a single button 1 Ensure that your radio is switched off Press and hold down the Summer time button until the summer time indicator appears in the display 2 To cancel summer time display press and hold down the Summer time button until the summer time indicator is removed from the display ...

Страница 20: ...a problem persists our technical staff would be pleased to help offer any assistance on operating the radio Our technical helpline number is 020 8758 0338 General Do not allow this radio to be exposed to water steam or sand Do not leave your radio where excessive heat could cause damage such as in a parked car where the heat from the sun can build up even though the outside temperature may not see...

Страница 21: ... Life Approx 70 hours of listening for 4 hours a day at normal volume using alkaline cells Frequency Coverage FM 87 5 108MHz MW 522 1629kHz LW 153 279kHz Circuit Features Loudspeaker Woofer 125mm 4ohms Tweeter 38mm 4 ohms Output Power Mains 1 4 Watts Batteries 0 8 Watts Headphone socket 3 5mm dia Aerial System FM Telescopic aerial MW Built in Ferrite aerial LW Built in Ferrite aerial 20 ...

Страница 22: ...pose of the plug immediately to avoid a possible shock hazard by inadvertent connection to the mains supply If this product is not supplied with a mains plug or one has to be fitted then follow the instructions given below IMPORTANT DO NOT make any connection to the larger terminal which is marked with the letter E or by the safety earth symbol or coloured Green or Green and yellow The wires in th...

Страница 23: ...esulting from incorrect use 2 Consequential damage 3 Receivers with removed or defaced serial numbers N B Damaged or broken telescopic aerials will not be replaced under guarantee Procedure Any claim under this guarantee should be made through the dealer from whom the instrument was purchased It is likely that your Roberts dealer will be able to attend to any defect quickly and efficiently but sho...

Страница 24: ...20 Issue 1 ROBERTSRADIOTECHNICALSERVICES 97 99 Worton Road Isleworth Middlesex TW7 6EG Technical Helpline 020 8758 0338 Mon Fri during office hours ...

Отзывы: