40
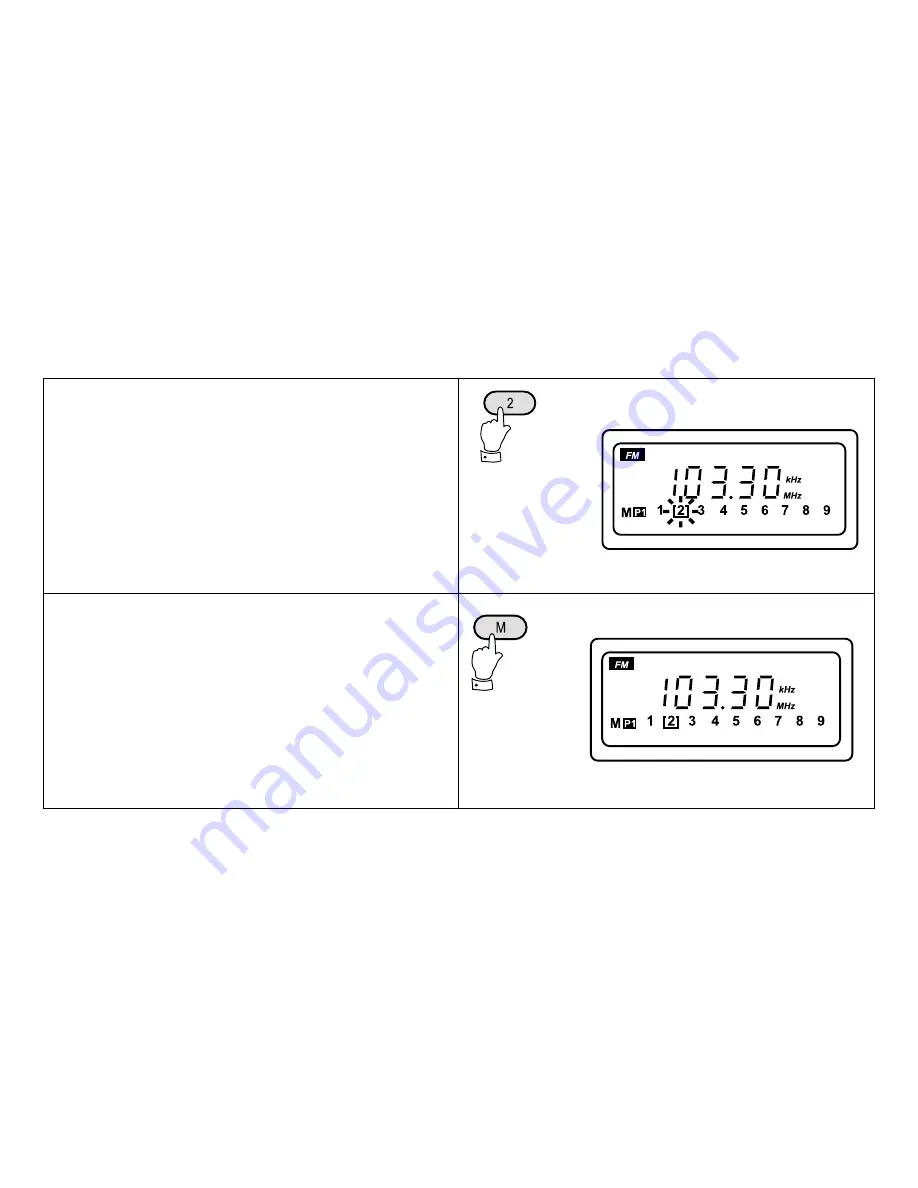
e.g. exchanging preset station 2 with preset station 7.
1. Recall preset 2.
2. Push the button "M", preset 2 and "M" will flash in the
display.
Changing preset station order
Страница 1: ...d d d d d d d d d d d d d d d d d d d d d d d d d d d d d d d d d d d d d d d d d d d d d d d d d d d d d d d d d d d d d d d d d d d d d d d d d d d d d d a a a a a a a a a a a a a a a a a a a a a a...
Страница 2: ...ory tuning 34 Recalling a station from preset memory 38 Cancelling a preset station 39 Changing preset station order 40 ATS Auto Tuning System 42 Memory scan 45 Setting the alarm 46 Setting the radio...
Страница 3: ...LW MW FM and SW Dual time facility allows you to preset your local time or UTC time or any two time zones with instant re call Scanning circuit allows you to search for active sta tions Cancel button...
Страница 4: ...ton 7 Cancel button 8 Decimal point and zero set button 9 0 digit P1 P2 memory and SW metre button 10 FM band FMATS and real dual time button 11 LW band LW ATS and radio standby button 12 MW band MW A...
Страница 5: ...If you need any further advice please call our Technical Helpline on 0181 758 0338 Mon Fri 3 10 11 12 13 14 15 1 2 3 4 5 6 16 7 8 9...
Страница 6: ...Earphone socket 18 DC input socket 19 AM external aerial socket 20 FM Mono stereo and AM DX Local switch 21 Telescopic aerial 22 Volume control 23 Lock switch 24 Folding stand 21 4 19 17 18 24 22 23...
Страница 7: ...If you need any further advice please call our Technical Helpline on 0181 758 0338 Mon Fri 26 25 27 28 25 Reset button 26 9 10kHz MW step switch 27 Battery compartment 28 Battery cover 5...
Страница 8: ...tre band indicator 10 Auto Tuning System indicator 11 Low battery indicator 12 Frequency units indicator 13 Frequency and time display 14 Dual time indicator 15 Radio standby indicator 16 HWS standby...
Страница 9: ...Technical Helpline on 0181 758 0338 Mon Fri 1 Position the radio face down 2 Press the catch marked OPEN and slide in the direction shown 7 This radio can be operated using 3 Alkaline LR6 AA size batt...
Страница 10: ...8 3 Insert the 3 LR6 AA size batteries as shown in the diagram 4 Replace the battery cover as shown in the diagram...
Страница 11: ...will display the battery condition for approx 7 seconds after the radio is switched off If the indicator falls below 2 the batteries should be replaced After removing the batteries you have approxima...
Страница 12: ...10 1 Replace batteries if the battery indicator falls below 2 2 Replace batteries if E and the low battery indicator flash in the display Low battery warnings...
Страница 13: ...If you need any further advice please call our Technical Helpline on 0181 758 0338 Mon Fri 11 3 Whenever the low battery symbol appears on the display the batteries should be replaced...
Страница 14: ...side of the radio Plug the adaptor into a stand ard 13A mains socket outlet Whenever the adaptor is used the batteries are automatically disconnected The mains adaptor should be disconnected from the...
Страница 15: ...running when the 3 LR6 AA size batteries are installed The display will show 0 00 The clock can be set with the radio power on or off 1 If the radio is switched on press the Display button to display...
Страница 16: ...the numbered buttons As you press each button the corresponding number will show on the display Note Time can only be adjusted whilst the symbol is flashing in the display 4 If you press the wrong num...
Страница 17: ...time a second time zone can be pro grammed into this radio 1 Press the button the display will show and flash 15 5 Press the Enter button to complete setting the clock the display will now show the c...
Страница 18: ...3 Press and hold down the Time Set button for more than 2 seconds the display Set will flash 16 2 Press Enter button within 3 seconds the display will stop flashing...
Страница 19: ...758 0338 Mon Fri 5 If you press the wrong number press the C cancel button which will delete one number at a time 17 4 While symbol is flashing set the correct time by pressing the numbered buttons As...
Страница 20: ...de press the button the symbol and dual time will be shown in the display After approximately 3 seconds the display will return to showing real time b To permanently change the display to dual time mo...
Страница 21: ...ical Helpline on 0181 758 0338 Mon Fri 19 Press the Time Set button for more than 2 seconds the symbol will flash in the display Press the 0 set button the display will show and flash Set 00 Press the...
Страница 22: ...20 Waveband selection There are four waveband selection buttons located be low the Liquid crystal display Waveband Frequency coverage FM 87 5 108 MHz LW 153 513 kHz MW 520 1710 kHz SW 1 711 29 999 MHz...
Страница 23: ...0338 Mon Fri 21 2 Press one of the four waveband select buttons the last frequency used on the selected waveband will be recalled and appear on the display 1 Turn on the radio by pressing the Power S...
Страница 24: ...d is selected pressing the SW Metre button a second time will display a flashing m indicat ing that a SW metre band may now be selected For ex ample pressing the 6 41m button will allow direct ac cess...
Страница 25: ...advice please call our Technical Helpline on 0181 758 0338 Mon Fri 23 MW 520 1710kHz Band INTERNAL Rotate for best reception LW 153 513kHz INTERNAL Rotate for best reception Illustration Aerial Type...
Страница 26: ...87 5 108MHz Band Illustration Aerial Type Frequency Range TELESCOPIC Fully extend the aerial angle and ro tate for best reception SW 1 711 29 999MHz TELESCOPIC Fully extend the aerial for best re cep...
Страница 27: ...cted by using any one of the five different available tuning methods Direct Tuning Manual Tuning Scan Tuning Memory Recall Tuning ATS Tuning on LW MW and FM bands Example To tune to 100 70 MHz on the...
Страница 28: ...e during entry press the C button to clear the last digit entered 4 Press the button marked Enter the frequency and waveband will now appear in the display Note Make sure that you enter the decimal po...
Страница 29: ...ou need any further advice please call our Technical Helpline on 0181 758 0338 Mon Fri 27 5 Extend the aerial fully and rotate for best FM recep tion 6 Adjust the Volume control for comfortable listen...
Страница 30: ...28 7 When selecting a stereo FM station and using stereo earphones make sure that the FM mode switch is in the STEREO position...
Страница 31: ...If you need any further advice please call our Technical Helpline on 0181 758 0338 Mon Fri 29 1 Press the Power Sleep button to turn on the radio 2 Select a waveband Manual tuning...
Страница 32: ...he symbol will appear in the display Frequency steps will be as shown below 5 To return to normal tuning steps press the Fine but ton to remove the symbol from the display Note Each press of the or bu...
Страница 33: ...If you need any further advice please call our Technical Helpline on 0181 758 0338 Mon Fri 31 1 Turn on the radio by pressing the Power Sleep but ton 2 Select a waveband Scan tuning...
Страница 34: ...nd hold down either the tuning or buttons for more than half a second to commence scan tuning The radio will scan all frequencies in the se lected band and stop automatically each time it finds an act...
Страница 35: ...0338 Mon Fri 33 6 Adjust the Volume control for comfortable listening 5 Press and hold down either the tuning or buttons for more than half a second to resume scan tuning When the waveband end is rea...
Страница 36: ...y 18 on SW 18 on FM 9 on LW and 9 on MW To store a station in preset memory proceed as follows 1 Turn on the radio by pressing the Power Sleep but ton 2 Tune to the desired frequency using one of the...
Страница 37: ...marked M memory the memory symbol M together with a suggested preset number will flash in the display for 12 seconds Note If some of the presets have already been used the radio will suggest the next...
Страница 38: ...show P2 An additional 9 presets can now be stored 36 5 Preset stations may be exchanged easily and at any time Select the preset that is to be changed by press ing the corresponding numbered button p...
Страница 39: ...want to store a new station press any button 1 9 for more than 2 seconds the new station will be stored in the selected memory location the original station in this location will be cancelled 2 Selec...
Страница 40: ...38 1 Turn on the radio by pressing the Power Sleep but ton 2 Select the waveband for the station required Recalling a station from preset memory...
Страница 41: ...h to select another pre set station press any one of the numbered buttons for instant access On SW and FM access to a further group of 9 presets can be obtained by pushing the P1 P2 buttonuntilthe P2...
Страница 42: ...40 e g exchanging preset station 2 with preset station 7 1 Recall preset 2 2 Push the button M preset 2 and M will flash in the display Changing preset station order...
Страница 43: ...If you need any further advice please call our Technical Helpline on 0181 758 0338 Mon Fri 41 3 Push button 7 Presets 2 and 7 will now be ex changed...
Страница 44: ...an 2 seconds The radio will beep and the display will flash ATS indicating the radio is in ATS mode 3 The radio will then scan from the lowest frequency on the selected waveband automatically storing...
Страница 45: ...ning is complete a beep will be heard The display will show M 1 and the station with the strong est signal for your area will be selected 5 If during ATS operation no stations are found the dis play w...
Страница 46: ...nly the 18 strongest stations will be stored in the preset memories 2 If the number of stations found duringATS operation is less than 9 the display will show the actual number of stations found For e...
Страница 47: ...scan the preset memories 1 Turn on the radio by pressing the Power Sleep but ton Select the required waveband 2 Push the Memory Scan button for more than 1 sec ond the radio will scan each preset mem...
Страница 48: ...Setting the alarm The alarm can be set with the radio power on or off 1 If the radio is switched on press the Display button to display the time 46...
Страница 49: ...dvice please call our Technical Helpline on 0181 758 0338 Mon Fri 1 Press the button the display will flash and show the last alarm time set this will be 0 00 the first time the alarm is set Setting t...
Страница 50: ...was keyed in press ing the C button will delete one digit for each press Press the Enter button the display will show 13 30 and Standby will stop flashing indicating that the alarm has been set to 13...
Страница 51: ...on 0181 758 0338 Mon Fri 3 When the alarm time is set the display will return to showing real time and the colon will start to flash 4 To verify the alarm time press the button to display the alarm t...
Страница 52: ...t for one hour if not turned off by pushing the Power Sleep button 3 Tune the radio to the required station before setting the alarm When the alarm operates the radio will play the last station select...
Страница 53: ...ep button Note The HWS alarm can be set independently from the buzzer alarm enabling 2 alarm times to be set one for the radio alarm and one for the HWS alarm Setting the count down timer The radio ha...
Страница 54: ...ing the numbered buttons e g to enter 1 hour and 30 minutes press the buttons marked 1 3 0 4 Press the Enter button Timer in the display will stop flashing indicating that the count down timer has bee...
Страница 55: ...e time remain ing may be checked by pressing Timer button press the Timer button to continue with the time remain ing or press the Enter button to restart the count down timer 5 The count down buzzer...
Страница 56: ...evert to showing real time Note 1 When the count down alarm is active press the Power Sleep button to turn off the alarm 2 The count down alarm will sound for 1 minute unless turned off by pushing the...
Страница 57: ...matically switch off the radio af ter a preset time has elapsed 1 Press and continue to hold down the Power Sleep button the display will cycle through the available sleep times in the order 60 45 30...
Страница 58: ...ime set will appear in the display for 2 seconds after which the display will revert to showing frequency 3 To cancel the sleep function press the Power Sleep button the symbol will disappear and the...
Страница 59: ...y be audible to reduce the hiss set the Mono Stereo switch to the Mono position to re turn to mono operation Note FM stereo is only available via headphones 2 When listening to AM MW LW SW broadcasts...
Страница 60: ...adio should be stereo and fitted with a 3 5mm stereo jack plug Insert the headphone plug into the socket marked on the left side of the radio When the headphones are plugged in the loudspeaker is auto...
Страница 61: ...n the symbol will ap pear in the display The Power Sleep and all other buttons will be disabled This will prevent accidental operation when the radio is packed in a suitcase or carrying pouch To relea...
Страница 62: ...Hz In Europe and most other parts of the world set the switch to the 9kHz position For the USA and Canada set the switch to the 10kHz position 1 Pull out the jack plug from the aerial reel and plug in...
Страница 63: ...carry out the following procedure 1 Switch off the radio and remove the batteries 2 With the aid of a suitable implement the end of a paper clip press the reset button located in the battery com part...
Страница 64: ...osed to water steam or sand Do not leave the radio where excessive heat could cause damage such as in a parked car where the heat from the sun can build up even though the outside tem perature may not...
Страница 65: ...22 1710kHz dependent on position of MW step size switch SW 1 711 29 999MHz 120m 2 300 2 495MHz 90m 3 200 3 400MHz 75m 3 900 4 000MHz 60m 4 750 5 060MHz 49m 5 900 6 200MHz 41m 7 100 7 350MHz 31m 9 400...
Страница 66: ...is tors 25 diodes 2 LED Aerial system LW Built in ferrite aerial MW Built in ferrite aerial SW Telescopic aerial FM Telescopic aerial Output power 180mW Sockets Headphone socket 3 5mm dia stereo AM ex...
Страница 67: ...d serial numbers N B Damaged or broken telescopic aerials will not be replaced under guarantee Procedure Any claim under this guarantee should be made through the dealer from whom the instrument was p...
Страница 68: ...TS RADIO TECHNICAL SERVICES DEPARTMENT 97 99 Worton Road Isleworth Middlesex TW7 6EG Technical Helpline 0181 758 0338 Issue 3 Imported by ROBERTS RADIO LIMITED PO BOX 130 MEXBOROUGH SOUTH YORKSHIRE S6...