background image

If you need any further advice, please call our Technical Helpline on :-

020 8758 0338 (Mon-Fri)

12

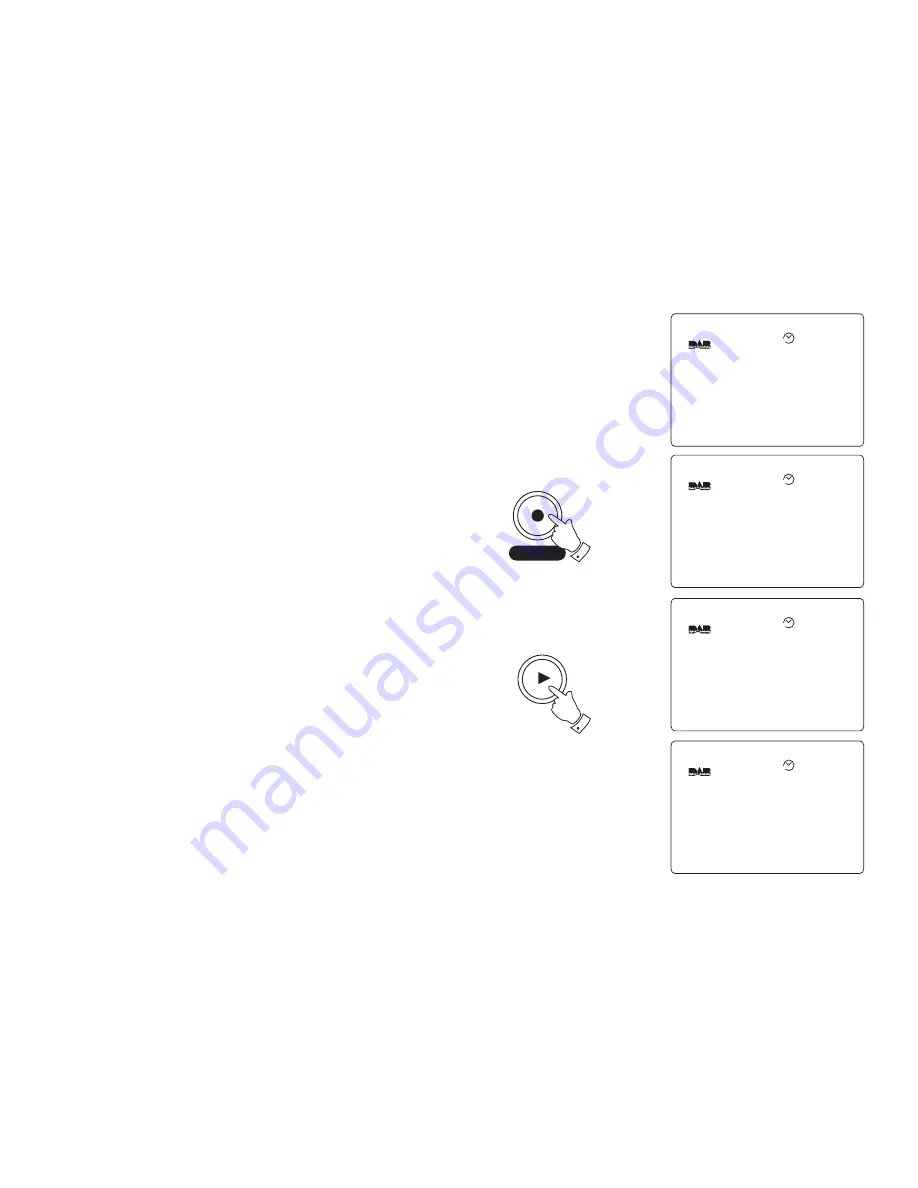
Pause Plus - record (SD card)

Your radio is supplied with a 32MB SD card which will give typically 30
minutes record time but can be over 1 hour depending on program type.

1.

Insert the SD card into the slot located on the top right side of your
radio. The display will show SDCard Inserted.

2.

Press and hold in the Record button until the display shows
Recording.

3.

The display will show the recording duration together with the
remaining record time available.

4.

Press the Record button to stop the recording.

Note: Record function is provided for personal use only

Pause Plus - play (SD card)

1.

Ensure that an


 SD card is inserted into the slot located on the top

right side of your radio. The display will show SDCard Inserted.

2.

Press the Play button to commence playback of previous recording.

3.

When the playback has finished the display will show Warning End
of File
.

4.

Press the Play button twice, after a few seconds your radio will
return to normal radio mode.

Information

SDCard Inserted

14:46

18-May-2004

AUTO

Recording

BBC Radio 5 Live

Recording   0:01:00

Rec Available 0:52:00

14:50

18-May-2004

AUTO

Playback

BBC Radio 5 Live

Playback   0:01:00

Duration 0:59:00

14:56

18-May-2004

AUTO

Warning

End of File

14:57

18-May-2004

AUTO

Play

Record

2

2

Содержание Gemini 1

Страница 1: ...RD 1 FM DAB digital radio with Please read this manual before use ROBERTSSound for Generations Gemini 1 ...

Страница 2: ...status DAB 25 26 Dynamic Range Control DRC settings DAB 27 Tuning range DAB 28 Digital output DAB 29 Radio Data Interface RDI output DAB 30 Contents Audio outputs 31 Audio 2 setup DAB 31 Operating your radio autosearch FM 32 Operating your radio manual tune FM 33 Presetting stations DAB FM 34 Recalling preset stations DAB FM 34 Clock settings 35 37 Alarms 38 Buzzer alarm 38 39 Radio alarm 40 42 Sn...

Страница 3: ... Fri Pause Rewind Play stop Record FM DAB Digital Radio RD 1 Station Presets 1 2 3 4 5 6 Band Display Set up 2 Controls 1 Record button 2 Play button 3 Rewind button 4 button 5 Preset buttons 6 On Off and sleep button 7 Band button 8 Display button 9 Set up button Front 1 2 3 5 6 4 7 8 9 ...

Страница 4: ...one socket 11 Telescopic aerial 12 RDI output socket 13 Digital audio output socket 14 Analogue audio 2 output socket 15 Analogue audio 1 output socket 12 11 10 9 13 14 15 2 1 LEFT DC IN 9 12V 2A RDI Aerial RIGHT Analogue Audio Out Digital Audio Out ...

Страница 5: ...cal Helpline on 020 8758 0338 Mon Fri 4 TREBLE BASS Max Min VOLUME Press to select TUNING 16 17 18 19 20 21 22 16 Bass control 17 Treble control 18 Volume control 19 Tuning control 20 SD card socket 21 Lock Switch 22 Battery compartment Controls Rightside ...

Страница 6: ...the batteries are removed from the radio Battery life BATTERIES 4x1 5v Size D UM 1 R20 Using the AC adaptor 1 Place your radio on a flat surface 2 Insert the adaptor plug into the DC socket located on the left side of your radio 3 Plug the adaptor into a standard 13 amp mains socket outlet Whenever the adaptor is used the batteries are automatically disconnected The AC adaptor should be disconnect...

Страница 7: ... will be selected 4 During Auto Tune as each group of stations is detected the bottom line of the display will show the number of stations found The display will also show a bargraph indicating progress of the Autotune 5 When the Auto Tune is complete the first station in numeric alpha order 0 9 A Z will be selected 6 If the station list is still empty after the DAB Auto Tune your radio will displ...

Страница 8: ...fter a few seconds the Dynamic Label System text DLS will appear on the display 6 Adjust the Volume Bass and Treble controls to the required settings Note To return to normal station mode from station list without selecting a station press and release the Display button 1Xtra BBC 1Xtra BBC AbracaDabra BBC Radio 1 BBC Radio 2 BBC Radio 3 AUTO BBC Radio 1 The Radio 1 Breakfast Show with Chris Moyles...

Страница 9: ...a information such as Programme type Multiplex name Signal strength and Battery level 1 Press the Display button to change display mode 2 Press the Display button to change back to original display mode Secondary services DAB 1 Certain radio stations have one or more secondary services associated with them If a station has a secondary service the top line of the display will show Secondary To sele...

Страница 10: ...on the DAB waveband 1 To place your radio in modesimplypressthe button the sound from the loudspeaker will be muted The display will show the time station was paused duration of pause and remaining pause time available 2 To return to the radio station that you were listening to simply press the button and your radio will continue playing from where you left off The display will show the amount by ...

Страница 11: ...you have scrolled back together with the maximum time you can rewind back to Note the rewind memory only starts when your radio is switched on 2 To return to real time press the Rewind button 3 Rewind memory is typically 15 minutes but can be up to 30 minutes depending on the DAB storage settings see page 13 Note the rewind feature only operates on the DAB waveband Rewind Press to select TUNING 1 ...

Страница 12: ...stop the recording and press again to return to normal mode 11 Record Recording BBC 7 Recording 0 01 00 Rec Available 0 51 00 13 57 18 May 2004 AUTO BBC 7 Rumpole or the Bailey Coming next Life Death and Sex with Mike and Sue 13 58 18 May 2004 AUTO Warning End of File 14 57 18 May 2004 AUTO Playback BBC 7 Playback 0 01 00 Duration 0 30 00 14 06 18 May 2004 AUTO Record Play Play 2 4 1 3 Pause Plus ...

Страница 13: ...ord button to stop the recording Note Record function is provided for personal use only Pause Plus play SD card 1 Ensure that an SD card is inserted into the slot located on the top right side of your radio The display will show SDCard Inserted 2 Press the Play button to commence playback of previous recording 3 When the playback has finished the display will show Warning End of File 4 Press the P...

Страница 14: ...the Setup button to enter the Setup menu 2 Rotate the Tuning control until the DAB section appears between the two black lines on the display 3 Press in and release the Tuning control to select the DAB section 4 Rotate the Tuning control anti clockwise until More is high lighted on the display 5 Press in and release the Tuning control to select the More section Set Up Record Timer Clock DAB Displa...

Страница 15: ...ease the Tuning control to store the change 11 Repeatedly press and release the Setup button until the display returns to show normal station mode DAB Audio 2 Optical output No RDI Enable No Storage On Storage Control Service Status AUTO Press to select TUNING Press to select TUNING Storage Control Rewind ecord 50 SDCard Format I I I I I I I I I I I I I I 50 R I I I I I I I I I I I I I I I I I I I...

Страница 16: ...Press in and release the Tuning control to select the DAB section 4 Rotate the Tuning control until More is highlighted on the display 5 Press in and release the Tuning control to select the More section Set Up Record Timer Clock DAB Display Sleep AUTO Set up Set Up Buzzer Alarm Radio Alarm Record Timer AUTO Press to select TUNING Press to select TUNING DAB Programme Type All Favourites Yes DRC En...

Страница 17: ...e Tuning control to store the change 10 Repeatedly press and release the Setup button until the display returns to show normal station mode Press to select TUNING Audio 2 Optical output No RDI Enable No Storage Storage Control Service Status Off DAB AUTO Press to select TUNING Audio 2 Optical output No RDI Enable No Storage Storage Control Service Status On DAB AUTO Audio 2 Optical output No RDI E...

Страница 18: ... days active 6 Press in and release the Tuning Control to confirm selection Rotate the Tuning control to select the required Day see note on page 19 7 Press in and release the Tuning control to confirm the selections 8 Rotate the Tuning control until the Start line is highlighted in the display 9 Press in and release the Tuning Control to select Rotate the Tuning control to select required hour co...

Страница 19: ...15 Press in and release the Tuning control to confirm the selection 16 Rotate the Tuning control until the Station line is highlighted in the display 17 Press in and release the Tuning control to confirm the selection 18 Rotate the Tuning control to select the required station 19 Press in and release the Tuning control to confirm the selection continued on next page Record Timer Timer Days Start 0...

Страница 20: ...cord the chosen program The loudspeaker will be muted during the Timed recording The loudspeaker may be un muted by pressing the Pause Plus button Note If record timer is set to record on more than one day of the week it will be necessary to change the SD card after each days recording otherwise the recording will be overwritten The filing system on your RD 1 only allows one recording per SD card ...

Страница 21: ...ntil the DAB section appears between the two black lines on the display 3 Press in and release the Tuning control to select the DAB section 4 Rotate the Tuning control until More is highlighted on the display 5 Press in and release the Tuning control to select the More section continued on next page Set Up Buzzer Alarm Radio Alarm Record Timer AUTO Set up 1 Press to select TUNING 2 Set Up Record T...

Страница 22: ...election After a few seconds the display will show Information SDCard Formatted 12 Repeatedly press and release the Setup button until the display returns to show normal station mode Press to select TUNING Press to select TUNING Press to select TUNING Press to select TUNING 6 8 10 11 DAB Audio 2 Optical output No RDI Enable No Storage On Storage Control Service Status AUTO Storage Control Rewind e...

Страница 23: ...the display 4 Press in and release the Tuning control to enter adjustment mode 5 Rotate the Tuning control to select just one programme type setting e g All Rock Pop Classic etc 6 Press in and release the Tuning control to confirm the selection 7 Repeatedly press and release the Setup button until the display returns to show normal station mode 8 When you next enter tuning list mode only the stati...

Страница 24: ...ning control to select required favourites setting e g Yes or No 6 Press in and release the Tuning control to confirm the selection 7 Repeatedly press and release the Setup button until the display returns to show normal station mode 8 After a period of time the most listened to stations will move up to the top of the station list and be marked with the symbol Set Up Buzzer Alarm Radio Alarm Recor...

Страница 25: ...e is highlighted in the display 5 Press in and release the Tuning control to enter adjustment mode 6 Rotate the Tuning control to select required DAB channel Press in and release the Tuning control to confirm the selection 7 Press either the Band or Display buttons to select the stations contained within the Multiplex for the selected DAB channel 8 Repeatedly press and release the Setup button unt...

Страница 26: ...ge On Storage Control Service Status AUTO 4 5 Service Status DAB This display gives extended information about the currently selected station 1 Press the Setup button to enter the Setup menu 2 Rotate the Tuning control until the DAB section appears between the two black lines on the display 3 Press in and release the Tuning control to select the DAB section 4 Rotate the Tuning control until More i...

Страница 27: ...Frequency DAB mode and Bit Rate 9 Repeatedly press and release the Setup button until the display returns to show normal station mode Press to select TUNING Press to select TUNING 6 7 DAB Audio 2 Optical output Yes RDI Enable No Storage On Storage Control Service Status AUTO Service Status BBC National DAB Stereo T DAB Allocation 12B Frequency 225 648MHz DAB Mode 1 Bit Rate 192 kbits sec AUTO Set ...

Страница 28: ...to select required DRC setting default is 0 DRC 0 DRC is switched off Broadcast DRC level will be ignored DRC 1 2 DRC level is set to 1 2 that sent by broadcaster DRC 1 DRC is set as sent by broadcaster 6 Press in and release the Tuning control to confirm the selection 7 Repeatedly press and release the Setup button until the display returns to show normal station mode Set Up Buzzer Alarm Radio Al...

Страница 29: ...nd release the Tuning control to enter adjustment mode 5 Rotate the Tuning control to select required lower channel Press in and release the Tuning control to confirm the selection 6 Rotate the Tuning control to select required upper channel Press in and release the Tuning control to confirm the selection 7 Repeatedly press and release the Setup button until the display returns to show normal stat...

Страница 30: ... 4 Rotate the Tuning control until the Digital Output line is highlighted in the display 5 Press in and release the Tuning control to enter adjustment mode 6 Rotate the Tuning control to select required setting Yes or No Press in and release the Tuning control to confirm the selection 7 Repeatedly press and release the Setup button until the display returns to show normal station mode Note when th...

Страница 31: ...ghted in the display Press in and release the Tuning control to confirm the selection 4 Rotate the Tuning control until the RDI Enable line is highlighted in the display 5 Press in and release the Tuning control to enter adjustment mode 6 Rotate the Tuning control to select required setting Yes or No Press in and release the Tuning control to confirm the selection 7 Repeatedly press and release th...

Страница 32: ...ay Press in and release the Tuning control to confirm the selection 4 Rotate the Tuning control until the Audio 2 line is highlighted in the display 5 Press in and release the Tuning control to enter station list select mode 6 Rotate the Tuning control to select required DAB channel Press in and release the Tuning control to confirm the selection 7 The station selected will be output to Audio outp...

Страница 33: ...control a few clicks clockwise to search up in frequency or rotate the Tuning control a few clicks anti clock wise to search down in frequency 6 Your radio will scan the FM waveband stopping each time it finds a station of sufficient strength 7 To search for additional stations repeat the above procedure 8 Adjust the Volume Bass and Treble controls to the required settings Band 10 02 24 MAY 2004 8...

Страница 34: ...and button to select the FM band 4 Rotate the Tuning control a clockwise to tune up in frequency or rotate the Tuning control anti clockwise to tune down in fre quency 5 Adjust the Volume Bass and Treble controls to the required settings Band 10 02 24 MAY 2004 87 50MHz AUTO Press to select TUNING 10 02 24 MAY 2004 93 50MHz AUTO 2 3 4 33 ...

Страница 35: ...er the chosen preset button Repeat this procedure for the remaining presets 4 Stations stored in preset memories may be overwritten by following the above procedure Recalling a preset station DAB and FM 1 Press the On Off button to switch on the radio 2 Select the required waveband by pressing the Band button 3 Momentarily press the required Preset button your radio will tune to the station stored...

Страница 36: ...adjustment mode Rotate the Tuning control to select the required DAB Auto Set setting Yes or No 5 Press in and release the Tuning control to confirm the selection 6 Rotate the Tuning control until the Time Set line is highlighted in the display 7 Press in and release the Tuning Control to select Rotate the Tuning control to select required hour continued on next page Set up 1 Set Up Buzzer Alarm R...

Страница 37: ...the Tuning control to select required Month Press in and release the Tuning control to confirm the selection 14 Rotate the Tuning control to select required Year Press in and release the Tuning control to confirm the selection continued on next page Clock DAB Auto Set No Time Set 08 Date Set 01 Jun 2004 24 Hour Format 24 Hour Mode dd mmm yyy 57 AUTO Press to select TUNING 8 Press to select TUNING ...

Страница 38: ...18 Rotate the Tuning control to select required dd mm yyyy format Press in and release the Tuning control to confirm the selection default dd mm yyyy 19 Repeatedly press and release the Setup button until the display returns to show normal station mode Clock DAB Auto Set No Time Set 08 57 Date Set 01 Jun 2004 24 Hour Format Mode dd mmm yyy 24 Hour AUTO Press to select TUNING 15 Set up 19 BBC 7 The...

Страница 39: ...he clock settings made on page 37 default is 24 hour Buzzer Alarm 1 Press the Setup button to enter setup mode 2 Press in and release the Tuning control to select Buzzer Alarm 3 Rotate the Tuning control until Alarm line is highlighted in the display 4 Press in and release the Tuning Control to select Rotate the Tuning control to select Alarm On continued on next page Set up Set Up Buzzer Alarm Ra...

Страница 40: ...ning control to confirm the selection Rotate the Tuning control to select the required minute 12 Press in and release the Tuning control to confirm the selection 13 Repeatedly press and release the Setup button until the display returns to show normal station mode 14 The Buzzer Alarm active symbol will appear in the display 15 Press the On Off button to switch off your radio The alarm will sound o...

Страница 41: ...splay 3 Press in and release the Tuning control to select Radio Alarm 4 Rotate the Tuning control until Alarm line is highlighted in the display 5 Press in and release the Tuning Control to select Rotate the Tuning control to select Alarm On Set Up Buzzer Alarm Radio Alarm Record Timer Clock AUTO Press to select TUNING Press to select TUNING Alarm Days SMTWTFS Time Set 00 00 Mode Current Station C...

Страница 42: ...te the Tuning control to select required hour 12 Press in and release the Tuning control to confirm selection Rotate the Tuning control to select the required minute 13 Press in and release the Tuning control to confirm the selection continued on next page Radio Alarm AUTO Alarm On Days SMTWTFS Time Set 00 00 Mode Current Station Current Press to select TUNING Radio Alarm AUTO Alarm On Days Time S...

Страница 43: ...ons are available to allow a different band and station to be selected for radio alarm 18 Repeatedly press and release the Setup button until the display returns to show normal station mode 19 The Radio alarm active symbol will appear in the display 20 Press the On Off button to switch off your radio The alarm will sound on the selected days at the preset time Press to select TUNING Radio Alarm AU...

Страница 44: ...the Tuning control until the Sleep section appears be tween the two black lines on the display 3 Press in and release the Tuning control to select the Sleep section 4 Press in and release the Tuning control to enter adjustment mode continued on next page Set up Set Up Buzzer Alarm Radio Alarm Record Timer 12 22 16 May 2004 AUTO Press to select TUNING Set Up DAB Display Sleep KeyPress Factory Defau...

Страница 45: ...may be activated by pressing and holding down the On Off button until the sleep symbol appears in the display Your radio will switch off after the preset sleep time has elapsed Note Once the default sleep time is set the sleep timer may be activated by pressing and holding in the On Off button until the symbol appears in the display It is not necessary to go through the sleep time setup again Slee...

Страница 46: ...hted in the display 4 Press in and release the Tuning control to enter adjustment mode Rotate the Tuning control to select Display Saving Yes or No 5 Press in and release the Tuning control to confirm the selection 6 Repeatedly press and release the Setup button until the display returns to show normal station mode Set up 1 Press to select TUNING 2 Set Up Buzzer Alarm Radio Alarm Record Timer AUTO...

Страница 47: ...the Tuning control until the Backlight line is highlighted in the display 4 Press in and release the Tuning control to enter adjustment mode Rotate the Tuning control to select required backlight mode e g On Off On with AC or Keypress 5 Press in and release the Tuning control to confirm the selection 6 Repeatedly press and release the Setup button until the display returns to show normal station m...

Страница 48: ...control to enter adjustment mode Rotate the Tuning control to select required contrast level 5 Press in and release the Tuning control to confirm the selection 6 Repeatedly press and release the Setup button until the display returns to show normal station mode Set up 1 Press to select TUNING 2 Set Up Buzzer Alarm Radio Alarm Record Timer AUTO Set Up Clock DAB Display Sleep Keypress AUTO Press to ...

Страница 49: ... the Timeout line is highlighted in the display 4 Press in and release the Tuning control to enter adjustment mode Rotate the Tuning control to select required Timeout setting Yes or No 5 Press in and release the Tuning control to confirm the selection 6 Repeatedly press and release the Setup button until the display returns to show normal station mode Set up 1 Press to select TUNING 2 Set Up Buzz...

Страница 50: ...e Tuning control to enter adjustment mode Rotate the Tuning control to select required KeyBeep setting Yes or No 5 Press in and release the Tuning control to confirm the selection 6 Repeatedly press and release the Setup button until the display returns to show normal station mode Set up 1 Press to select TUNING 2 Set Up Buzzer Alarm Radio Alarm Record Timer AUTO Press to select TUNING 4 Set up 6 ...

Страница 51: ...elease the Tuning control to enter adjustment mode 3 Rotate the Tuning control to select Yes Press in and release the Tuning control to confirm the selection 4 The display will blank and after a few seconds your radio will enter DAB Auto Tune Set Up Buzzer Alarm Radio Alarm Record Timer AUTO Set up 1 Press to select TUNING 2 Set Up Sleep KeyPress Factory Default AUTO Factory Default Return all use...

Страница 52: ... Tuning control until the display shows Information FM Mono your radio will switch to mono mode 3 To return to stereo mode press and hold in the Tuning control until the display shows Information FM Stereo your radio will switch back to stereo mode Note Stereo is only available when using earphone headphones 2 1 LEFT DC IN 9 12V 2A RDI Aerial RIGHT Analogue Audio Out Digital Audio Out Information ...

Страница 53: ... 928 239 200MHz Circuit Features Loudspeaker 100mm diameter 4ohms Output Power 1 8 Watts Headphone socket 3 5mm dia stereo Audio 1 output 2 x RCA Audio 2 output 2 x RCA Optical output TosLink Aerial System FM Telescopic aerial DAB Telescopic aerial General Do not allow this radio to be exposed to water steam or sand Do not leave your radio where excessive heat could cause damage It is recommended ...

Страница 54: ...53 ...

Страница 55: ...sequential damage 3 Receivers with removed or defaced serial numbers N B Damaged or broken telescopic aerials will not be replaced under guarantee Procedure Any claim under this guarantee should be made through the dealer from whom the instrument was purchased It is likely that your Roberts dealer will be able to attend to any defect quickly and efficiently but should it be necessary the dealer wi...

Страница 56: ...Issue 1 ROBERTSRADIOTECHNICALSERVICES 97 99 Worton Road Isleworth Middlesex TW7 6EG Technical Helpline 020 8758 0338 Mon Fri during office hours ...

Отзывы: