background image

2

Part no. CB-209-1424 07/14/2022

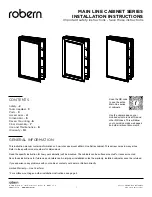
Main Line Cabinet Series

© 2022 Robern, Inc. 701 N. Wilson Ave. Bristol, PA  19007  U.S.A.

800.877.2376      

www.robern.com

SAFETY

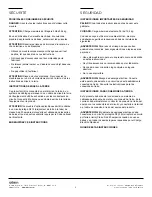
IMPORTANT SAFETY INSTRUCTIONS

DANGER:

 Read all instructions before using this cabinet. 

CAUTION:

 Maximum shelf load 34lbs/15.4kg

When using an electrical furnishing, basic precautions should always be followed, including the following:

WARNING:

 To reduce the risk of burns, fire, electric shock, or injury to persons:

• 

Use this furnishing only for its intended use as described in these instructions. 

• 

Do not use attachments not recommended by the manufacturer.

• 

Never drop or insert any object into any opening.

• 

Do not use outdoors.

WARNING:

 Risk of electric shock. Connect this furnishing to a properly grounded circuit only. See Grounding instructions.

GROUNDING INSTRUCTIONS 

Electrical option cabinet must be connected to a grounded metal, permanent wiring system, or an equipment-grounding conductor must 

be run with the circuit conductors and connected to the equipment-grounding terminal or lead on the product.

WARNING:

 Electrical option cabinet must be wired to a Class A 20 Amp GFCI (Ground Fault Circuit Interrupter) protected circuit when 

used in bathrooms and all other locations required by the National Electric Code.

SAVE THESE INSTRUCTIONS

Содержание MAIN LINE CABINET Series

Страница 1: ...ed The cabinets can be surface mounted or recess mounted Save these instructions for future use and reference An improper installation voids the warranty Installed cabinets cannot be returned If you e...

Страница 2: ...not use attachments not recommended by the manufacturer Never drop or insert any object into any opening Do not use outdoors WARNING Risk of electric shock Connect this furnishing to a properly groun...

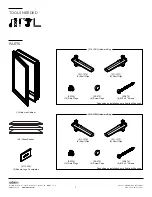
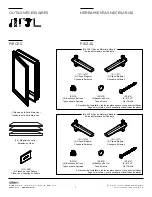
Страница 3: ...go Coverplates 216 1201 Hardware Bag 216 1208 Hardware Bag 1 Main Line Cabinet Depending on installation not all parts will be used 211 1376 3 Shelf Clips 211 1377 3 Shelf Clips SS134 10 Hole Plugs SS...

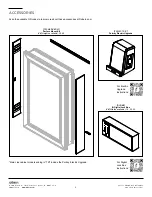
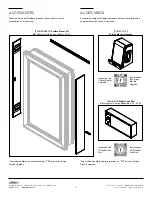
Страница 4: ...des to learn more about these accessories at Robern com P2SMKITXXD4P Surface Mount Kit XX Heights available 30 40 ACCESSORIES P2ELECTRIC Portray Electric Upgrade TM For Electric Upgrade Instructions T...

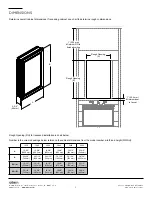
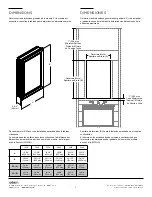
Страница 5: ...m 15 3 8 390 5 mm 19 3 8 492 mm 19 3 8 492 mm 23 3 8 594 mm 23 3 8 594 mm B 30 1 16 764 mm 39 7 16 1002 mm 30 1 16 764 mm 39 7 16 1002 mm 30 1 16 764 mm 39 7 16 1002 mm RO A 14 1 2 369 mm 14 1 2 369 m...

Страница 6: ...the desired side Check for square plumb and level Electrical Option Cabinets Provide separate electrical connections for electrical options Pull electric wire through the cabinet hole Be sure to provi...

Страница 7: ...ent Rotate front screw to increase or decrease door overlay 3B Height adjustment Rotate cam screw on mounting plate to adjust door 3C Depth adjustment Rotate rear spiral tech cam screw to adjust door...

Страница 8: ...nused holes inside the cabinet Place the screw head caps SS672 over any exposed screw heads 5 Install a Robern logo coverplate 211 1329 into each unused electrical access hole 6 Insert clear shelf cli...

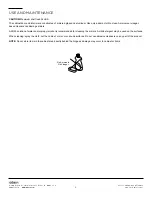
Страница 9: ...interior are constructed of mirrored glass and aluminum Use only a damp cloth to clean Ammonia or vinegar based cleaners can damage mirrors A 50 50 solution of water and isopropyl alcohol is recommend...

Страница 10: ...ose authorized by ROBERN At the expiration of the one year warranty period ROBERN shall be under no further obligation under any warranty expressed or implied including the implied warranty of merchan...

Страница 11: ...ne informaci n sobre c mo montar empotrado un gabinete de la serie Main Line Esta serie viene en muchos tama os Consulte los n meros de modelo espec ficos para conocer las dimensiones Lea las instrucc...

Страница 12: ...orsqu elle est utilis e dans les salles de bains et tous les autres endroits requis par le Code national de l lectricit ENREGISTREZ CES INSTRUCTIONS INSTRUCCIONES IMPORTANTES DE SEGURIDAD PELIGRO Lea...

Страница 13: ...l installation toutes les pi ces peuvent ne pas tre utilis es Seg n el montaje no ser necesario utilizar todas las piezas OUTILS N CESSAIRES HERRAMIENTAS NECESARIAS 211 1329 2 Plaque du Logo Robern Pl...

Страница 14: ...en savoir plus sur ces accessoires sur Robern com Escanee los c digos QR disponibles para obtener m s informaci n sobre estos accesorios en Robern com Instructions de Portray Electric Upgrade Les mod...

Страница 15: ...rence aux dimensions de le meuble partir du num ro de mod le de la largeur et de la hauteur WWHH Apertura sin terminar RO para instalaci n empotrada en el cuadro a continuaci n El n mero en los encabe...

Страница 16: ...allez des vis n 10 x 2 po dans les montants du mur travers les trois trous de montage restants REMARQUE Ne serrez pas trop les vis ou les parois de le meuble pourraient se d former Estas instrucciones...

Страница 17: ...a vis de la plaque de montage pour ajuster la position de la porte 3C R glage de la profondeur Faites tourner la vis de la plaque de la spirale arri re pour ajuster le jeu de la porte 1 Alignez la por...

Страница 18: ...arri re sur les c t s de le meuble 7 Poussez l arri re de l tag re dans les clips gauche et droit A Enfoncez l tag re dans les clips B 4 Presione los tapones de los orificios del estante SS134 en los...

Страница 19: ...uit REMARQUE Ne pas stocker les objets dans la zone de le meuble directement derri re la charni re que des dommages peut se produire au Cabinet ou des articles PRECAUCI N La carga m xima plataforma 34...

Страница 20: ...directement votre revendeur 2022 ROBERN INC TOUS DROITS R SERV S Garant a Limitada T rmino de Un A o ROBERN garantiza al comprador original que seg n su propio criterio reparar reemplazar o har los a...

Отзывы: