- Open box, tilt onto open side, slide box up
- Undo 4 cover straps
- Set extrusion rails aside
- Undo 2 side straps
- Open tent, remove ladder, cover, boot bags, gear
hammocks, and hardware bag, leave window poles,
close tent
- Flip to side with 4 holes
- Cut off plastic cover
- Align extrusion rails
- Slide nuts into rails
- Locate holes on opposite side, push bolts through
tape, tighten
- Flip tent
- Cut off plastic cover, remove tape
- Align brackets
- Locate holes on opposite side, push bolts through
tape, don’t tighten
- Align ladder, feed bolts through, tighten
- Tighten brackets
- Install boot bags and gear hammock
- Secure ladder strap
- Install cover
- Lift onto vehicle
- Drop botls through slides and slide into rails
- Sandwich rack with plate and tighten
- Install extrusion end caps
- Undo 4 straps
- Flip back cover, slide out of frame
- Undo side straps
- Undo ladder strap
- Extend ladder, use to lever open
- Pull out ladder awning pole, flip out brackets,
insert, velcro
- Grab bag of poles, insert into frame, bend and
insert in awning
- Roll up window covers
- Lift ladder, zip on annex, zip on floor
- When closing, use bungees
- Remove cover
- Insert annex cord into frame
- Fold up ladder
- Zip annex on
- Layout and zip on floor
- Fold ladder back down
WHAT’S IN THE BOX!?
1) Start by cutting open one end of the box.
Be careful not to cut the tent
fabric!
Fold back the box flaps and flip the box so the open side is pointed down.
You should be able to slide the box straight up and off the tent.
2) Lay the tent so the side with four holes in the base is facing up (not the side
with the velcro tie-down.)
3) Locate the mounting rails and set them aside.
4) Undo the 4 straps keeping the tent closed, unfold the tent, unzip one of the
doors, and remove the following items and set them aside:
a. PVC cover (1)
b. Ladder (1)
c. Boot bags (2)
d. Gear hammock (1)
e. Hardware bag (1)
The long bag containing the window poles can remain in the tent.
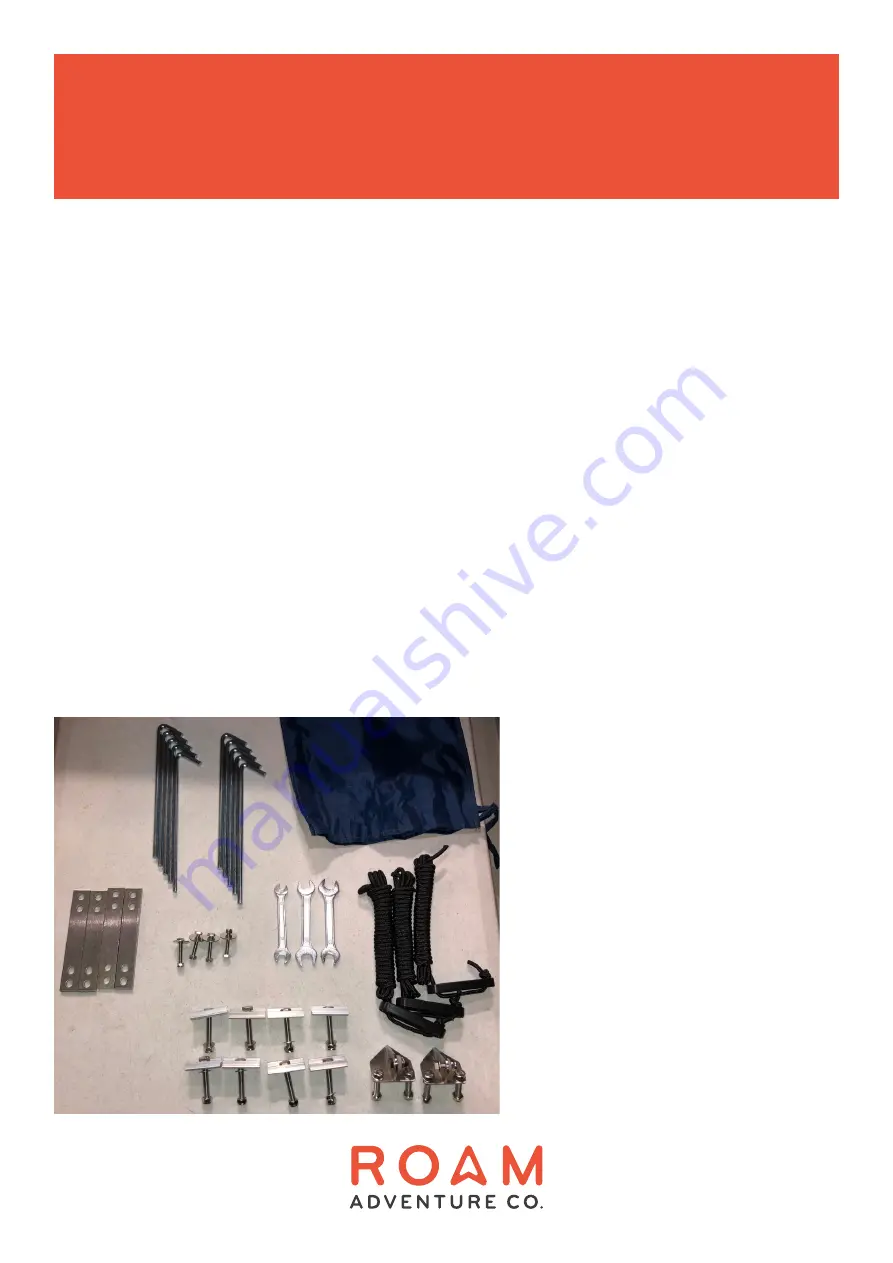
5) Clear a space to empty the hardware bag and find these items inside:
F
A
B
H
G
D
C
E
A. Hardware/stake bag (1)
B. Stakes (8)
C. Sandwich plates (4)
D. Mounting rail hardware (4)
E. Box wrenches (3)
F. Ladder awning tie downs (3)
G. Vehicle mounting slide
brackets (8)
H. Ladder mounting brackets (2)
3
Содержание Vagabond
Страница 1: ...USER MANUAL THE VAGABOND ROOFTOP TENT 1...


