background image

English

English

3

4

31) PHONO BUTTON

32) CD STOP BUTTON

33) -

34) -

35) TOP COVER MECHANISM

36) TURNTAB

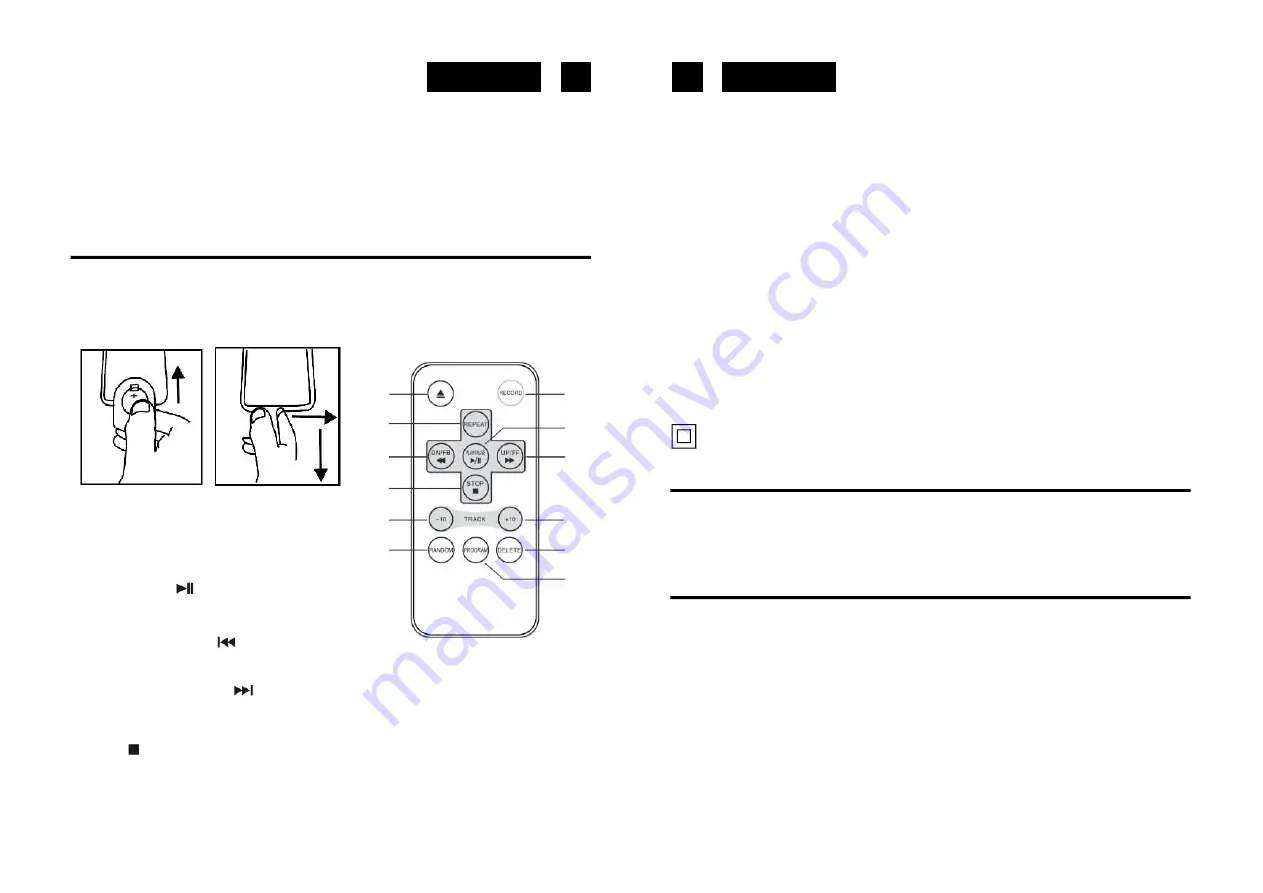
REMOTE  CONTROL

BATTERY INSTALLATION
the infra-red transmitter requires 2 pcs CR-2025 size battery for operation.

CONNECTING  TO  POWER

Before switching on make sure that the voltage of your electricity supply is the same as that

indicated on the rating plate.

For  your  own  safety  read  the  following  instructions  carefully  before  attempting  to  connect

this  unit  to  the  mains.

MAINS (AC) OPERATION

This  unit  is  designed  to  operate  on  AC  230V  50Hz  current  only.  Connecting  it  to  other

power  sources  may  damage  the  unit.

CAUTION

To  prevent  electric  shock  disconnect  from  the  mains  before  removing  cover.  No  user

serviceable  parts  inside.  Refer  servicing  to  qualified  service  personnel.

SAFETY PRECAUTION

Do  not  allow  this  unit  to  be  exposed  to  rain  or  moisture.

Mains  Supply:  230V  50Hz  - AC  only

    This  symbol  means  that  this  unit  is  double  insulated.  An  earth  connection  is  not

required.

POWER SUPPLY

Remove the stereo carefully from the box, retaining the packaging for future use.

AC POWER OPERATION

Connect the plug to a mains power inlet 230V AC ~ 50 Hz.

MW/FM TUNER

Operation

Switch ON the Power Switch (15). The red Power Indicator (17) will light up.

Select the desired frequency band with the Band Selector

 (14) for FM or (12) for MW

band.

Tune to the desired radio station by turning the Tuning control (21).

ANTENNA

For FM reception there is a built-in FM antenna wire (28) at the rear of the unit. Move the wire

around to obtain the best reception.

For MW reception the signals are picked up through a built-in ferrite antenna. Your may have

to orient the unit to obtain the best reception.

37) OPEN / CLOSE CD DOOR.
38) -

39) REPEAT BUTTON
40) PLAY/PAUSE

 in CD mode, press once

to start playback. press again to enter
pause mode.
41) skip/search backward

press once to skip

to  previous  tack.press  &  hold  for  search
backward.
42)  SKIP/SEARCH  forward

press  once  to

skip  to  next  track,  press  &  hold  for  search
forward.

43) STOP  in CD mode, press to stop playback or cancel the stored program.
44) + 10 Track Button
45) - 10 Track Button
46) RANDOM   BUTTON

in CD mode, press to active random function.

47) -
48) PROGRAM in CD mode, press to active programming function.

39

37

41

43

44

46

38

40

42

45

47

48

Содержание HIF-1897T

Страница 1: ...d istruzioni Manual de instrucciones Manual de instruções R AUDIO VIDEO is a registered Trademark of Roadstar S A Switzerland All rights reserved CD MP3 PLAYER WITH TURNTABLE STEREO AND RADIO HIF 1897T WWW ROADSTAR COM Roadstar Management SA via Passeggiata 7 CH 6883 Novazzano Switzerland ...

Страница 2: ...que se necesite nuevamente Ihr neues Gerät wurde unter Beachtung der strengen ROADSTAR Qualitätsvorschriften gefertigt Wir danken Ihnen für den Kauf unseres Produktes Bitte lesen Sie diese Bedienungsanleitung durch und heben Sie sie auf um jederzeit darin nachschlagen zu können Il vostro nuovo apparecchio è stato prodotto ed assemblato sotto lo stretto controllo di qualitá ROADSTAR Vi ringraziamo ...

Страница 3: ...system before using it for the first time Please retain this manual for future reference LOCATION OF CONTROLS 1 DUST COVER 2 CD PLAY PAUSE BUTTON 3 CD SKIP UP 4 CD DOWN BUTTON 5 PLAY MODE BUTTON 6 FUNCTION BUTTON 7 VOLUME KNOB 8 REMOTE SENSOR 9 RECORD BUTTON 10 CD DOOR 11 CD DOOR OPEN CLOSE BUTTON 12 MW BAND BUTTON 13 14 FM BAND BUTTON 15 POWER ON OFF 16 CUE LEVER 17 POWER LED INDICATOR 18 LCD DIS...

Страница 4: ...box retaining the packaging for future use AC POWER OPERATION Connect the plug to a mains power inlet 230V AC 50 Hz MW FM TUNER Operation Switch ON the Power Switch 15 The red Power Indicator 17 will light up Select the desired frequency band with the Band Selector 14 for FM or 12 for MW band Tune to the desired radio station by turning the Tuning control 21 ANTENNA For FM reception there is a bui...

Страница 5: ...est Notes Do not stop or turn the platter manually Moving or jarring the turntable without securing the Tonearm clamp could result in damage to the Tonearm Replace the protective cap on the stylus when not in use PLAYINGCOMPACTDISC To start 1 Press function selector 26 to select CD mode 2 Press OPEN CLOSE button 11 to open the cd door 10 3 Place a cd with the printed side facing up inside the tray...

Страница 6: ...use be sure the system is at stop mode before programming 1 Press CD mode stop the cd playback 2 Press the PLAY MODE button P will appear on LCD display 18 Moreover it will indicate program no and digits for track no to be programmed 3 Select a desired track by pressing SKIP or buttons 3 4 Press the PLAY MODE button to store the trace into memory 5 Repeat steps 3 and 4 to enter additional tracks i...

Страница 7: ... keine vom Benutzer selbst instandsetzbaren Teile Reparaturen dürfen nur von einer autorisierten Fachwerkstatt durchgeführt werden Dieses Gerät ist für 230V 50Hz Netzspannung ausgelegt Bei längerer Nichtbenutzung des Geräts ziehen Sie den Stecker aus der Steckdose Setzen Sie das Gerät weder Feuchtigkeit noch Regen aus Schalten Sie das System erst dann ein wenn Sie alle Verbindungen genau geprüft h...

Страница 8: ...trennen Sie das Gerät vom Netz ab bevor Sie den Deckel entfernen Verwenden sie keine nutzbaren inneren Teile Für die Wartung wenden Sie sich an qualifiziertes Kundendienstpersonal Sicherheitsmaßnahmen Setzen Sie das Gerät weder Regen noch Feuchtigkeit aus Stromversorgung AC 230Volt 50Hz nur Wechselstrom AC Dieses Zeichen bedeutet daß dieses Gerät doppelt isoliert ist Eine Erdung ist nicht notwendi...

Страница 9: ...tte heben und zur Ruhe zurückbringen Hinweise Drehen oder stoppen Sie den Plattenteller nicht manuell Wenn Sie den Plattenteller bewegen oder anstossen ohne den Tonarm mit der Klemme gesichert zu haben konnte der Tonarm beschadigt werden Stecken Sie die Schutzkappe auf die Wiedergabenadel wenn das Gerät nicht benutzt wird WIEDERGABEEINERCD Erste Schritte 1 Drücken Sie mit dem Funktionschalter 26 d...

Страница 10: ... MODE woraufhin P auf dem LCD Display 18 eingeblendet wird Außerdem erscheinen die Programmnummer und Ziffernstellen für die zu programmierende Tracknummer 3 Wählen Sie nun einen Track mittels der SKIP Tasten 3 aus 4 Speichern Sie den Track durch Drücken der Taste PLAY MODE 5 Wiederholen Sie die Schritte 3 und 4 gegebenenfalls zum Speichern weiterer Tracks 6 Nachdem Sie alle gewünschten Tracks pro...

Страница 11: ... l appareil En case de panne faites appel aux techniciens qualifiés pour les réparations L appareil ne renferme aucune pièce reparable par l utilisateur Cet appareil a été conçu pour une tension d alimentation de 230V 50Hz Débranchez la prise de courant quand on prévoit de ne pas utiliser l appareil pendant un certain temps L unité ne doit pas être exposée à l humidité ou à la pluie Mettez l appar...

Страница 12: ... avant d enlever la protection A l intérieur il n y a pas de parties utilisables S adresser au personnel qualifié pour toute opération d entretien Consignes de Sécurité N exposer cet appareil ni à la pluie ni à l humidité Alimentation du réseau CA 230Volt 50Hz CC seulement Ce symbole signifie que l appareil a été doublement isolé La connexion de terre n est pas nécessaire PREPARATION POUR L UTILIS...

Страница 13: ...ture peut causer des dommages au bras de lecture Remettre le capuchon de protection sur la pointe de lecture quand l appareil n est pas utilisé 21 22 LECTURE D UN DISQUE COMPACT Pour commencer 1 Tournez le sélecteur de fonction 26 afin de choisir le mode CD 2 Appuyez sur la touche OPEN CLOSE 11 pour ouvrir le compartiment CD 10 3 Insérez un CD avec la face imprimée orientée vers le haut et referme...

Страница 14: ... sur la touche PLAY MODE P s affiche sur l écran LCD 18 Le numéro de programme et les numéros de piste pour la programmation seront également visibles 3 Sélectionnez une piste désirée en appuyant sur la touche SKIP 3 4 4 Appuyez sur la touche PLAY MODE pour mettre la piste en mémoire 5 Si nécessaire répétez les étapes 3 et 4 pour mettre en mémoire des pistes supplémentaires 6 Lorsque toutes les pi...

Страница 15: ... In caso di guasto fare appello a tecnici qualificati per le riparazioni Questo apparecchio è stato progettato per funzionare a 230V 50Hz Se nonsi intende utilizzare l apparecchio per un lungo periodo di tempo rimuovere la spina dalla presa di corrente Non esporre l apparecchio alla pioggia o all umidità Utilizzare l apparecchio solo dopo aver verificato che tutte le connessioni siano state esegui...

Страница 16: ... Il collegamento ad un atro tipo di fonte di alimentazione potrebbe danneggiare l apparecchio Attenzione Per prevenire le scariche elettriche scollegare la spina prima di rimuovere il coperchio Fare riferimento al personale di un centro di servizi qualificato Precauzioni di Sicurezza Non esporre l apparecchio alla pioggia o all umidità Fonte di Alimentazione Principale solo AC 230V 50Hz AC Questo ...

Страница 17: ... della puntina e della chiusura del braccio di lettura lo potrebbe danneggiare Mettere il cappuccio di protezione sulla puntina quando non verrà utilizzata RIPRODUZIONEDIUNCOMPACTDISC Per iniziare 1 Premere il selettore di funzioni 26 per selezionare la modalità CD 2 Premere il tasto OPEN CLOSE 11 per aprire il vassoio CD 10 3 Inserire un CD con il lato stampato rivolto verso l alto e chiudere il ...

Страница 18: ...del CD 2 Premere il tasto PLAY MODE P comparirà sul display LCD 18 Saranno inoltre visibili anche il numero di programma e i numeri di traccia per la programmazione 3 Selezionare la traccia desiderata premendo i tasti SKIP UP 3 o SKIP DOWN 4 4 Premere il tasto PLAY MODE per memorizzare la traccia 5 Ripetere i punti 3 e 4 per entrare tracce addizionali nella memoria se necessario 6 Quando tutte le ...

Страница 19: ...re la cubierta La unidad no hay en su interior componentes que pueda manipular el usuario Encargue su reparación a per sonal cualificado Esta unidad funciona con 230V 50Hz Cuando el equipo vaya a estar un tiempo prolongado sin utilizarse desenchufar el ca ble de alimentación La unidad no debería ser expuesta a lluvia o humedad No conecte la unidad hasta que no se hayan efectuado todas las otras co...

Страница 20: ...arato a la toma de corriente FUNCIONAMIENTO CON RED CA Este aparato ha sido diseñado para que funcione con una fuente de alimentación de CA 230V 50Hz La conexión a otro tipo de fuente de alimentación podría dañar el aparato Atención Para prevenir las descargas eléctricas desconectar la clavija antes de remover la tapa No emplear las partes utilizables en el interior Dirigirse al personal de un cen...

Страница 21: ...ción sobre la aguja cuando no se utilizará REPRODUCCIÓNDEUNCD Primeros pasos 1 Gire el selector de función 26 para seleccionar el modo de CD 2 Pulse el botón OPEN CLOSE abrir cerrar 11 para abrir la tapa del CD 10 3 Coloque en la bandeja un CD con el lado impreso hacia arriba y cierre la tapa del CD 4 Se ejecutará la búsqueda en el soporte La pantalla LCD 18 mostrará el número total de pistas y el...

Страница 22: ...icará el número de programa y los dígitos disponibles para el número de pista que se programará 3 Seleccione una pista con los botones SKIP o saltar hacia delante hacia atrás 3 4 Pulse el botón PLAY MODE para almacenar el registro en la memoria 5 Si desea introducir otras pistas en la memoria repita los pasos 3 y 4 6 Una vez programadas todas las pistas deseadas pulse el botón PLAY PAUSE reproducc...

Отзывы: