background image


Getting started 

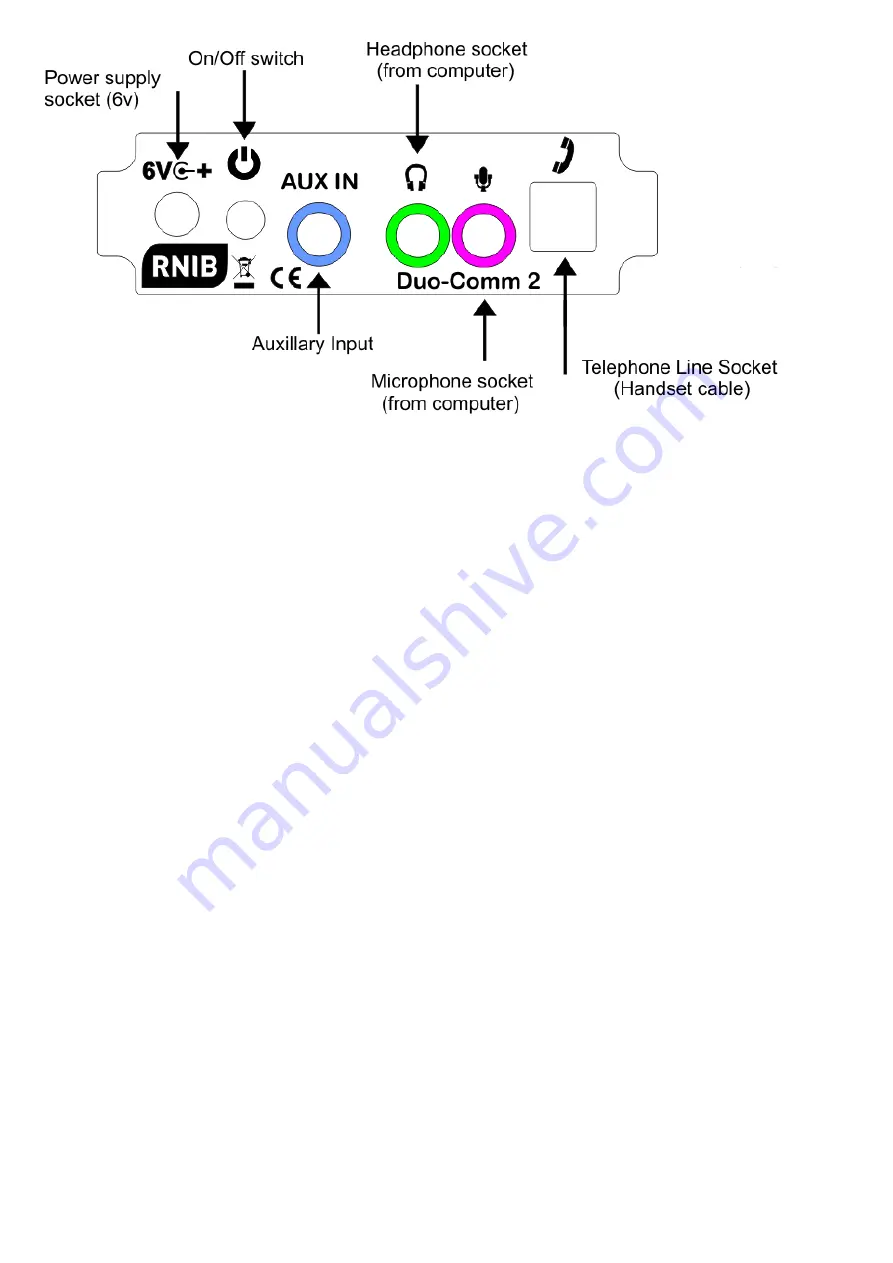
Plug the cables supplied plus the cables from your telephone into the 
sockets on the Duo-Comm 2 rear facia panel in the following order. 
 
Plug the Power adaptor cable into the Duo-Comm 2 power socket (marked 
with "6v" and centre positive icon). This is the first socket on the left hand 
side of the rear facia panel. 
 
Plug the headphone cable into the Duo-Comm 2 headphone socket 
(marked with a headphone icon and outlined in green).  Connect the other 
end of this cable to your computers headphone socket, which is usually a 
green coded socket.  
 
Plug the microphone connector (Pink) into the Duo-Comm 2 Microphone 
socket (marked with a microphone icon and outlined in pink). Connect the 
other end of this cable to your computers microphone socket, which is 
usually a pink coded socket.  
 
Plug the phone line cable (coiled) into the Duo-Comm 2 telephone line 
connector socket and connect the other end to your phone's original 
handset socket. This is the square, protruding socket at the far right of the 
rear facia panel. 
 
If required plug the auxiliary cable (shortest cable) into the Duo-Comm 2 
auxiliary input socket (outlined in blue). This is marked with 

the words “Aux 

In”. Connect the other end of the cable to your external devices headphone 

Содержание Duo-Comm 2

Страница 1: ...ion manual Please retain these instructions for future reference These instructions are also available in other formats Contents General description 1 Items supplied with the Duo Comm 2 2 Orientation 2 Controls and functions 2 Front facia panel 2 Rear facia panel 4 Getting started 5 Product features 7 Technical specification 7 Terms and Conditions of sale 8 How to contact RNIB 8 Product Regulation...

Страница 2: ...acia panels at each end The controls for the Duo Comm 2 are situated on both facia panels The front panel has three knobs on it and two buttons Hold the Duo Comm 2 so that the knobs are facing towards you and the three knobs are on the left of the panel The Duo Comm 2 is now correctly orientated Controls and functions Front facia panel There are three knobs and two buttons on the front of the prod...

Страница 3: ...ode 1 enables you to listen to the computer in both earpieces Mode 2 enables you to listen to the phone line in one earpiece and the computer in the other Mode 3 enables you to listen to the phone line in both earpieces Mode 4 enables you to listen to an auxiliary device in both earpieces The mute select button has an on off function The mute select button will mute all inputs including the microp...

Страница 4: ...o Comm around in your hand through 180 degrees You are now looking at the rear panel From left to right the rear panel has the following connections Power supply socket circular and recessed with a centre pin This accepts the plug from the power supply Power on off push switch Circular and protruding Auxiliary input socket a small 3 5 mm jack socket marked with the words Aux In and highlighted by ...

Страница 5: ...ch is usually a green coded socket Plug the microphone connector Pink into the Duo Comm 2 Microphone socket marked with a microphone icon and outlined in pink Connect the other end of this cable to your computers microphone socket which is usually a pink coded socket Plug the phone line cable coiled into the Duo Comm 2 telephone line connector socket and connect the other end to your phone s origi...

Страница 6: ...t button increments to the next mode with each press as per the following sequence Mode 1 Computer Mode Default enables you to listen to the computer in both earpieces and allows access to the computers microphone inputs An LED will illuminate above the PC volume knob The microphone volume LED will also be illuminated Mode 2 Dual Mode enables you to listen to the phone line in the left earpiece an...

Страница 7: ...al must be rotated clockwise To decrease the volume the rotary dial must be rotated anti clockwise Please test the headset microphone volume by ringing a friend or colleague so that they can tell you if the microphone volume needs adjusting Try to avoid high levels of volume on the microphone as this may be uncomfortable for the person listening to you Product features The Duo Comm 2 enables you t...

Страница 8: ...dgate Peterborough PE1 1TN Online Shop shop rnib org uk Email for international customers exports rnib org uk Product Regulations Declaration of Conformity The Duo Comm HT299 fully complies with the directives listed below of UK and European legislation on electronic products entering the UK and European markets This product is CE marked and fully complies with all applicable EU legislation WEEE 2...

Страница 9: ...equipment To remind you that old electrical equipment can be recycled it is now marked with the crossed out wheeled bin symbol Please do not throw any electrical equipment including those marked with this symbol in your bin What is WEEE The Waste Electrical or Electronic Equipment WEEE Directive requires countries to maximise separate collection and environmentally friendly processing of these ite...

Отзывы: