Page 2 of 3
email: [email protected]
FURNITURE
Riverside
Vogue Bed Room
Queen Bed
Assembly Instructions
Adj Glide
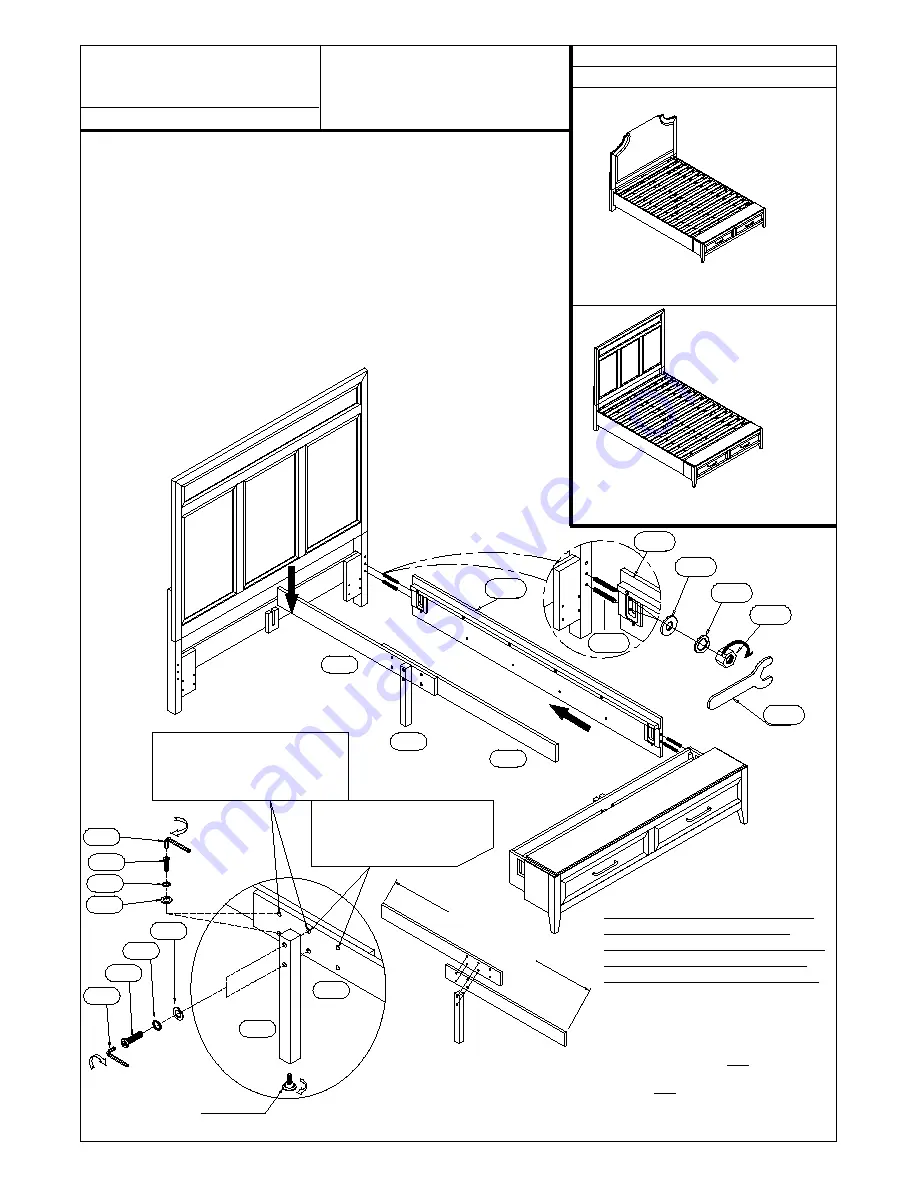
STEP 8
3. Lean the back of the Headboard against the wall where the Bed will be
assembled.
4. Install two All-Thread Bolts (R-B) into the metal threaded inserts installed in
the Headboard Legs and into the metal inserts on the Footboard.
5. Carefully position one end of one Bed Rail (R-A) onto the All-thread Bolts on
the Headboard and connect using the Flat Washers (R-E), Spring Washers
(R-D), and Hex Nut (R-C). Only partially tighten the Nuts until the Footboard
has been connected. Repeat for other Bed Rail.
6. Position and connect the Footboard (F-A) to the other end of the Bed Rails,
attaching as in the previous Steps.
7. Carefully align the Footboard to be 'square' with the Headboard. Using the
Open Wrench (R-F) tighten all Hex Nuts attaching the Side Rails to the
Headboard and Footboard. (See Detail E).
F-C
F-C
F-C
F-D
F-D
8. Assemble Parts A & B of the Slat Support Rails (F-C) using the two 1-1/2" long
Bolts (F-F), Spring Washers (F-H) and Flat Washers (F-I). Assemble the Slat
Support Leg (F-D) to the Support Rails using the two 2-3/4" Long Bolts (F-G) and
the same Washers. Tighten all four Bolts with the Allen Wrench (F-K).
9. Position the Slat Support assembly into the pockets on the Headboard and
Footboard.
F-F
F-H
F-I
F-K
F-G
F-H
F-I
F-K
Note: Use these four holes
when assembling the Slat
Support Rails for a Queen or
Eastern King Bed.
Note: Use these four holes
when assembling the Slat
Support Rails for a California
King Bed.
75-1/8" For Queen / Eastern King
NOTE: The Slat Support Rails Parts
A & B, and Support Leg, can be
assembled to fit a Queen/King Bed or
to fit a California King Bed length,
depending on the sets of holes used.
Made in Viet Nam
R-F
R-C
R-E
R-B
R-D
R-A
R-A
46170
4/6-5/0 UPH HEADBOARD
46174
4/6-5/0 PANEL HEADBOARD
Detail E
46173 5/0 UPH BENCH STORAGE FOOTBOARD
46172 5/0-6/6 BED RAILS
46173 5/0 UPH BENCH STORAGE FOOTBOARD
46172 5/0-6/6 BED RAILS


