RC Series
RC3502SV-7311IR Installation Guide
04-2017-A
www.rivatech.de
8
Note
i
< Use of Ferrite Core >
Installing the ferrite core to a LAN cable is highly recommended to reduce high frequency
noise level. Please follow the instructions below.
1. Open the ferrite core by lifting the clip.
2. Make two loops with the cable through the ferrite core.
3. Close the ferrite core to hold the cable loops into its place.
Caution
!
Sealing gaps is recommended as gaps may appear after the camera installation.
Gaps may cause problems such as moisture, water leakage, and etc., which
negatively affect the operation of the camera if gaps remain unsealed.
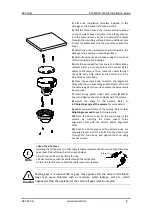
1)
Place the installation template included in the
package on the desired installation surface.
2)
Drill the three holes in the correct positions based
on the template paper, and insert the plastic anchors
into the holes (In case you need to connect the cables
through the mounting surface, drill an additional hole
to pass the cables based on the size of the cable entry
hole.)
3)
Attach the silicon waterproof band included in the
package to the camera’s mounting surface.
4)
Open the camera’s dome cover using the L wrench
(3mm) included in the package.
5)
Install the provided ferrite core to the LAN cable by
reference to the first note below, and connect all the
cables to the camera. Then, route the cables through
the cable entry hole either at the bottom or at the
side of the camera body.
6)
Place the camera body to match the alignment
holes with the corresponding anchor blocks, and hold
the camera against the surface where the camera will
be mounted.
7)
Insert O-ring gasket under each screw (M4x30)’s
head, and tighten the anchor blocks with the screws.
8)
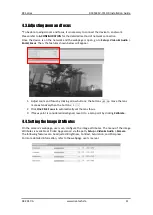
Adjust the angle of the camera. Refer to
4.2.Adjusting angle of the camera
for more details.
9)
Adjust zoom and focus of the camera. Refer to
4.3.
Adjusting zoom and focus
for more details.
10)
Place the dome cover on the main body of the
camera by matching the dome cover’s three
alignment holes with the camera body’s alignment
holes.
11)
Once the dome cover and the camera body are
properly placed, insert the bolts into the three holes
through the main body, and tighten them up using
the hex wrench.
2 turns


