12
cleANING
Caution:
Switch the appliance off before
cleaning it; pull the power plug
out off the socket and turn the
slice thickness adjustment
knob (4) to the "0" position.
Clean the food slicer regularly
to prevent the accumulation of
food residue. The rotary blade
must also be cleaned regularly
as described below to prevent its
surface from rusting.
Note:
Over time, an accumulation of
food residue may cause damage
to the surface of the rotary blade,
causing it to rust.
Preparation
•
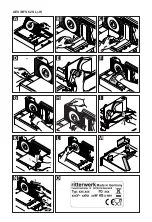
Removing the slice
carriage (11).
Pull the slice carriage for-
wards up to the first stop. Raise
it slightly and then pull it over the
first stop and on to the second
one. Raise it again and then pull
it completely off the appliance.
Remove the rotary blade (14):
AeS/BFS 62 Sr(-h)
Place a suitable coin on the blade
catch (13) and turn it in a clock-
wise direction.
AeS/BFS 62 Sl(-h)
Place a suitable coin on the
blade catch (13) and turn it in an
anticlockwise direction.
•
Take hold of the rotary blade at
its rotational centre and remove
it.
cleaning after each use
•
Wipe down the housing and
all removed parts, including the
rotary blade, with a damp cloth.
Occasional cleaning
•
Give all removed parts, includ-
ing the rotary blade, a thorough
wash in warm soapy water (not in
the dishwasher!).
•
Clean the housing behind the
blade using a dry cloth/brush.
English
Note:
Do not use any abrasive cleans-
ers, sponges with rough surfaces
or hard brushes to clean the
appliance.
•
Dry all parts that you have
washed.
•
Grease the rotary blade's gear
wheel with a little Vaseline.
•
Fit the rotary blade back into
the appliance.
MAINteNANce
Your food slicer is maintenance-
free. However, we recommend
that you occasionally apply a little
Vaseline to the rails of the slice
carriage to keep them lubricated
and ensure that the carriage
continues to move easily.
StOrAGe
Remove the finger protec
-
tor (9) and left-over holder (10)
and hang them both onto the
retaining brackets (7) and (8).
•
Make sure that the slice thick-
ness adjustment knob (4) is set
to position "0", as otherwise the
appliance cannot be folded down
for safety reasons.
Hold the appliance at the stop
plate (3) and use the other hand
to press the release button for
folding up device (6).
•
Swivel the appliance until it is
located fully in the drawer.
Note:
The slice carriage (11) and
slice tray (5) can be left on the
appliance.
DISPOSAL
At the end of its service
life this product may not
be disposed of as part of
normal domestic waste.
It must be taken to a dedicated
collection point for recycling
electrical and electronic devices.
This is referred to by the symbol
on the product, the operating
instructions or the packaging.
The materials can be used
again in accordance with their
identification. The reusage,
material-sensitive recycling or
other forms of recycling of old
appliances enables you to make
a vital contribution to protecting
our environment.
Please consult with the disposal
office at your local authority.
reAch DIrectIVe
See www.ritterwerk.de
SPECIAL ACCESSORIES
A non-toothed rotary blade is also
available specifically for sliced
meat, sausage and ham.
SERVICE, REPAIRS AND
SPARE PARTS
Please contact your local after-
sales service for all service,
repairs and spare parts matters!
See www.ritterwerk.de
techNIcAl DAtA
This appliance complies with the
following regulations and direc-
tives:
– 2014/30/EU
– 2014/35/EU
– 1935/2004/EC
– ErP 2009/125/EC
– 2011/65/EU
The appliance thus complies with
the CE specifications.
Mains voltage/power consump-
tion: Refer to the type label on the
underside of the appliance.
Slice thickness:
0 mm to approx. 14 mm
wArrANty
This ritter appliance comes with
a two-year manufacturer’s war-
ranty, starting with the date of
purchase and in accordance with
the EU warranty directives. In
the event of a warranty claim or
for servicing, the appliance must
always be sent to the appropriate
national customer service centre.
Содержание AES 62 SL
Страница 2: ...AES BFS 62 SR H AES BFS 62 SL H ...
Страница 5: ...AES BFS 62 SR H ...
Страница 6: ...AES BFS 62 SL H ...
Страница 7: ...P Q AES BFS 62 SR SR H ...
Страница 8: ...Q AES BFS 62 SL H ...
Страница 9: ...S S AES BFS 62 SR H AES BFS 62 SL H R AES BFS 62 SR H SL H ...

