13 |
P a g e
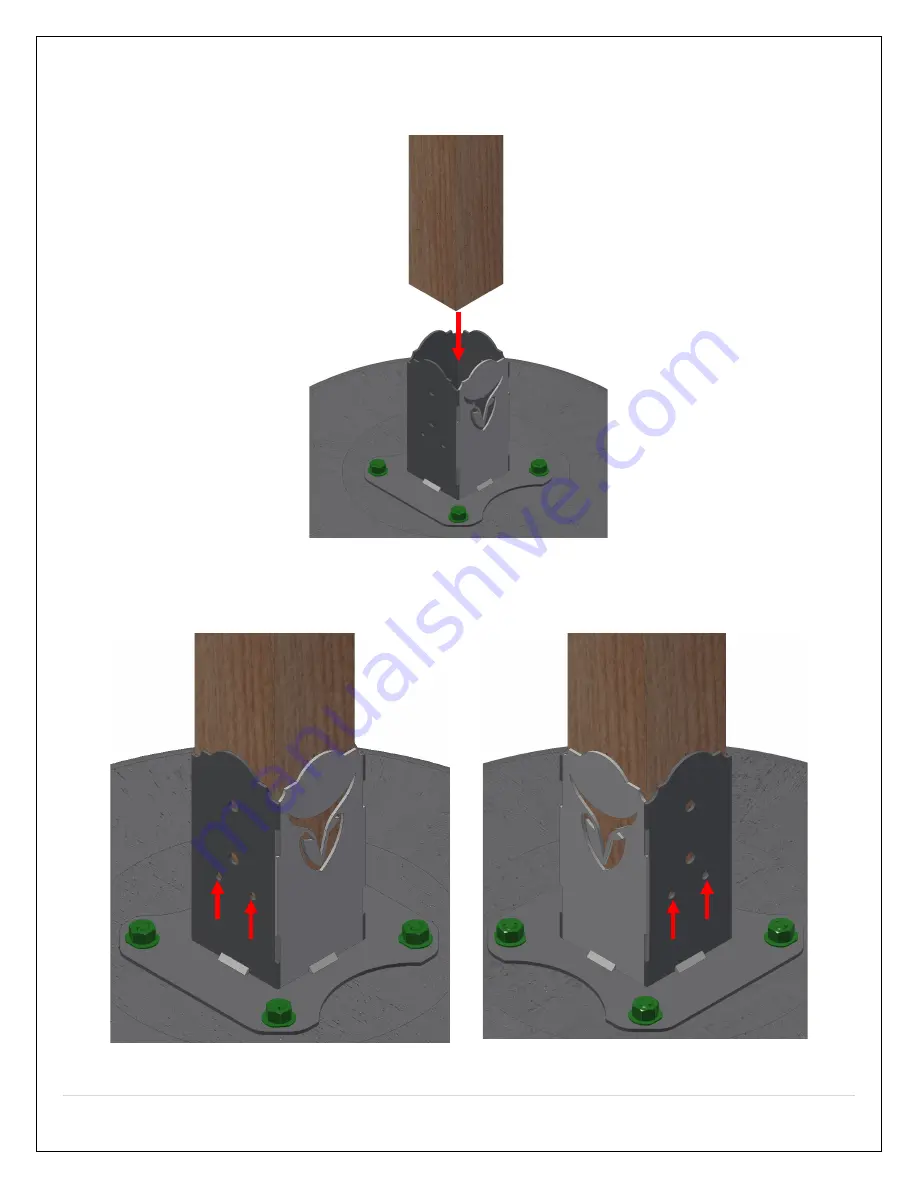
A.
INSTALLING PERGOLA POSTS
2.
Slide one 4x4 post inside a Floor Anchor. Let gravity pull the post all the way down.
3.
Identify the 5/16” holes in two opposite faces in the floor anchor square tube (two holes in each face).
Страница 1: ...d are not to be used for other structure construction purposes Thoughtfully engineered Brackets eliminate all wood joinery skills requirements Skills required drill holes in concrete and hammer in anchors drilling pilot holes and driving lag screws into lumber Easy lift and place U channels eliminate need for lifting equipment Super easy assembly work Self aligning design squares up structure auto...
Страница 2: ...r and hole depth for various lag screws and wood types Lag Screw Type Wood Type Pilot hole drill diameter and hole depth X 1 1 4 Lag Screw McMasterCarr com SKU 92351A546 Soft Wood 3 32 drill bit diam 1 1 4 depth Hard Wood 3 16 drill bit diam 1 1 4 depth 3 8 X 3 Lag Screw McMasterCarr com SKU 92351A636 Soft Wood 11 64 drill bit diam 3 depth Hard Wood drill bit diam 3 depth A properly sized pilot ho...
Страница 3: ...n approvals from the local building inspection department or the local authority over building codes 1 1 2 Other Cautions CAUTION Adhere to all safety requirements Wear safety glasses goggles when working Wear safety gloves when handling brackets hardware and lumber Wear hearing protection when using a circular saw miter saw table saw or hammer drill INSTALLER Leave this manual with the consumer C...
Страница 4: ...ypes 7 16 Hex Socket Drive X 1 1 4 Hex Hd lag screws All pergola types 9 16 Hex Socket Drive 3 8 X 3 Hex Hd lag screws Raftered pergola single dual quad headers 3 32 Drill Bit Drill pilot holes for lag screws in soft wood All pergola types 11 64 Drill Bit Drill pilot holes for 3 8 lag screws in soft wood Raftered pergola single dual quad headers X 4 Masonry Drill Bit Drill X 2 deep holes in concre...
Страница 5: ...ail at info RioOutdoors com Include your name and shipping address and your order number if available We will respond within 24 hours with a resolution to your problem Item SKU Description Item Qty Item Image Post Top Single Header Bracket SKU 4SH 4 4x4 Fixed Floor Anchor Bracket SKU 4FA 4 Rafter Tie Bracket SKU RT 18 x 1 1 4 SS Lag Screw McMasterCarr com SKU 92351A546 144 3 8 x 3 SS Lag Screw McM...
Страница 6: ...tem Qty Item Cost Total Item Cost Item Image 4x4 Post Lumber You determine length 4 2x6 or 2x8 Header Lumber 12 ft max 2x6 16 ft max 2x8 2 2x6 or 2x8 Rafter Lumber You determine length 16 centers 9 for 12 ft header 11 for 16 ft headers 1 2 X 2 3 4 1 2 13 threads Vibration Resistant Hammer On Stud Anchor for Concrete McMasterCarr com SKU 92188A305 16 3 8 x 3 SS Lag Screws for deck mounting McMaster...
Страница 7: ...particular area The diameter of the footing is determined by the weight that each footing is subjected to by the pergola structure If you choose to use concrete footings or to add this pergola on top of an existing wooden deck consult your local building permit office to determine the required footing depth and diameter and the cross brace beam requirements If you fail to follow local officials gu...
Страница 8: ... on your pergola size We have designed our pergola systems to eliminate the need to cut any 4x4 post or header members Plan accordingly to minimize your work requiremens Mark each Floor Anchor Bracket location using colored chalk and tracing the outer profile of the Floor Anchor Bracket bottom plate on top of the concrete pad or wood deck Remeasure and verify the proper location for each post If p...
Страница 9: ...ll the Surface Mount footing system 1 Excavate the required hole diameter and depth 2 Pour concrete into the footing holes 3 Work in 6 incremental depths Tap concrete with the tip of a trowel to remove air bubbles Work upward until you reach ground level or 1 above ground level 4 Along the outer 2 3 inches create a downward tapered profile moving away from the footing center in all directions on t...
Страница 10: ...the side elevation profile for this pergola system Dim A above is the height of the post used Dim B is the inner ceiling height of the pergola Dim B is measured to the bottom surface of the header member Post Height Dim A Dim B 96 96 92 3 4 108 108 104 3 4 120 120 116 3 4 132 132 128 3 4 144 144 140 3 4 ...
Страница 11: ...chor you will be using to anchor the bracket to the concrete footing or pad 3 Drill into the concrete through the four holes in the bracket bottom plate and into the concrete using a hammer drill and masonry drill bit Drill minimum 2 1 4 deep and maximum 2 3 8 depth Do not drill less than 2 1 4 depth as the anchor will not pinch the bracket down fully if the hole is less than 2 deep 4 Using compre...
Страница 12: ...mit office It is important to be cautious when installing a pergola on top an existing wooden deck You must plan to add extra cross support beams for low weight pergolas like cubic shaped pergolas For heavier pergolas like raftered pergolas you must plan and add additional support posts directly under the pergola posts which will transfer the pergola load to the ground At the ground level a concre...
Страница 13: ... INSTALLING PERGOLA POSTS 2 Slide one 4x4 post inside a Floor Anchor Let gravity pull the post all the way down 3 Identify the 5 16 holes in two opposite faces in the floor anchor square tube two holes in each face ...
Страница 14: ...1 1 4 holes at the center of each 5 16 hole four holes total see step 2 5 Drive a X 1 1 4 lag screw through each pilot hole using a rachet and 7 16 socket Tighten down all lag screws 6 Repeat steps 1 to 4 for all vertical posts ...
Страница 15: ...ver the 4x4 post top after aligning the header receiver u channel in the proper direction Let gravity work and pull the bracket all the way down on top of the post 2 Identify the three 5 16 holes which are on the top surface and on the vertical surface on the opposite side of the U channel in the bracket ...
Страница 16: ...s a hole depth indicator when you drill each pilot hole Pilot holes should be drilled at least 1 1 4 deep A little bit deeper is acceptable but do not drill less than the required 1 1 4 depth 4 Drill 3 32 X 1 1 4 deep pilot holes at the center of the three 5 16 Holes Locate pilot holes at the center of each 5 16 hole ...
Страница 17: ...ne x 1 1 4 SS Hex Lag Screw through each 5 16 hole into the pilot holes you drilled in step 4 using a 7 16 Socket and Rachet driver Tighten down each screw 6 Repeat steps 1 through 5 for each post top single header bracket ...
Страница 18: ...ngths for your headers it is time to prepare the header to install the rafter tie brackets We have designed the rafter tie brackets to be auto aligning and simple to locate precisely Follow these steps for easy rafter tie placement 1 On the ground place headers with the top edge of headers facing upward Butt two headers together and align their ends flush 2 Clamp headers together using a C clamp o...
Страница 19: ...ented towards the inside area of the pergola Look through the rectangle slot in the Rafter Tie Slide the Rafter Tie until you can see the pencil mark line you marked on the header top surface in the rectangle slot 7 Drill 3 32 pilot holes in the center of the 5 16 holes in the Rafter Tie brackets Two 5 16 holes exist on each side of the Rafter Tie Bracket ...
Страница 20: ...8 Using a 7 16 Socket and Ratchet Driver drive a x 1 1 4 Lag Screw through the two holes on each side of the Rafter to secure the rafter tie to the header 9 Repeat steps 7 and 8 for all rafter ties on both headers ...
Страница 21: ...e header between the two posts by measuring the overhangs and moving the header until the overhang lengths on both sides are equal 3 Locate the two 5 16 holes one on each wing extension of the post top single header bracket Drill 3 32 X 1 1 4 deep pilot holes at the center of the two 5 16 Holes Locate pilot holes at the center of each 5 16 hole ...
Страница 22: ... down each screw 5 Repeat steps 1 2 for the second header and steps 3 4 for the remaining 3 post top single header brackets 6 Prepare an 11 64 drill bit to drill a pilot hole for 3 8 X 3 Lag Screws Wrap tape around the drill bit shaft 3 from the end of the drill bit While drilling the pilot hole the tape will indicate when you have reached the required depth ...
Страница 23: ... pilot hole in the center of each 7 16 hole The pilot hole will go through the header and into the 4x4 post Drill at least 3 deep or a little bit deeper not shallower Drive one 3 8 x 3 SS lag screw using a 9 16 socket and ratchet through the header and into the post through the pilot holes you drilled Tighten all screws ...
Страница 24: ...ce one rafter on a matching pair of rafter tie brackets Measure the rafter overhang on each side of the pergola and center the rafter 2 Drill 3 32 x 1 1 4 deep pilot holes in center of two holes in the Rafter Tie bracket faces on both sides of the rafter ...
Страница 25: ...g a 7 16 socket and ratchet driver drive x 1 1 4 Lag Screws through the pilot holes you drilled in the header Two x 1 1 4 Lag Screws are required on both sides of the header 4 Repeat steps 1 3 for all remaining rafters ...
Страница 26: ... us know how the construction project went for you Was it easy to do Did parts fit easily and properly Do you like the quality of our products and design styles Is your pergola structure sturdy and strong Please go to RioOutdoors com and provide us with your review Thank you for being a RioOutdoors com customer ...
Страница 27: ...n for evaluation Incomplete claims may be rejected All pergola brackets must be installed according to all manufacturers instructions as per the installation instruction manual by a RioOutdoors com All Local and National required codes must be met Repair replacement parts purchased by the consumer from RioOutdoors com after the original coverage has expired will carry a 90 day warranty valid with ...
Страница 28: ...R ANY INCIDENTAL OR CONSEQUENTIAL COMMERCIAL DAMAGES OR DAMAGES TO PROPERTY TO THE EXTENT PERMITTED BY APPLICABLE LAW RioOutdoors com MAKES NO EXPRESS WARRANTIES OTHER THAN THE WARRANTY SPECIFIED HEREIN THE DURATION OF ANY IMPLIED WARRANTY IS LIMITED TO DURATION OF THE EXPRESSED WARRANTY SPECIFIED ABOVE IF IMPLIED WARRANTIES CANNOT BE DISCLAIMED THEN SUCH WARRANTIES ARE LIMITED IN DURATION TO THE ...