background image

MerCruiser 7.3L D-Tronic Diesel

Page 60

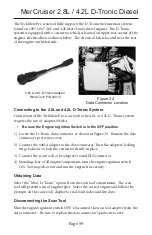
Figure 35   

7.3L Data Connector Location

The TechMate scan tool fully supports the D-Tronic fuel injection system 

found on 1997-Up 7.3L MerCruiser diesel engines. The 7.3L D-Tronic system is 

equipped with a diagnostic data connector which is located near the rear of the 

engine as shown in Figure 33. 

7.3L D-tronic Adapter 

Rinda Tech P/N 94021

Connecting to the 7.3L D-Tronic System

Connection of the TechMate Pro scan tool to the 7.3L D-Tronic system requires 

the use of  adapter #94021 . 

•  Be sure the Engine’s Ignition Switch is in the OFF position.

1)  Locate the D-Tronic data connector as shown in Figure 33.  Remove the data 

connector’s protective cover.

2)  Connect the 94021 adapter to the data connector. Turn the adapter’s locking 

ring clockwise to lock the connector firmly in place.

3)  Connect the scan tool to the adapter’s round DIN connector.
4)  Standing clear of all engine components, turn the engine’s ignition switch 

ON.  You may also start and run the engine if necessary.

Obtaining Data

Select the “Merc D-Tronic” option from the scan tool’s main menu.  The scan 

tool will present a list of engine types.   Select the correct engine and follow the 

prompts on the scan tool’s display to read fault codes and live data. 


Disconnecting the Scan Tool

Shut the engine’s ignition switch OFF.  Disconnect the scan tool adapter from the 

data connector

 Be sure to replace the data connector’s protective cover.

Data Connector

Содержание TechMate Pro

Страница 1: ...Rinda Technologies Inc www rinda com TechMate Pro User s Guide Marine Scan Tool TM The fastest and easiest way to troubleshoot Marine Electronic Fuel Injection Systems ...

Страница 2: ... ...

Страница 3: ...TechMate Pro Marine Scan Tool Rinda Technologies Inc 4563 N Elston Ave Chicago IL 60630 www rinda com Tel 773 736 6633 Fax 773 736 2950 Copyright 2015 Rinda Technologies Inc USER S GUIDE Revision 2 TM ...

Страница 4: ... software in terms of correct ness accuracy reliability currentness or otherwise Limitation of Liability Neither Rinda Technologies Inc nor its authorized dealer shall be liable for any defect indirect incidental special or consequential damages whether in an action in contract or tort including negligence and strict liability such as but not limited to loss of anticipated profits or benefits resu...

Страница 5: ...FI 21 Pleasurecraft Crusader ECM 07 ECM 08 28 Indmar GCP EFI 29 Ilmor MV8 EFI 30 Ilmor MV10 EFI 31 OBD M compliant EFI 33 MerCruiser PCM 555 ECM 555 EFI 34 MerCruiser Mercury Racing PCM 09 EFI 47 MerCruiser Thunderbolt V Ignition 52 MerCruiser 2 8L 4 2L D Tronic Diesel 59 MerCruiser 7 3L D Tronic Diesel 60 Mercury Outboards see outboard manual supplement Adapters and Accessories 61 ...

Страница 6: ...eries contain sulfuric acid and produce highly explosive gases that may ignite To prevent serious injury always observe this precaution along with the safety precautions provided by the engine boat and battery manufacturers Always test and service a running engine in a well ventilated area Always wear approved eye protection IMPORTANT The scan tool is a sensitive electronic instrument Always handl...

Страница 7: ...ess EFI fault codes and fault descriptions Perform functional tests Large bright LCD display readable in direct sunlight Durable water and oil resistant keypad Software upgradeable for future applications Built in USB1 connection for easy updates via a PC SD memory card support for system expansion Ergonomically designed for easy use Rubberized non slip exterior provides assured grip Designed and ...

Страница 8: ...ns decline choices Navigates right Also used for special functions in some menus Switches between 3 parameter and 5 parameter data display modes when viewing live engine data Also used to recall scan tool device information when the main menu is displayed Used to activate tests Also used to recall system time and date when the main menu is displayed Navigates left Also used for special functions i...

Страница 9: ... be moved up or down to highlight a menu item If there are more items in the menu than can be displayed on a single screen a scroll bar will appear on the right side of the menu items as shown in Figure 3 below The presence of a scroll bar indicates additional menu choices are available which are not presently displayed The two arrow indicators within the scroll bar show the direction s the highli...

Страница 10: ...ic units MAP Type For MEFI 2 thru MEFI 4 EFI systems only Adjusts MAP readings to accom modate 1 atmosphere and 2 atmosphere MAP sensors Use 2 ATM setting only when working on MEFI 2 thru MEFI 4 equipped supercharged engines Fuel Scaling For MEFI 1 and 2 EFI systems only Use Merc MEFI 1 Scaling only when working on older MerCruiser engines equipped with MEFI 1 or MEFI 2 EFI systems Tool Informatio...

Страница 11: ...dmar engine models equipped with GCP Indmar EFI Ilmor MV8 marine engines equipped with Ilmor 4G EFI Ilmor MV10 marine engines 2009 Up with Ilmor EFI MerCruiser engines equipped with PCM 555 and ECM 555 EFI MerCruiser Mercury Racing engines equipped with PCM 09 EFI OBD M compliant sterndrive inboard gasoline marine engines MerCruiser engines with Thunderbolt V Ignition MerCruiser 2 8L and 4 2L D Tr...

Страница 12: ...oduced by Volvo Penta that are equipped with Electronic Fuel Injection Upon selecting the Sterndrives Inboards menu choice the scan tool will establish communication with the engine s Electronic Control Module ECM and automatically determine the type of module that is present There are at the time of this writing six base GM marine system types that are supported by the TechMate Pro scan tool Some...

Страница 13: ... al Please be aware that the connector may have a protective cap attached to it Examples are shown in Figure 4 and Figure 5 below Figure 4 GM EFI Diagnostic Link Connector DLC Note Some manufacturers place a protective cover over the DLC which must be removed in order to connect the scan tool to the engine Be sure to replace the connector cover if used in order to protect the diagnostic connector ...

Страница 14: ... modules one on each engine may be electronically linked together This link is usually installed by the boat manufac turer and provides the ability to diagnose both engines from a single diagnostic connector With the exception of setting the engine s base timing all scanner functions are available for accessing both engines from one diagnostic plug In order for the scanner to function properly in ...

Страница 15: ...if necessary If the engine will not start simply leave the ignition switch ON and proceed 4 After the scan tool displays its initial opening messages use the and keys to select the Sterndrives Inboards menu item then press the YES key to select it Figure 6 94029 CAN Network Adapter Engine 1 Engine 2 Selection MEFI 1 4 ECMs Only This menu allows you to select which engine you would like to service ...

Страница 16: ...u MEFI 6 ECMs Only The Power Balance Test is designed to assist a technician in finding a problematic cylinder This test commands the ECM to disable the spark output or on some systems both spark and fuel to a selected cylinder thereby causing that cylinder to misfire not produce power This test must be enabled by the engine manu facturer Upon selecting the Power Balance Test the scan tool will qu...

Страница 17: ...circumstances resetting the BLM values should not need to be performed unless specified by the engine manufacturer ECM Output Tests Function The TechMate scan tool has the ability to activate a number of ECM outputs for diagnostic purposes Upon selecting the ECM Output Tests menu choice the scanner will interrogate the ECM in order to determine its version type You will then be presented with a me...

Страница 18: ... Lamp J2 31 Fuel Pump Output J2 9 IAC Motor Reset MEFI 2 EFI Output Tests MerCruiser only MerCruiser models using 1996 GM MEFI II ECM only Buzzer Circuit Output 1 J2 11 Buzzer Circuit Output 2 J2 26 Fuel Pump Output J2 9 IAC Motor Reset Physically connected to J2 11 may electronically respond as J2 12 due to ECM s calibration MEFI 2 EFI Output Tests Volvo and Other Makes Check Gauges Lamp J2 11 Bu...

Страница 19: ...p J1 25 Check Gauges Lamp J1 7 Check Engine Lamp J1 9 General Warning 2 Output J1 22 Fuel Pump Output J1 23 IAC Motor Reset MEFI 4 Output Tests ECM Pin General Warning 1 Output J1 22 Buzzer Output J1 8 RPM Controlled Output J1 7 Oil Level Lamp J1 18 Check Gauges Lamp J1 9 Check Engine Lamp J1 27 General Warning 2 Output J1 23 Fuel Pump Output J1 6 IAC Motor Reset ...

Страница 20: ...1 53 Warning Horn Output J1 54 Governor Status Lamp J1 55 Oil Level Lamp J3 8 Trans Shift Output J3 13 Troll Lamp J3 16 MEFI 6 Output Tests ECM Pin DTC Lamp 1 J1 51 MIL Lamp J1 52 RPM Controlled Output J1 53 Warning Horn Output J1 54 Governor Status Lamp J1 56 Fuel Select 1 J3 4 Fuel Select 2 J3 6 Intercooler Relay Output J3 7 SVS Lamp J3 8 DTC Lamp 2 J3 9 Trans Shift Output J3 11 Slow Mode Lamp J...

Страница 21: ...ple and straight forward 1 Locate the engine s diagnostic connector DLC The exact location of this connector is specified in the engine manufacturer s service manual and may vary depending upon the engine type Please be aware that the connector may have a protective cap attached to it Figure 7 Volvo Penta EGC Control Module 2 With the engine s ignition switch in the OFF position plug the scan tool...

Страница 22: ...ct the Main Data Monitor function To read system fault codes select ECM Faults MAIN MENU Main Data Monitor ECM Faults ECM Functions ECM Info Warning Monitor Figure 8 Main Volvo Penta EGC Menu Viewing Specialized Diagnostic Data In addition to providing general diagnostic data and fault information as described above the scan tool provides several other data lists that are each tailored for a speci...

Страница 23: ...tle Monitor data list This list is available only when connected to an engine that is equipped with Electronic Throttle Control ETC The throttle monitor data list provides quick access to EGC system parameters that are critical to electronic throttle operation A complete set of items related to throttle lever position and throttle blade angle are provided to assist in diagnosing ETC related proble...

Страница 24: ...gine speed when the spark output is disabled Upon selecting this test you will be prompted to select the spark output 1 thru 8 to disable Spark outputs follow cylinder number order Use the and keys to select the desired spark output and then press the TEST key to start the test The test will run for approximately 10 seconds To abort the Spark Kill test at any time press and hold the scanner s NO k...

Страница 25: ...e pulsed The test must be performed with Key ON Engine OFF This test is intended to be used for injector leak down testing and it can assist a technician in identifying clogged injectors A fuel pressure gauge is normally used in conjunction with this test Refer to the engine manufacturer s service literature for specific details and procedures on injector testing Upon selecting this test you will ...

Страница 26: ...e enable normal spark and fuel operation Do not perform this test at sea The Compression Test should only be performed dockside or at a service facility since the engine will be disabled until the test is properly exited If the scan tool is disconnected from the engine during the Compres sion Test the engine will remain in a disabled state You must recon nect the scan tool re enter the Compression...

Страница 27: ... oxy gen sensors and one or more catalytic converters The test allows a technician to check the functionality of the O2 sensor feedback system by automatically cycling the engine through rich and lean phases of operation This test must be performed with the engine idling and gear selector in the Neutral position The engine s speed will be increased to approximately 1200 rpm during the test To abor...

Страница 28: ...onnector which is compatible with the 94029 CAN adapter however diagnostics are NOT supported via the CAN connector on ECM 07 equipped engines You must use the 94026 GCP adapter In 2008 Pleasurecraft Engine Group introduced the ECM 08 module which fully supports CAN communication for engine diagnostics ECM 08 based systems require use of the 94029 scan tool CAN network adapter for all diagnosis an...

Страница 29: ...are used on Indmar s current production engines mid 2009 and newer and have Indmar s logo cast into the ECM housing CAN Network Adapter Rinda Tech P N 94029 The TechMate Pro scan tool fully supports both the type 1 and type 2 modules with an extensive set of diagnostic functions Both type 1 and type 2 modules require use of the 94029 scan tool CAN network adapter shown above for diagnostic communi...

Страница 30: ...r the GM Delphi MEFI 5 modules used on some early MV8 engines The TechMate Pro scan tool offers an extensive set of diagnostic functions when connected to MV8 equipped engines Connecting the scan tool requires adapter 94029 CAN Network Adapter as shown in the photo at the bottom of this page Diagnostic functions for Ilmor MV8 ECM modules are identical to those de scribed in the Volvo Penta EGC sec...

Страница 31: ...d for this application as shown on page 30 3 Once the tool is connected turn the ignition switch ON start the engine or simply leave the ignition switch ON and proceed 4 After the scan tool displays its initial opening messages use the and keys to select the Sterndrive Inboards menu item then press the YES key 5 After selecting the Sterndrive Inboards function the scan tool will attempt to communi...

Страница 32: ...ug the scan tool s communication cable into the diagnostic connector Scan tool adapter 94029 CAN Network Adapter is required for this application as shown below CAN Network Adapter Rinda Tech P N 94029 3 Once the tool is connected turn the ignition switch ON start the engine or simply leave the ignition switch ON and proceed 4 After the scan tool displays its initial opening messages use the and k...

Страница 33: ...ystem Connection and operation of the tool is simple and straight forward 1 Locate the engine s 4 pin diagnostic connector DLC The exact location of this connector is specified in the engine manufacturer s service manual and may vary depending upon the engine type Please be aware that the connector may have a protective cap attached to it 2 With the engine s ignition switch in the OFF position plu...

Страница 34: ...isplayed as shown in Figure 14 below Figure 14 Main PCM Menu SMARTCRAFT PCM PCM Data PCM Faults PCM History PCM System Info PCM Functions To obtain diagnostic data select the PCM Data option This menu choice causes the scanner to begin reading and displaying live data from the PCM module Use the and keys to scroll through the engine operating data that is displayed PCM Faults Selecting the PCM Fau...

Страница 35: ...each fault that is stored This snapshot is taken at the time the fault was detected Figure 16 PCM History Menu PCM HISTORY Freeze Frame Memory Fault Seconds Erase Fault History RPM History Erase RPM History Figure 17 PCM Freeze Frame Example SELECT FREEZE FRAME 9 Engine Guardian 16 MAP Sensor Circu 81 Main Power Relay 85 Oil Pressure Low 101 CAN Communicatio To view the Freeze Frame data select a ...

Страница 36: ... active fault information RPM History PCM 555 control modules have the ability to record the number of hours an en gine has been operated within a predetermined set of RPM ranges These ranges are set at the factory and allow a service technician to view a profile of how a par ticular engine has been operated Upon selecting the RPM History menu option a list will be displayed showing the hours accu...

Страница 37: ... menu option allows a technician to access a variety of PCM functional tests and settings as shown in Figure 18 Figure 18 PCM Functions Menu PCM FUNCTIONS Output Tests Induced Misfire Test Set Engine Location Set Trim Limit Set Trailer Limit Output Tests The Output Test menu option provides a technician with the ability to exercise various PCM actuators and controls in order to verify correct oper...

Страница 38: ... or disconnecting the pump s electrical connector This test should be performed with Key On and Engine Off 1 Review the warnings stated above and be sure the engine is not running when attempting to perform this test 2 After selecting the Fuel Injectors function from the PCM Output Test menu the scanner will begin to display several safety messages Review these mes sages and be certain their instr...

Страница 39: ... to verify proper ignition coil operation The ignition coil under test will be fired at a rate equivalent to 1600 rpm This test helps a technician verify that a particular ignition coil is receiving a command signal from the PCM and that the coil s high voltage output is sufficient to generate a spark discharge WARNING Use of spark gap tester is required for this test Do not perform this test with...

Страница 40: ... direct injector is receiv ing a command signal from the PCM IMPORTANT Before performing this test the engine s electric fuel pump should be disabled Disabling of the fuel pump may be accom plished by removing the fuel pump fuse or disconnecting the pump s electrical connector This test should be performed with Key On and Engine Off 1 Review the warnings stated above and be sure the engine is not ...

Страница 41: ...de to be moved in 5 degree increments using the scan tool s and keys and also displays the current TPS voltages and TPS percent in real time This test must be performed with Key On Engine Off Follow the scan tool s on screen prompts to proceed with the test Press and hold the NO key on the scan tool s keypad to stop the test at any time Gear Shift Motor Test DTS systems only This test allows the t...

Страница 42: ...ory messages Review these messages and be certain their instructions are followed 3 When the advisory messages have been displayed you may begin the test by pressing the YES key While the test is in progress the scanner will display the current engine RPM as well as the IAC valve s position Use the and keys to change the IAC s position in 5 increments The IAC position range is from 100 to 100 Whil...

Страница 43: ... test at any time 3 After the test is complete the scan tool will return to the Output Test menu Induced Misfire Test The Induced Misfire Test is designed to assist a technician in finding a problem atic cylinder This test commands the PCM module to disable the fuel injector on a selected cylinder thereby causing that cylinder to misfire not produce power Perform the following steps to conduct the...

Страница 44: ...o test another cylinder or press the NO key to return to the scanner s PCM Function menu Set Engine Location This function allows the technician to read and modify the PCM s engine location setting All engines shipped from the factory are configured as STAR BOARD Multi engine installations may require an alternate setting when used within a Mercury MerCruiser SmartCraft system Refer to the engine ...

Страница 45: ...m the PCM Functions menu the scanner will ask you to confirm if you would like to proceed with the trim limit adjustment Press YES to continue or NO to exit 3 After pressing YES you will be asked to physically trim the stern drive to the upper trim limit position using the boat s trim controls After trimming the drive to the desired position press YES to proceed You may press the NO key to exit if...

Страница 46: ...further assistance on selecting the correct setting Oil Pump Prime outboard engines only This function commands the PCM to begin it s two stroke oil pump priming sequence Please refer to appropriate engine service documentation for the recommended use of this PCM function Reset Break in Oiling outboard engines only This function resets the PCM s engine break in timer to provide increased oil neede...

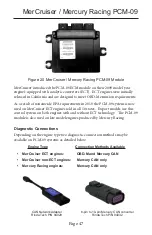
Страница 47: ...ECT engines sold in all 50 states Export models use this control system on both engines with and without ECT technology The PCM 09 module is also used on late model engines produced by Mercury Racing Diagnostic Connections Depending on the engine type two diagnostic connection methods may be available on PCM 09 systems as detailed below Engine Type Connection Methods Available MerCruiser ECT engin...

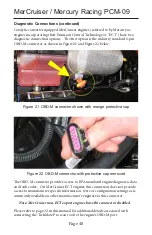
Страница 48: ...th orange protective cap Figure 22 OBD M connector with protective cap removed The OBD M connector provides access to EPA mandated engine diagnostic data and fault codes On MerCruiser ECT engines this connection does not provide access to manufacturer specific information tests or configuration settings as is commonly available on other manufacturer s engines via this connector Note MerCruiser non...

Страница 49: ...oting engines equipped with the PCM 09 engine control system Connection of the tool to the engine is detailed in the steps below 1 Adapters 94029 and 94032 are required for this application Attach the 94029 CAN network adapter to the scan tool communication cable Once attached proceed to attach adapter 94032 to the 6 pin connector on the 94029 adapter as shown in Figure 23 below Figure 23 Adapter ...

Страница 50: ... engine if necessary 4 After the scan tool displays its initial opening messages use the and keys to highlight the Sterndrives Inboards option from the main menu then press the YES key to select it Engine ECM Detection After selecting the Sterndrives Inboards system type the scan tool will first determine if more than one engine is available for diagnosis Multi engine vessels often have their engi...

Страница 51: ...e is primarily the connection method of the scan tool and adapters required For descriptions of the various diagnostic functions present on PCM 09 systems please refer to the MerCruiser PCM 555 EFI section of this manual Please note that not all engines provide all functions described Features and functions are dependent upon the PCM 09 application The TechMate Pro scan tool will typically display...

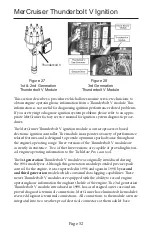
Страница 52: ...wo of the three versions are capable of providing histori cal engine operating information to the TechMate Pro scan tool The 1st generation Thunderbolt V module was originally introduced during the 1994 model year Although this generation module provided precise spark control for the engine it was superseded in 1996 and again in 1998 by second and third generation models which contained data loggi...

Страница 53: ...e Knock Sensor module that may be mounted adjacent to it 1st Generation Thunderbolt V Module 2nd Generation Thunderbolt V Module 3rd Generation Thunderbolt V Module White outline around text New Data Connector Referring to the images shown above you will notice that both the 1st and 2nd generation Thunderbolt V modules are physically identical The telltale indicator that identifies the 2nd generat...

Страница 54: ...eweler s screwdriver or a pair of needle nose pliers to carefully remove this material This removal process will expose the Thunderbolt V s two data communication terminals Note the communication terminals should be recovered with silicone rubber GE RTV silicone or equivalent when you have finished acquiring the Thunderbolt V s data 3 Referring to Figure 27 and Figure 28 connect the YELLOW and VIO...

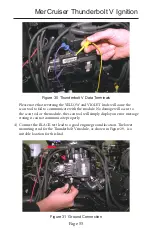
Страница 55: ...use the scan tool to fail to communicate with the module No damage will occur to the scan tool or the module the scan tool will simply display an error message stating it cannot communicate properly 4 Connect the BLACK test lead to a good engine ground location The lower mounting stud for the Thunderbolt V module as shown in Figure 29 is a suitable location for this lead ...

Страница 56: ... To properly connect the scan tool to this module carefully proceed through the following steps 1 Before connecting the scan tool cables to the Thunderbolt V module be sure the engine s ignition switch is in the OFF position 2 Locate the 3rd generation Thunderbolt V module mounted on the exhaust elbow Unplug the engine wiring harness from the module s four pin data connector Plug the square connec...

Страница 57: ...NOT START THE ENGINE 2 Choose the Thunderbolt V option from the scan tool s main menu 3 The scan tool will now automatically attempt to retrieve data from the Thun derbolt V module If data is not received within 10 seconds the scan tool will report that a communication error has occurred In this situation turn the engine s ignition switch to the OFF position and recheck the scan tool con nections ...

Страница 58: ...round lead from the engine s ground connection 4 For 2nd Generation modules remove the YELLOW and VIOLET mini grabber test clips from the Thunderbolt V s communication terminals For 3rd generation modules unplug the 4 pin scan tool adapter from the module s data connector 5 Replace the removed silicone rubber waterproofing on the 2nd generation module s communication terminals Use General Electric...

Страница 59: ...2 Remove the data connector s protective cover 2 Connect the 94014 adapter to the data connector Turn the adapter s locking ring clockwise to lock the connector firmly in place 3 Connect the scan tool to the adapter s round DIN connector 4 Standing clear of all engine components turn the engine s ignition switch ON You may also start and run the engine if necessary Obtaining Data Select the Merc D...

Страница 60: ...as shown in Figure 33 Remove the data connector s protective cover 2 Connect the 94021 adapter to the data connector Turn the adapter s locking ring clockwise to lock the connector firmly in place 3 Connect the scan tool to the adapter s round DIN connector 4 Standing clear of all engine components turn the engine s ignition switch ON You may also start and run the engine if necessary Obtaining Da...

Страница 61: ...ool Adapters Page 61 94005 GM Marine EFI Adapter 94006 PCM 555 ECM 555 Adapter 94011 Mercury 3 0L Adapter 94013 Mercury Racing 2 5L Adapter 94014 2 8L 4 2L D Tronic Diesel Adapter 94020 Thunderbolt V Adapter ...

Страница 62: ...Adapters Page 62 94021 7 3L D Tronic Diesel Adapter 94024 Volvo Penta EGC Adapter 94026 Pleasurecraft Crusader GCP Adapter 94028 Mercury 2 pin Adapter 94029 CAN Network Adapter 94032 6 pin to 10 pin CAN Converter ...

Страница 63: ...Scan Tool Adapters Page 63 94038 Mercury 3 pin Adapter 94039 Mercury 18 pin Adapter 94015 Deluxe Carrying Case shown with tool and adapters 94037 In line Power Adapter ...

Страница 64: ...Rinda Technologies Inc 4563 N Elston Ave Chicago IL 60630 www rinda com Copyright 2015 Rinda Technologies Inc Printed in USA ...

Отзывы: