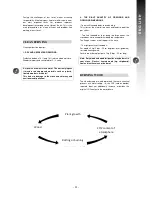
RIKA tara Скачать руководство пользователя страница 13


- 13 - 

E

N

G

L

IS

H


4. OPERATION 


FIRE LIGHTING 


To reduce the emission of pollutants as far as possible, we 
ask  you  to  observe  the  following  instructions  for  the  sake 
of the environment. 
 
1. 
If  the  stove  and  chimney  are  still  cold  or  if  there  is 
atmospheric  low  pressure,  we  recommend  burning  some 
paper  initially  to  remove  the  cold  from  the  stove  and 
chimney. 
 
2. 
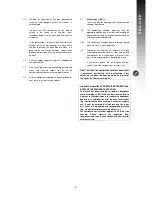
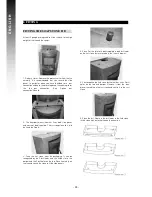
To light the fire, place uncoated paper at the bottom of the 
combustion chamber, then 0.5 kg softwood chippings and 
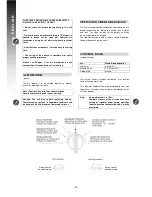
1  kg  wood  (3  small  logs).  Turn  the  regulator  knob  to  the 
right to fire lighting setting; primary and secondary air are 
completely open. (See “Regulator knob” see page 14)


Please  do  not  use  glossy  paper  or  paper  from 
magazines. It does not burn well and the printing inks 
create highly toxic substances in the flue gas.


3. 
Only  use  paper  for  fire  lighting.  Wait  until  the  softwood 
chippings are burning well.


Turn the regulator knob 90° to the left some minutes later. 
The  primary  air  is  now  closed  and  the  secondary  air 
completely open. Set the regulator knob to the ideal setting 
some minutes later; (see “Regulator knob” page 14)


4. 
After burn-off, place approx. 2  kg wood (2 logs) on the fire. 
Open  the  riddle  grate  and  the  primary  air  until  the  wood 
burns well.


Proceed in the same way every time you place more wood 
on the fire. 
 

NOTE: 

If a lot of smoke develops when wood is placed on a 
low, a explosive gas/air mixture may arise and cause a 
deflagration.  It is  recommended  for  safety  reasons  to 
start fire lighting again.


5. 
The mineral content of the wood (approx. 1 %) remains at 
the bottom of the combustion chamber as the residue. This 
is  an  excellent  fertiliser  for  all  plants  in the  garden;  it is  a 
completely natural product.


The ash should be stored first and extinguished with water. 


Содержание tara

Страница 1: ...1 TARA Instruction Manual...

Страница 2: ...2...

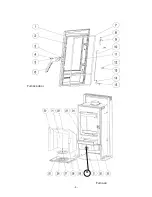
Страница 3: ...3 Fitting dimensions...

Страница 4: ...4 30 Furnace Furnace door...

Страница 5: ...5 50 Panel...

Страница 6: ...12 4 OPERATION Lighting the fire 13 Ash drawer 14 Operation the shaker grate 14 Rotary control knob 14 5 FITTING OPTIONS Fitting the panel soap stone lid 15 6 MAINTENANCE AND CLEANING General maintena...

Страница 7: ...o a great extent The wood used in the packaging has not been surface treated and may therefore be burnt in your stove The cardboard and film PE can be disposed of via the municipal waste collection fo...

Страница 8: ...xplosive materials such as empty spray cans etc in the combustion chamber and storing them near the stove is strictly prohibited due to the danger of explosion No light or inflammable clothing is to b...

Страница 9: ...to the chimney may be endangered 1 8 1 The combustion chamber door is to be kept closed when the stove is not in operation 1 9 Fouling of the chimney i e deposits of highly inflammable materials such...

Страница 10: ...t types of wood have different fuel values Deciduous wood is particularly suitable It burns with a constant flame and forms long lasting embers Coniferous wood has higher levels of resin and burns off...

Страница 11: ...HE RIGHT QUANTITY OF FIREWOOD AND FIREWOOD DIMENSIONS Too much firewood leads to overheating This stresses the material too much and leads to poor flue gas values Too little firewood or logs being too...

Страница 12: ...o assist assembly and as a base The stove can also be pushed on this cardboard or carpet We recommend original flue pipes from RIKA for proper connection The connection may not project into the chimne...

Страница 13: ...the flue gas 3 Only use paper for fire lighting Wait until the softwood chippings are burning well Turn the regulator knob 90 to the left some minutes later The primary air is now closed and the seco...

Страница 14: ...do not put ash in flammable containers and do not place the ash drawer on flammable surfaces OPERATING THE RIDDLE GRATE The ash is moved from the combustion chamber to the ash drawer by pushing the ri...

Страница 15: ...here are two designs here one with the flue pipe connection at the top and the option with soap stones for the flue pipe connection at the rear Further details on fitting the soap stone lid can be fou...

Страница 16: ...risk of damage to the glass surface and or inscription The glass cleaner can be obtained from your specialist fire dealer Should the glass become heavily sooted the possible cause could be damp wood...

Страница 17: ...but burns off again is operation is correct See Maximum fuel quantities See Clean burning possibly use wood briquettes are evenly dry 2 Stove does not draw properly Chimney draught insufficient Stove...

Страница 18: ...antled The first soap stone lid is laid on it and the 5 bolts 3 Take the first stone from the packaging It can be recognised by the 5 drill holes and the milled slot in the bottom and the 2 drill hole...

Страница 19: ...ing lid with one another Part 47 48 The procedure for fitting the soap stone lid for the rear connection Item 40 is identical with the fitting of the soap stone lid for the top connection Please take...

Страница 20: ...ime of purchase Connection must be performed by a specialist for such stoves Any costs incurred by the manufacturer due to unjustified warranty claims are to be charged to the claimant Wear parts and...

Страница 21: ...21...

Страница 22: ...22...

Страница 23: ...tamp Cachet du revendeur Attached by Raccord par Purchase day Date d achat Model designation Nom du mod le Numbers of the vehicle identification plate on the furnace back Numm ros de la plaque signal...

Страница 24: ...24 Z32829 2011 12 05 G U A R A N T E E G A R A N T I E Customer Client To A Stamp Marque...

Отзывы: