20089637
28
GB
Start-up, calibration and operation of the burner
6.6
Pressure switch adjustment
6.6.1
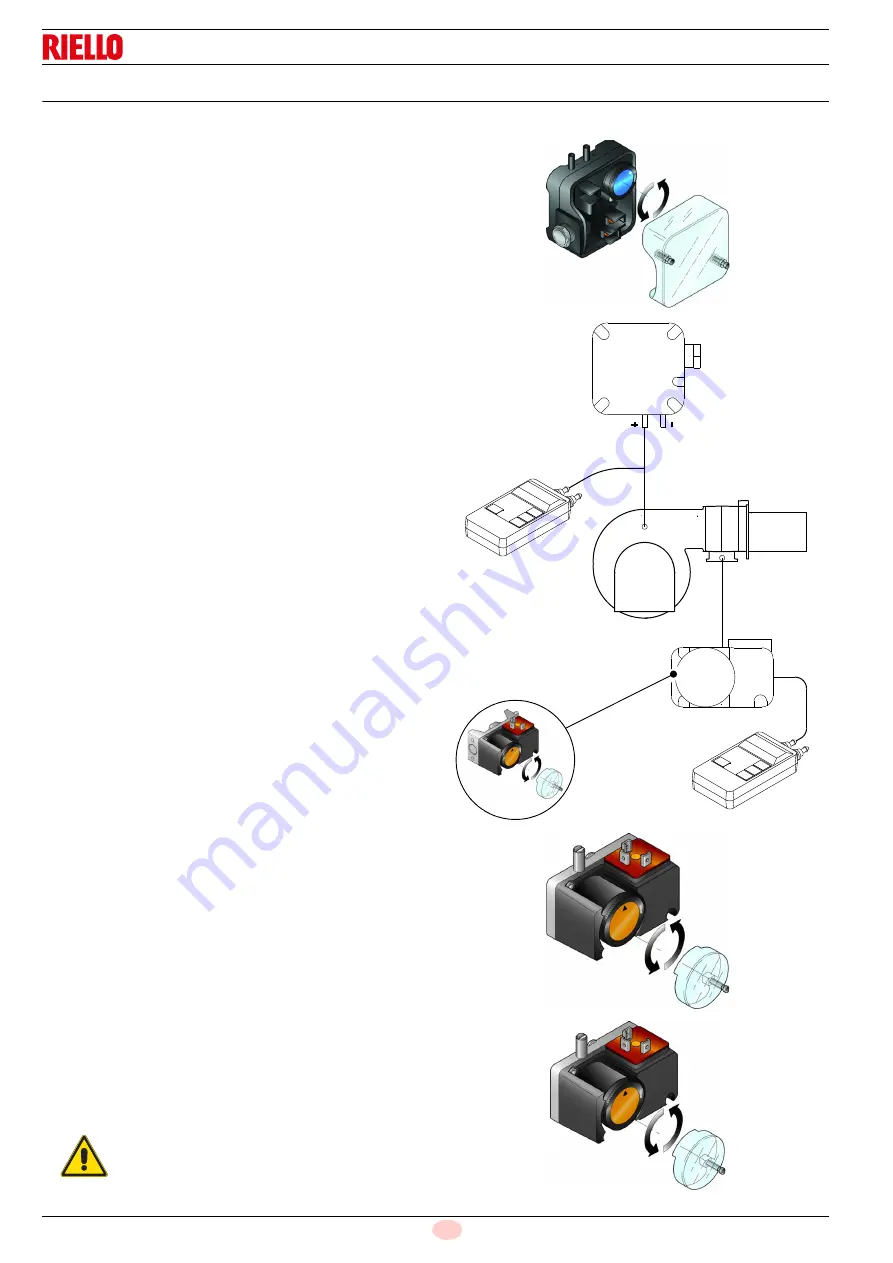
Air pressure switch - check CO
Adjust the air pressure switch after performing all other burner
adjustments with the air pressure switch set to the start of the
scale (Fig. 31).
With the burner operating at MIN output, insert a combustion
analyser in the stack, slowly close the suction inlet of the fan (for
example, with a piece of cardboard) until the CO value does not
exceed 100 ppm.
Slowly turn the appropriate knob clockwise until the burner goes
into lockout.
Check the indication of the arrow pointing upwards on the gradu-
ated scale.
Turn the knob clockwise again, until the value shown on the grad-
uated scale corresponds with the arrow pointing downwards, and
so recovering the hysteresis of the pressure switch (shown by the
white mark on a blue background, between the two arrows). Now
check the correct start-up of the burner.
If the burner locks out again, turn the knob anticlockwise a little
bit more.
6.6.2
Maximum gas pressure switch
Adjust the maximum gas pressure switch (Fig. 32) after making
all other burner adjustments with the maximum gas pressure
switch set to the end of the scale.
To calibrate the maximum gas pressure switch, open the tap and
then connect a pressure gauge to its pressure test point.
The maximum gas pressure switch must be regulated to a value
no higher than 30% of the measurement read on the gauge when
the burner is working at maximum output.
After making the adjustment, remove the pressure gauge and
close the tap.
6.6.3
Minimum gas pressure switch
The purpose of the minimum gas pressure switch is to prevent
the burner from operating in an unsuitable way due to too low gas
pressure.
Adjust the minimum gas pressure switch (Fig. 33) after having
adjusted the burner, the gas valves and the gas train stabiliser.
With the burner operating at maximum output:
–
install a pressure gauge downstream of the gas train stabilis-
er (for example at the gas pressure test point on the burner
combustion head);
–
choke slowly the manual gas cock until the pressure gauge
detects a decrease in the pressure read of about 0.1 kPa
(1 mbar). In this phase, verify the CO value which must al-
ways be less than 100 mg/kWh (93 ppm).
–
Increase the adjustment of the gas pressure switch until it in-
tervenes, causing the burner shutdown;
–
remove the pressure gauge and close the cock of the gas
pressure test point used for the measurement;
–
open completely the manual gas cock.
6.6.4
PVP pressure switch kit
Adjust the pressure switch for the leak detection control (PVP kit)
(Fig. 34) according to the instructions supplied with the kit.
WARNING
1 kPa = 10 mbar
Fig. 31
D3854
PGM
PA
D3856
20181543
Fig. 32
Fig. 33
D3855
Fig. 34
D3855
Содержание RS 1300/EV BLU
Страница 2: ...Translation of the original instructions ...
Страница 40: ...20089637 38 GB Appendix Electrical panel layout ...
Страница 41: ...39 20089637 GB Appendix Electrical panel layout ...
Страница 42: ...20089637 40 GB Appendix Electrical panel layout 0 0 0 1 0 2 3 2 3 2 4 2 5 2 2 2 2 2 32 3 2 62 6 6 3 2 2 4 2 ...
Страница 43: ...41 20089637 GB Appendix Electrical panel layout ...
Страница 44: ...20089637 42 GB Appendix Electrical panel layout 0 1 1 1 ...
Страница 45: ...43 20089637 GB Appendix Electrical panel layout 0 1 0 ...
Страница 46: ...20089637 44 GB Appendix Electrical panel layout 0 1 1 1 2 1 3 1 1 1 1 1 1 1 41 4 4 1 1 2 1 ...
Страница 47: ...45 20089637 GB Appendix Electrical panel layout 0 0 0 1 0 2 0 0 0 0 0 0 0 30 3 3 0 0 1 0 4 ...
Страница 48: ...20089637 46 GB Appendix Electrical panel layout 0 0 1 2 0 0 3 3 3 0 1 4 ...
Страница 51: ...49 20089637 GB Appendix Electrical panel layout ৼ 0 1 1 1 1 1 2 2 2 0 2 2 2 2 2 2 2 2 2 2 2 0 2 3 ...
Страница 53: ......
Страница 54: ......
Страница 55: ......


