background image

15 

20197230

GB

Hydraulic systems

6.3

Two-pipe system

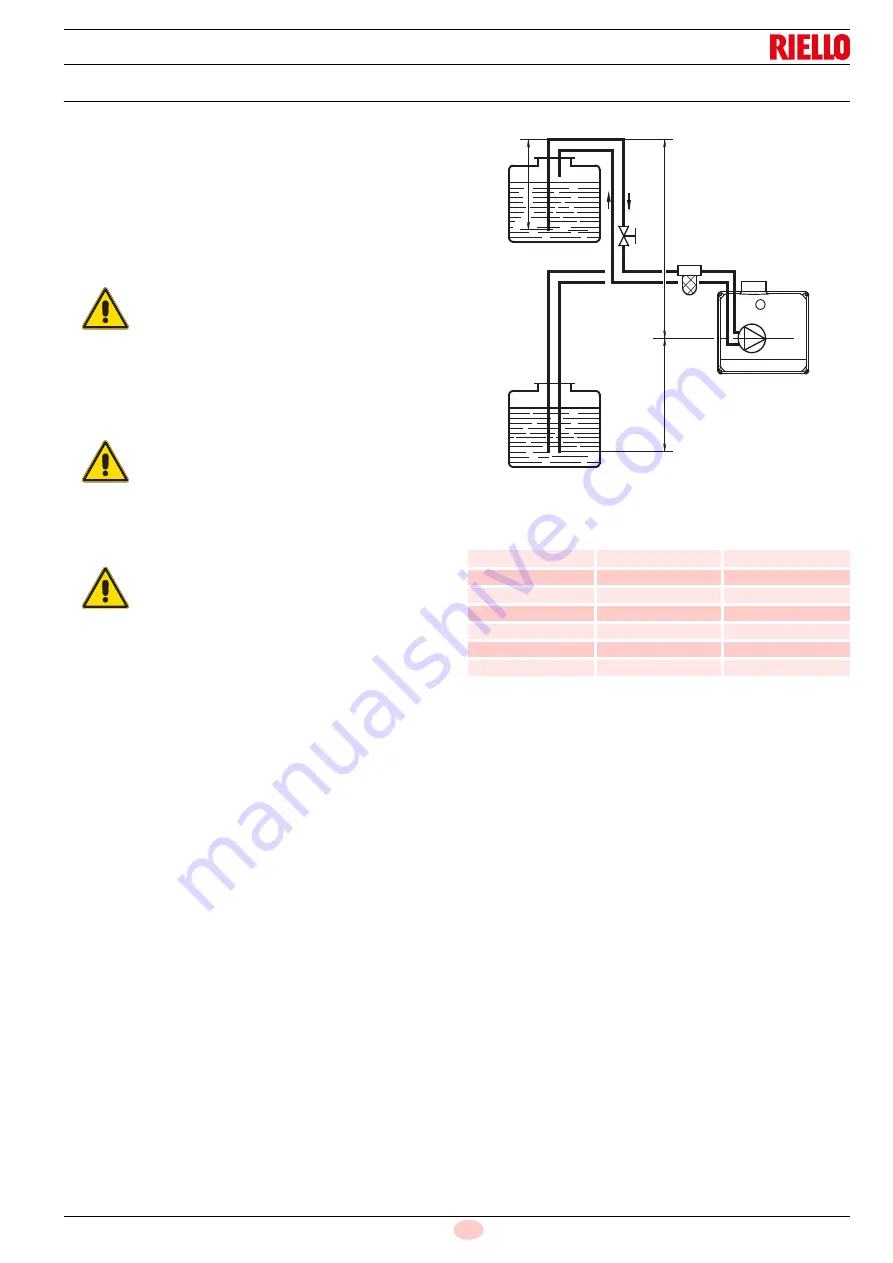
The two-pipe vacuum systems (Fig. 12) have a negative fuel
pressure (depression) at the burner input.
Usually the tank is lower than the burner.
The return line should terminate in the oil tank at the same level
as the suction line; in this case a non-return valve is not required.
Should however the return line arrives over the fuel level, the
non-return valve is indispensable. 
This solution however is less safe than previous one, due to the
possibility of leakage of the valve.

6.3.1

Priming pump

On the system in Fig. 12 switch on the burner and wait for the
priming. Should lockout occur prior to the arrival of the fuel, await
at least 20 seconds before repeating the operation.

Tab. H

H

difference of level

L

maximum length of the suction line

I.D.

internal diameter of the oil pipes

NOTE:

Tab. H shows the maximum approximate lengths for the supply
line, depending on the difference in level, length, and the diame-
ter of the fuel conduit.

CAUTION

You are advised to use additional filters on the fuel
supply line. 
The Manufacturer recommends the use of a good
quality fuel filter on the tank (Fig. 12), and a sec-
ondary filter (60

 for light oil) to protect the burner

pump and nozzle from contamination. 

WARNING

Before starting the burner make sure that the re-
turn pipe-line is not clogged: any obstruction
would cause the pump seals to break.

WARNING

The pump vacuum should not exceed a maximum
of 0.4 bar (30cm Hg).
Beyond this limit gas is released from the oil.

H

metres

L metres

I.D. (8 mm)

I.D. (10 mm)

0

35

100

0.5

30

100

1

25

100

1.5

20

90

2

15

70

3

8

30

3.5

6

20

max.

 4 m

H

H

D5308

Fig. 12

Содержание 3749251

Страница 1: ...20197230 1 02 2022 Installation use and maintenance instructions Kerosene and Gas oil burner One stage operation CODE MODEL TYPE 3749251 RIELLO 40 G5 BF 492T51 GB...

Страница 2: ...Original instructions...

Страница 3: ...ons to avoid burnout or bad combustion of the burner 10 5 3 Handling 10 5 4 Preliminary checks 11 5 5 Operating position 11 5 6 Securing the burner to the boiler 12 6 Hydraulic systems 13 6 1 Fuel sup...

Страница 4: ...iance with the following Technical Standards EN 12100 EN 267 According to the European Directives MD 2006 42 EC Machine Directive LVD 2014 35 EU Low Voltage Directive EMC 2014 30 EU Electromagnetic Co...

Страница 5: ...ed out correctly may cause damage to the ma chine and or injury to people DANGER DANGER LIVE COMPONENTS This symbol indicates operations which if not car ried out correctly lead to electric shocks wit...

Страница 6: ...vent of damage to things or injury to people if such damage injury was due to any of the following causes incorrect installation start up use and maintenance of the burner improper incorrect or unreas...

Страница 7: ...e Only those parts envisaged by the manufacturer can be replaced 3 2 Personnel training The user is the person body or company that has acquired the machine and intends to use it for the specific purp...

Страница 8: ...lating gasket No 1 Screw and nuts for flange No 1 Nuts for flange No 2 4 Technical description of the burner Designation Combustion head Voltage Code RIELLO 40 G5 BF TC 1 230 50 3749251 Model RIELLO 4...

Страница 9: ...iven in Fig 1 Tab D 4 6 Firing rate as EN 267 C F G 130 I 4 5 E A 11 D 180 72 72 150 4 5 H B Fig 1 Flange Burner D5305 Model A B C D E F G H I RIELLO 40 G5 BF 271 249 288 191 90 93 226 75 26 0 8 0 0 4...

Страница 10: ...ne 2 Gauge connection 3 Pump pressure regulator 4 Vacuum gauge connection 5 Air damper 6 Regulating air damper rod 7 Lock out lamp and reset button 8 Flange with insulating gasket 9 Wiring loom fittin...

Страница 11: ...ical wiring inside the boiler complies with the national and local safety regulations Install switches fuses earth connection etc in compliance with local regulations Do not confuse the powered conduc...

Страница 12: ...created in the combustion chamber If the smoke pipe is closed the burner must be drawn back till the extraction of blast tube from the furnace Before oper ating in this way take the voltage off 5 3 Ha...

Страница 13: ...the supplier The packaging elements wooden cage or card board box nails clips plastic bags etc must not be abandoned as they are potential sources of danger and pollution they should be collected and...

Страница 14: ...and if necessary the nuts interposing the insulating gasket see Fig 7 It is necessary that the insulating gasket A Fig 8 is placed be tween the boiler door and the burner flange Provide an adequate li...

Страница 15: ...seal with subsequent fuel leaks inside the burner 6 Hydraulic systems Explosion danger due to fuel leaks in the pres ence of a flammable source Precautions avoid knocking attrition sparks and heat Mak...

Страница 16: ...ab F Tab G H difference of level L maximum length of the suction line I D internal diameter of the oil pipes Tab F and Tab G the approximate maximum lengths for the supply pipes according to the diffe...

Страница 17: ...the operation Tab H H difference of level L maximum length of the suction line I D internal diameter of the oil pipes NOTE Tab H shows the maximum approximate lengths for the supply line depending on...

Страница 18: ...24 hours with the use of a time switch positioned in series with the thermostatic line Refer to the wiring diagrams The electrical safety of the device is obtained only when it is correctly connected...

Страница 19: ...m shown carefully and carry out a good earth connection The electrical wiring carried out by the installer must be in compliance with the rules in force in the country The section of the conductors mu...

Страница 20: ...20197230 18 GB Electrical system 7 2 Operating programme Fig 15 12s 12s 5s D5229 Normal operation Lock out due to failure to light Thermostat Motor Ignition transformer Valve Flame Lock out lamp...

Страница 21: ...factory set at these values Tab J Tab J 8 Start up calibration and operation of the burner WARNING The first start up of the burner must be carried out by qualified personnel as indicated in this man...

Страница 22: ...bustion chamber turn to the left sign to decrease it Fig 18 WARNING It is advisable to replace nozzles every year dur ing regular maintenance operations CAUTION The use of nozzles other than those sp...

Страница 23: ...and operation of the burner 8 6 Electrodes setting Before assembling or removing the nozzle loosen the screw A and move the electrodes ahead Fig 19 WARNING These dimensions Fig 19 must be respected 2...

Страница 24: ...free of all impurities and positioned correctly Clean the combustion head in the fuel outlet area Check that the positioning of the combustion head is correct and that it is properly fixed to the boi...

Страница 25: ...ANGER Disconnect the electrical supply from the burner by means of the main system switch DANGER Close the fuel shut off valve Wait for the components in contact with heat sources to cool down complet...

Страница 26: ...during the pre purging The flame sensor sees extraneous light Eliminate the light Burner runs normally in the prepurge and ignition cycle and locks out after 5 seconds ca The flame sensor is dirty Cle...

Страница 27: ...our counter kit 11 Appendix Accessories Burner Standard length mm Extended head length mm Code RIELLO 40 G5 BF 107 121 3000686 RIELLO 40 G5 BF 107 121 INOX 3000687 Burner Spacer thickness mm Code RIEL...

Страница 28: ...Subject to modifications RIELLO S p A I 37045 Legnago VR Tel 39 0442 630111 http www riello it http www riello com...

Отзывы: